
GA4 data export to BigQuery via Server-Side Tag Manager: a step-by-step setup guide
A little bit of background. We recommend all our clients to set up data export from GA4 to BigQuery. Why is this necessary? In short, to conduct deeper analysis of GA4 data and easily combine it with data from other systems into end-to-end reports. If you are interested in a more detailed explanation, check out my colleague’s article – "Everything You Need to Know About BigQuery: What It Is, Why You Need It, and Its Benefits for Marketing."
But let’s get back to the topic of my material. In one of our projects, a daily data export from GA4 to BigQuery was set up. However, at a certain point, we started exceeding the limit of 1 million events per day, and as a result, the daily export became unavailable.
Of course, there is an option to connect Analytics 360, where you can get daily exports with higher limits, but the client was not ready for such expenses, so we decided to look for another solution.
The first idea was to use GA4’s native streaming to BigQuery. However, in this case, we encountered a significant data loss, which I will discuss in more detail. That’s why we started researching this issue and looking for a solution to ensure we receive all the data.
Disadvantages of GA4 Data Export to BigQuery
According to Google’s official documentation, in daily updates, the data discrepancy between the GA4 interface and BigQuery can be around ±2-5%. As for streaming, Google does not provide any percentage at all, only offering an unclear explanation.

There are no exact figures regarding data completeness. Many users report significant discrepancies.
From our experience, in a real project, data loss reached approximately 10-20%. Sometimes, we managed to catch drops of 70-80% for a custom order creation event compared to the GA4 interface. Below is a screenshot with actual values for several events.
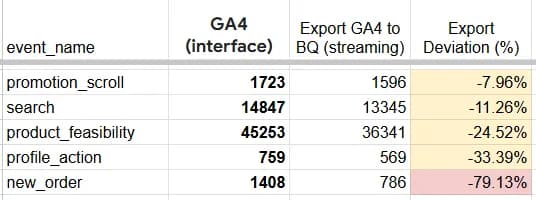
- event_name - event name from GA4
- GA4 (interface) - number of events in the GA4 interface
- Export GA4 to BQ (streaming) - number of events in BigQuery from GA4 export
- Export Deviation (%) - percentage of data loss in export compared to the interface
With such deviations, it is impossible to work, so it was necessary to find another way to obtain all the data. The method we decided to use is transferring GA4 data from Server-Side GTM directly to BigQuery. Considering that the server-side tag manager was already used in the project, the task did not seem complicated. Simo Ahava has a great article describing this method, and we also found several ready-made templates in server-side GTM that were already created for this task. We will discuss their features and why we decided to develop our own solution in the next section.
To summarize: if you have streaming enabled and have encountered significant data losses, the data transfer method I describe in this material will definitely be useful to you.
At this stage, I struggled with smoothly transitioning to the article's outline, so I will just place it below to avoid unnecessary complications for both you and me)
Available Solutions in Server-Side GTM and Their Features
When looking for a solution to a problem, the first step is always to check if someone has already done it before you. In this case, we also followed the path of least resistance and explored existing ready-made templates in Server-Side GTM for recording data in BigQuery.
Before starting our search, we needed to define the desired outcome.
What exactly did we want to achieve?
- Ensure that all data sent to GA4 from Server-Side GTM is recorded in BigQuery without any loss.
- Structure the recorded data in a format as close as possible to the GA4 export schema.
- Configure partitioning by date and clustering by event name in the final table to optimize both query execution speed and costs.
- Template from OWOX - Google Analytics 4 RawData to BigQuery
There are no issues with the accuracy of this template's operation—all data successfully reaches BigQuery. However, it is recorded in a truly "raw" format. By default, this template contains only two fields that are written to the table:
- createdAt - timestamp of the event.
- rawDataOwox - all data sent to GA4, including system parameters and event data, stored in a single field.
Below is a screenshot showing how the data appears in the rawDataOwox field.

You probably already understand why this option didn’t suit us—it is inconvenient to work with such data. Additionally, the table lacks partitioning and clustering.
We aimed to create a more convenient solution that would allow for more efficient data processing. Moreover, using partitioning and clustering helps optimize query execution in BigQuery. This is particularly important when working with large data volumes. Such configurations reduce system load and improve processing speed. And let’s not forget that they also help reduce query processing costs. However, the current template does not provide these capabilities.
2. Template from taneli-salonen1 - BigQuery Event
This option seemed more interesting—it contained more fields that were recorded separately in the table:
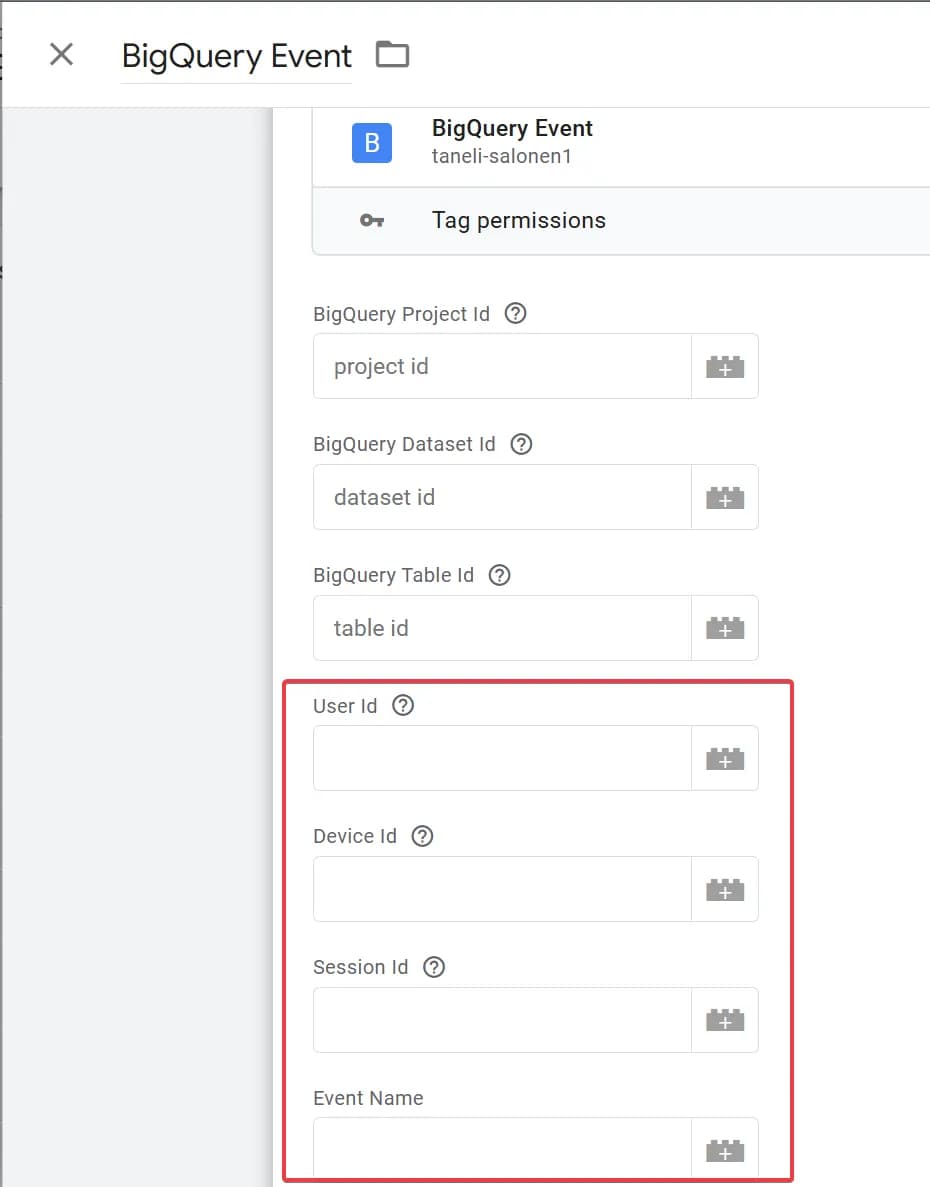
This would have already allowed us to configure clustering by event_name for optimization, but it was still not exactly what we needed.
Some data was recorded in separate fields (specifically those highlighted in red in the screenshot + event_timestamp), while everything else was sent to event_params. It was better, more detailed, but still not quite what we were looking for.
At this stage, our team came to the conclusion that if someone else could create a tag template in Server-Side GTM, why couldn't we? And that’s when the most interesting part began.
Creating a custom GA4 Data Export to BigQuery template and using it
We needed to develop a template that would correctly process and record data into the necessary fields in the required format.
Of course, this was not a one-day process, and we conducted numerous tests before we implemented these three points in a way that met our requirements.
I do not have JavaScript coding skills at a professional developer level, but my knowledge as a web analyst turned out to be entirely sufficient. All that was needed was an understanding of basic JS principles. At times, I also used ChatGPT to save time.
So don’t be alarmed when you scroll down and see a lot of code: you don’t need to be a developer to understand the described solution or to make modifications. I will try to describe the processes within it in as much detail as possible.
Before we move on to the most interesting part, let me show you the final result—the schema of the data table in BigQuery that you will obtain:
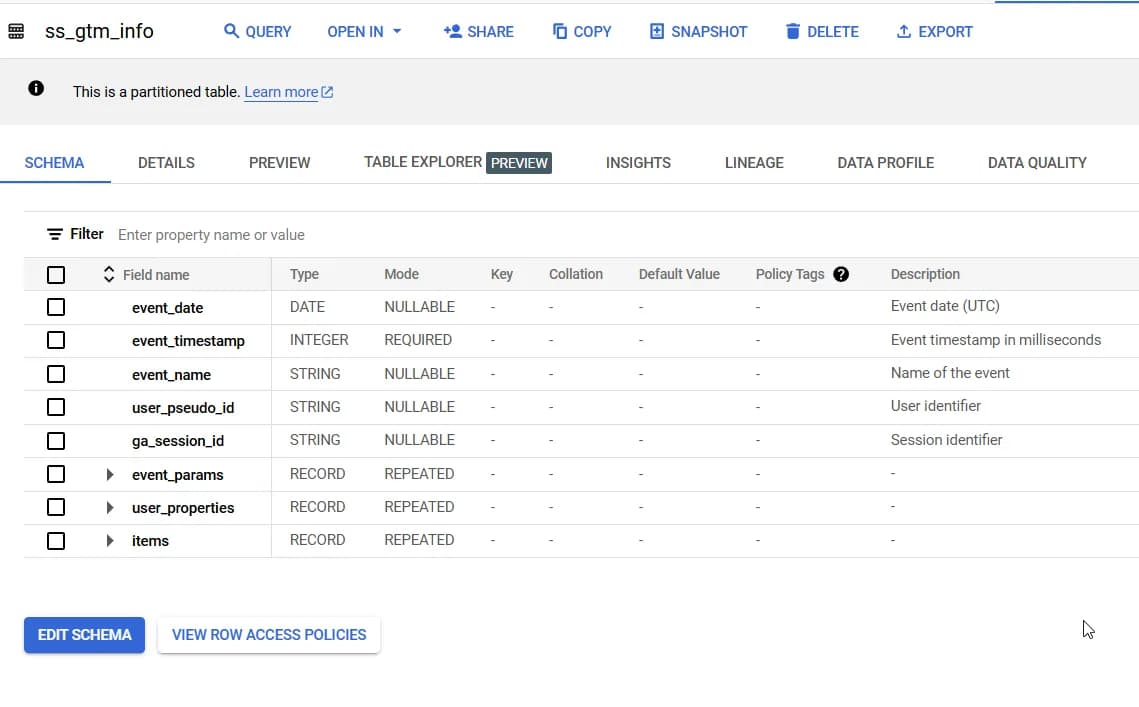
For comparison, I will add a screenshot of the GA4 export schema, where I have highlighted in yellow the data that has been separated in our structure.
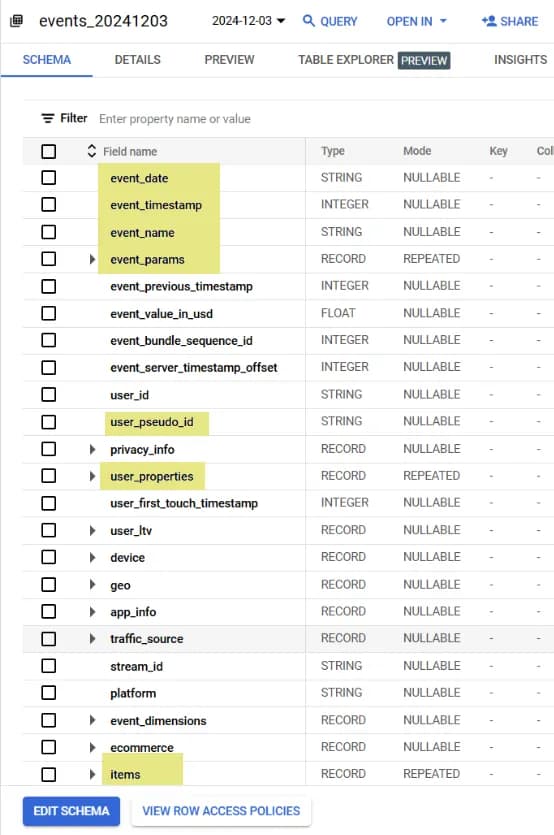
It is clear that our table does not replicate ALL fields from the GA4 export, but it does cover part of the key fields, event-level parameters, product data, and user properties.
In the current structure of the template, you will get:
- event_date
- event_timestamp
- event_name
- user_pseudo_id
- ga_session_id
- event_params
- user_properties
- items
Once again, we are not offering our template as an exact replacement for GA4 data export in the same format—we used this specific structure because it met our needs.
Therefore, the purpose of this article is twofold: first, to present our solution, and second, to explain in detail how everything is structured so that you can adapt the solution to your needs and refine the table structure.
The solution described here has not yet been added to the template gallery, so to use the template, follow these steps:
- Download the template from GitHub (click on the download icon).

2. Go to Server-Side GTM
3. In the Templates section, click on the New button, import the saved template, and save it.
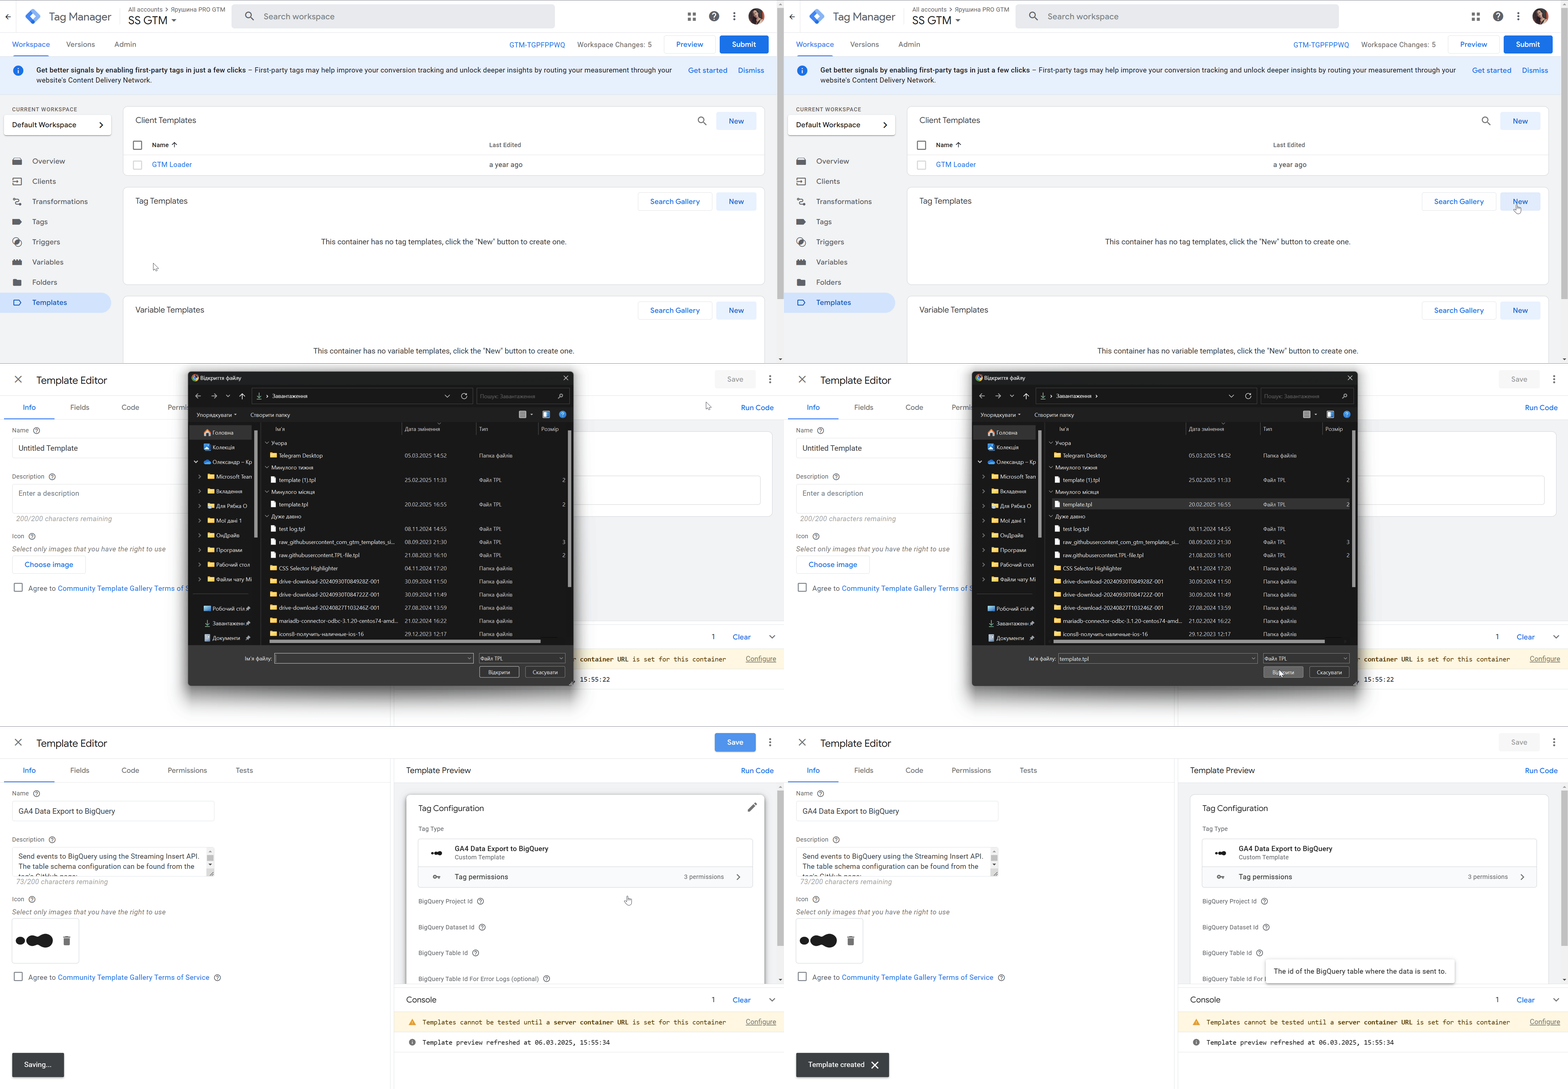
Congratulations! You have successfully added the template, and now just a few steps remain to configure it for your data.
Configuration in BigQuery
To configure data transfer to a BigQuery table, you need to create this table in BigQuery.
- Create a separate dataset (or you can use an existing one).
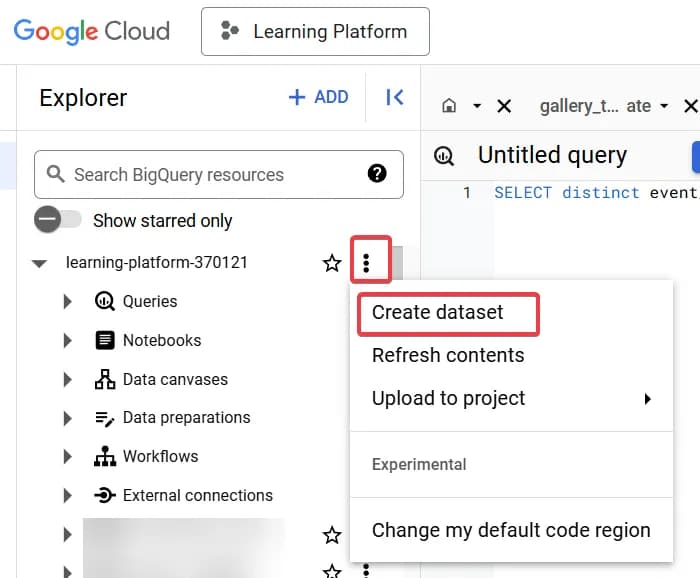
In the opened window, fill in the necessary details:
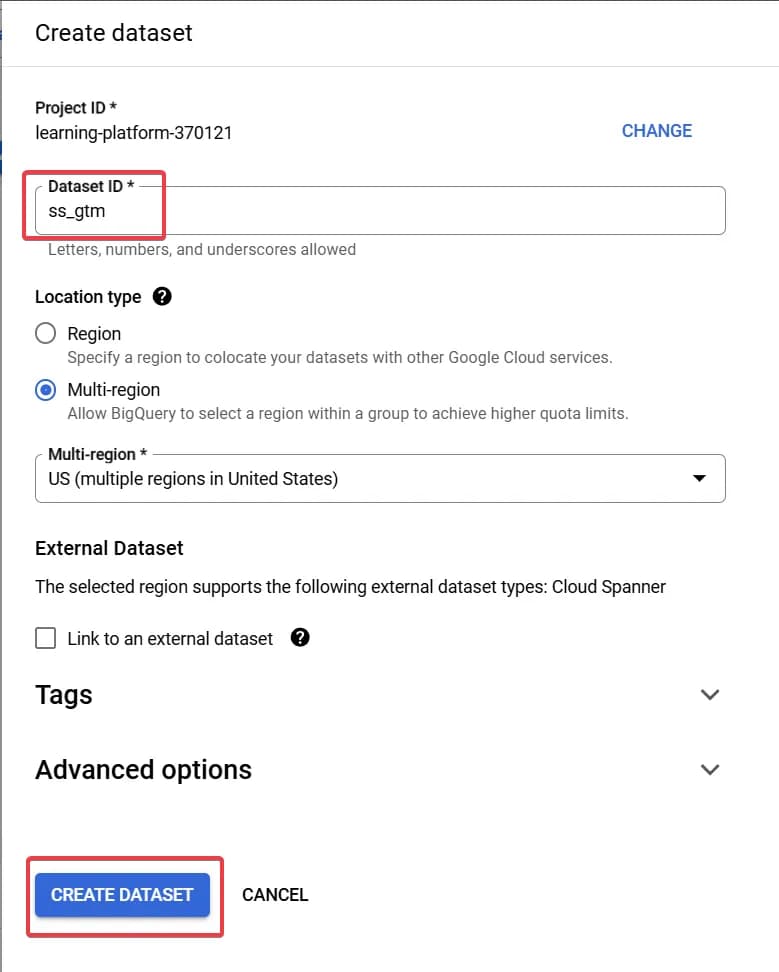
*You can change the dataset name and region as needed.
2. Create a table within this dataset.
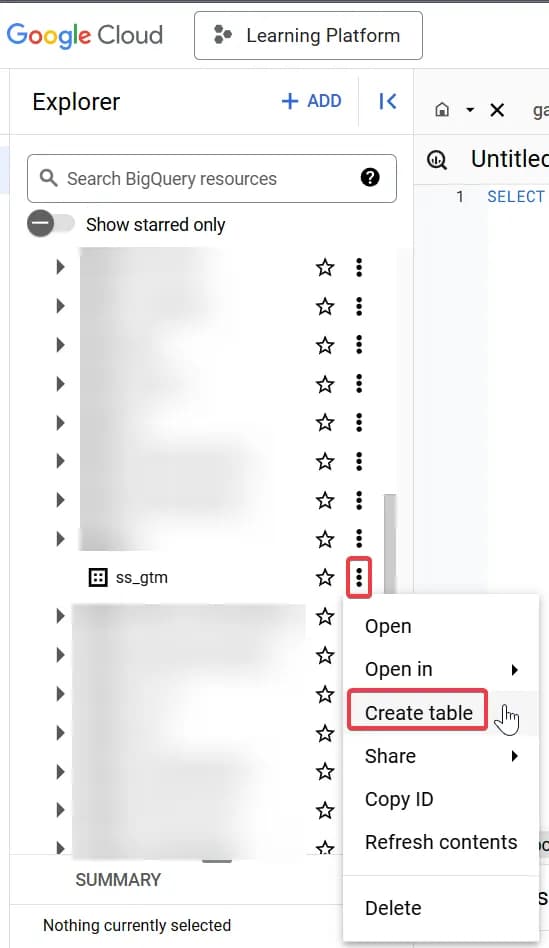
When creating the table, specify its name and, in the schema settings, enable the Edit as text checkbox to insert the prepared table schema (copy it entirely and paste it into the Insert field). Then, save the changes.
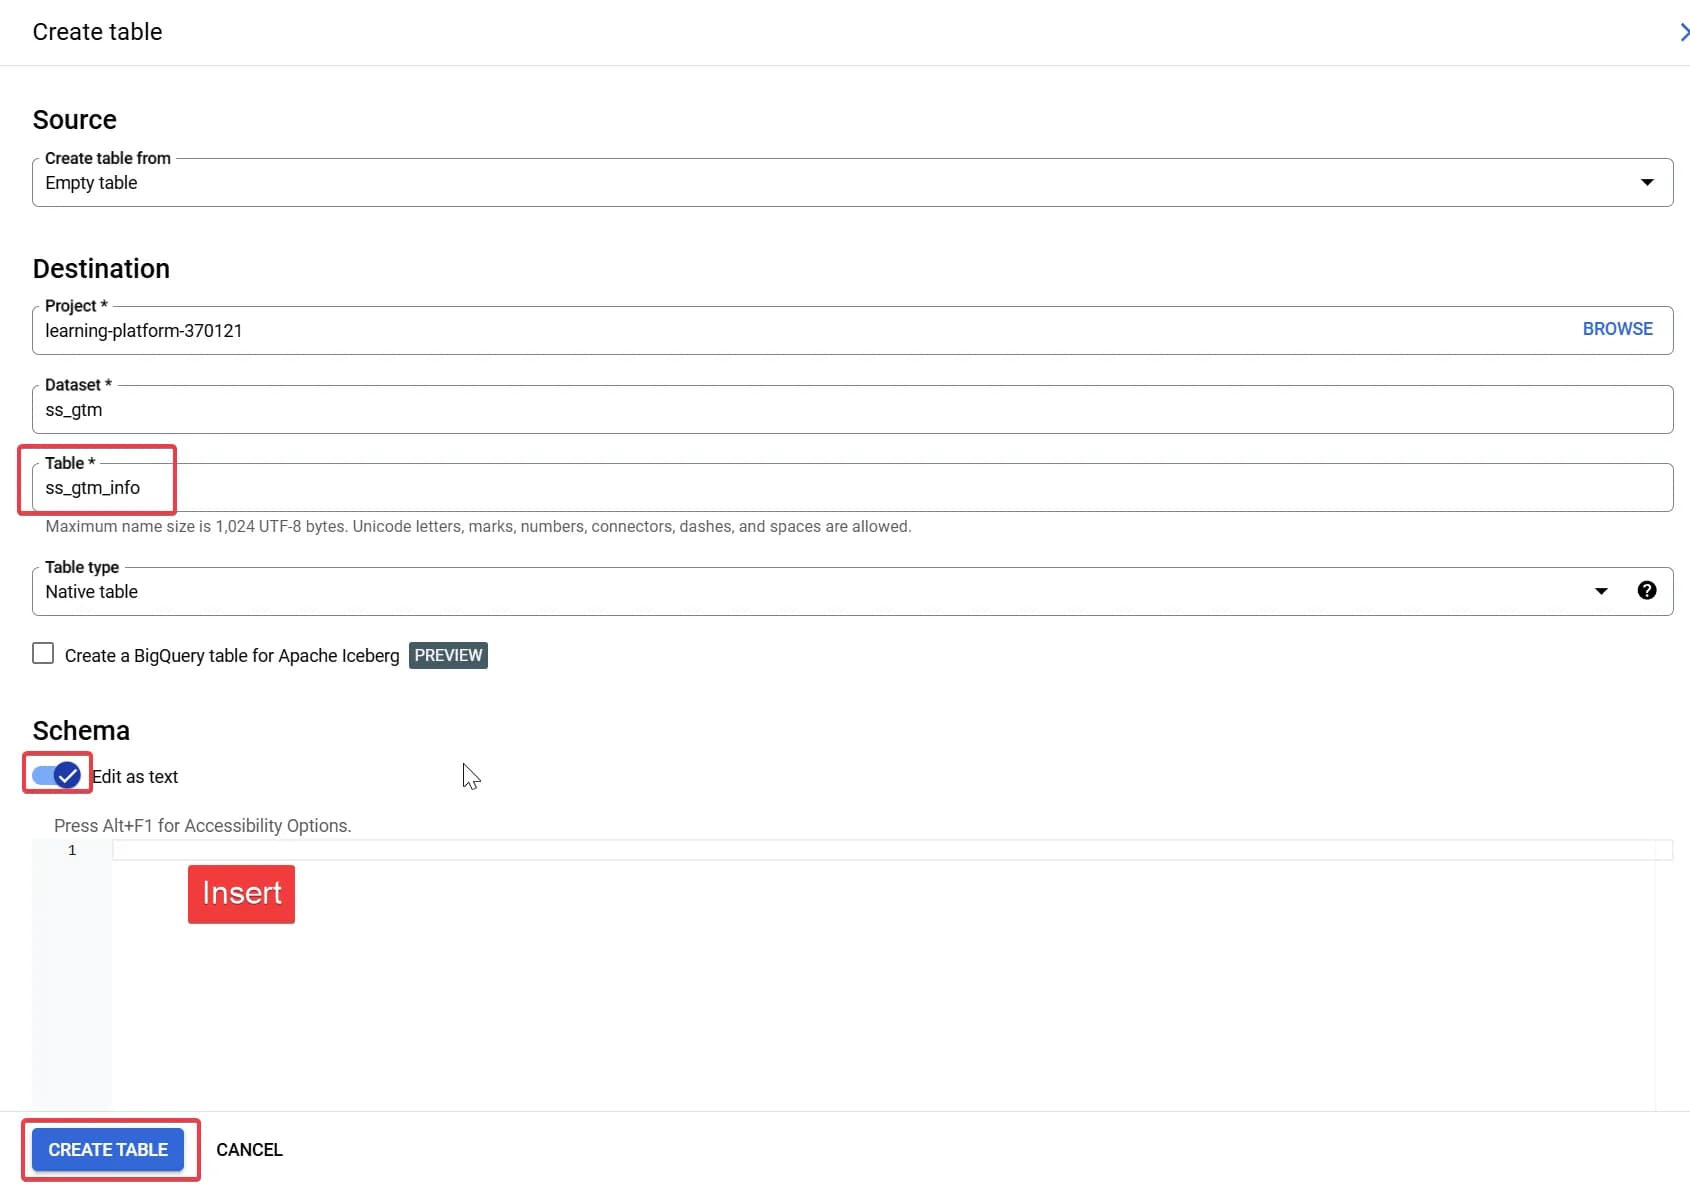
* You can change the table name as needed.
Important! Don’t forget to configure partitioning and clustering as specified below:
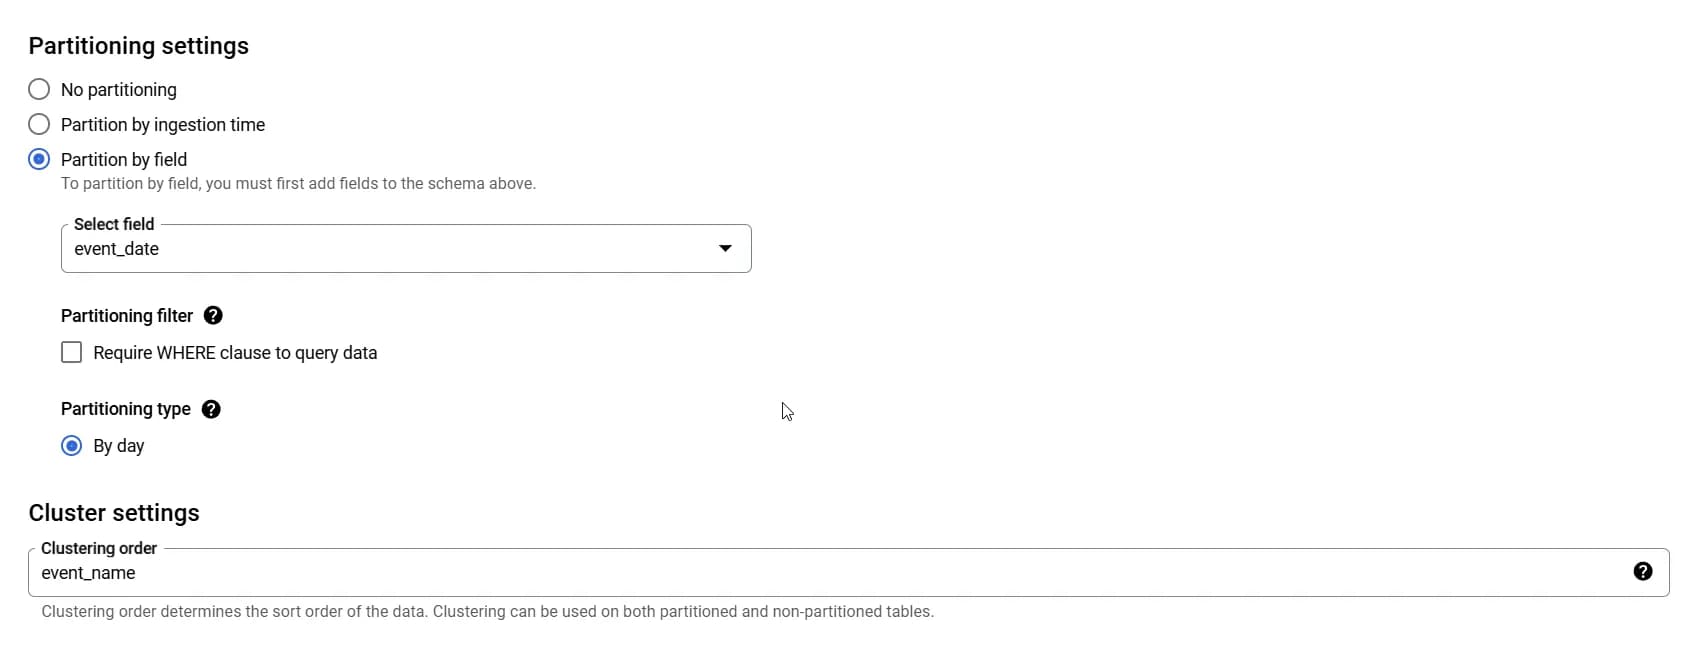
Save the table (Click CREATE TABLE).
After completing these settings, you will have a table with the following schema:
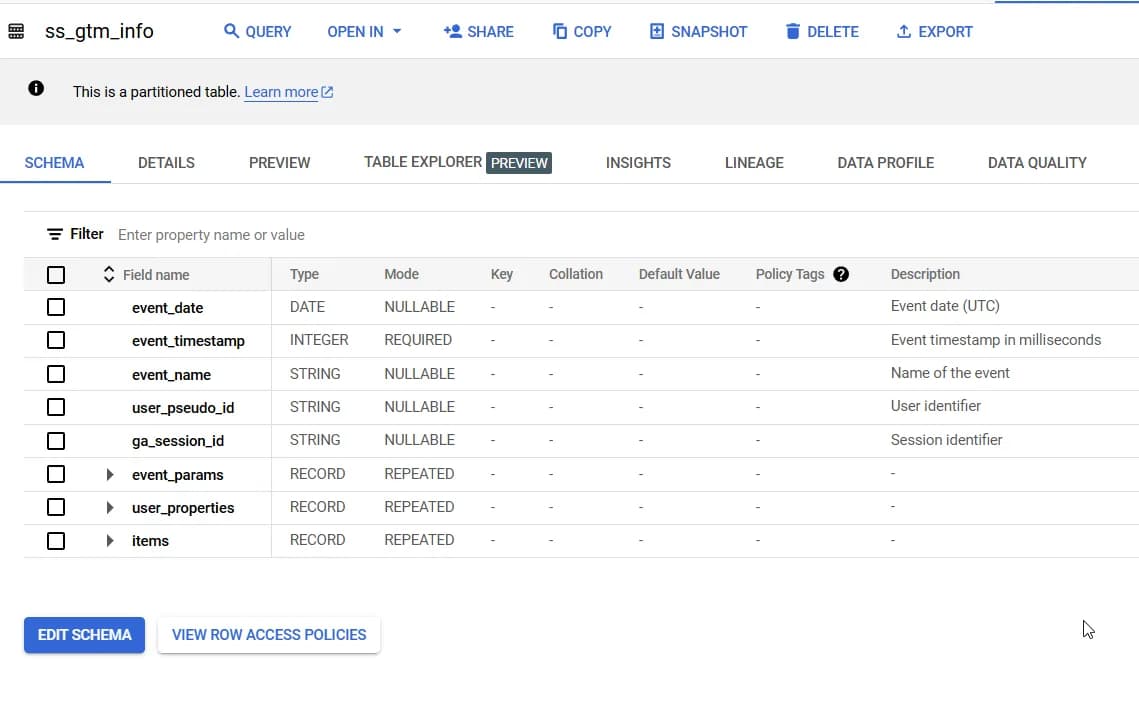
This concludes the BigQuery configuration.
Configuration in Server-Side GTM
Filling in Required Fields
- Create a new tag based on our template.
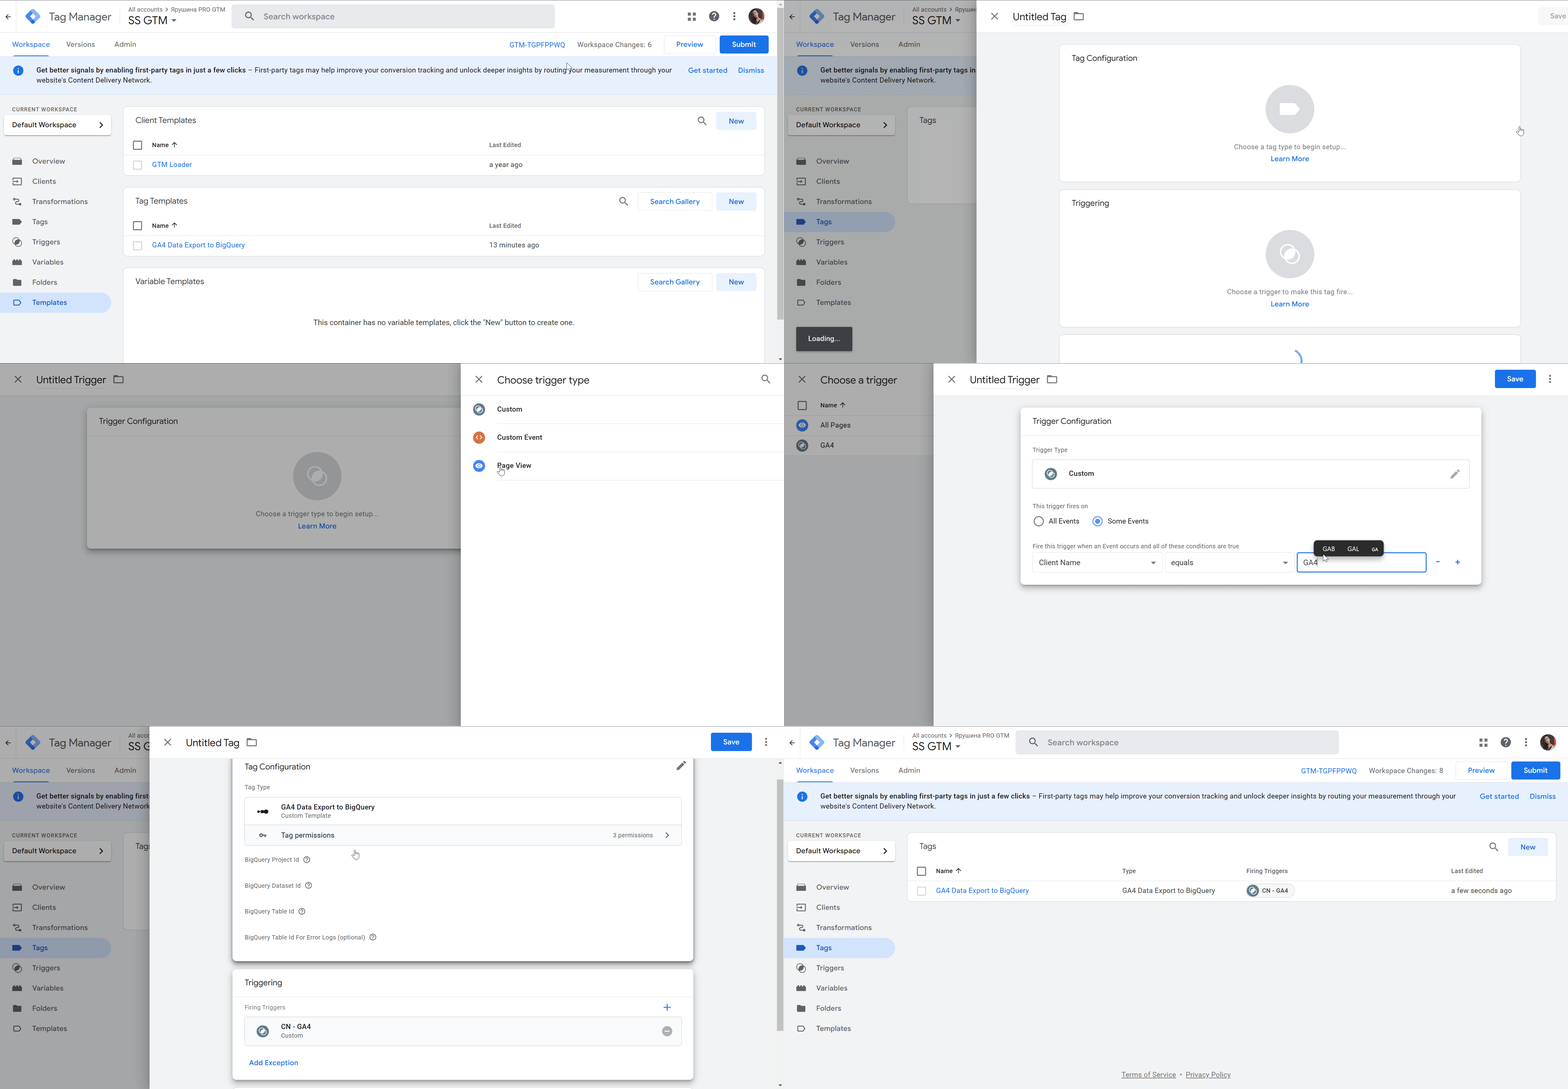
We use the CN - GA4 trigger by default (all events recorded in GA4 are captured), but if needed, you can modify it to record only specific events.
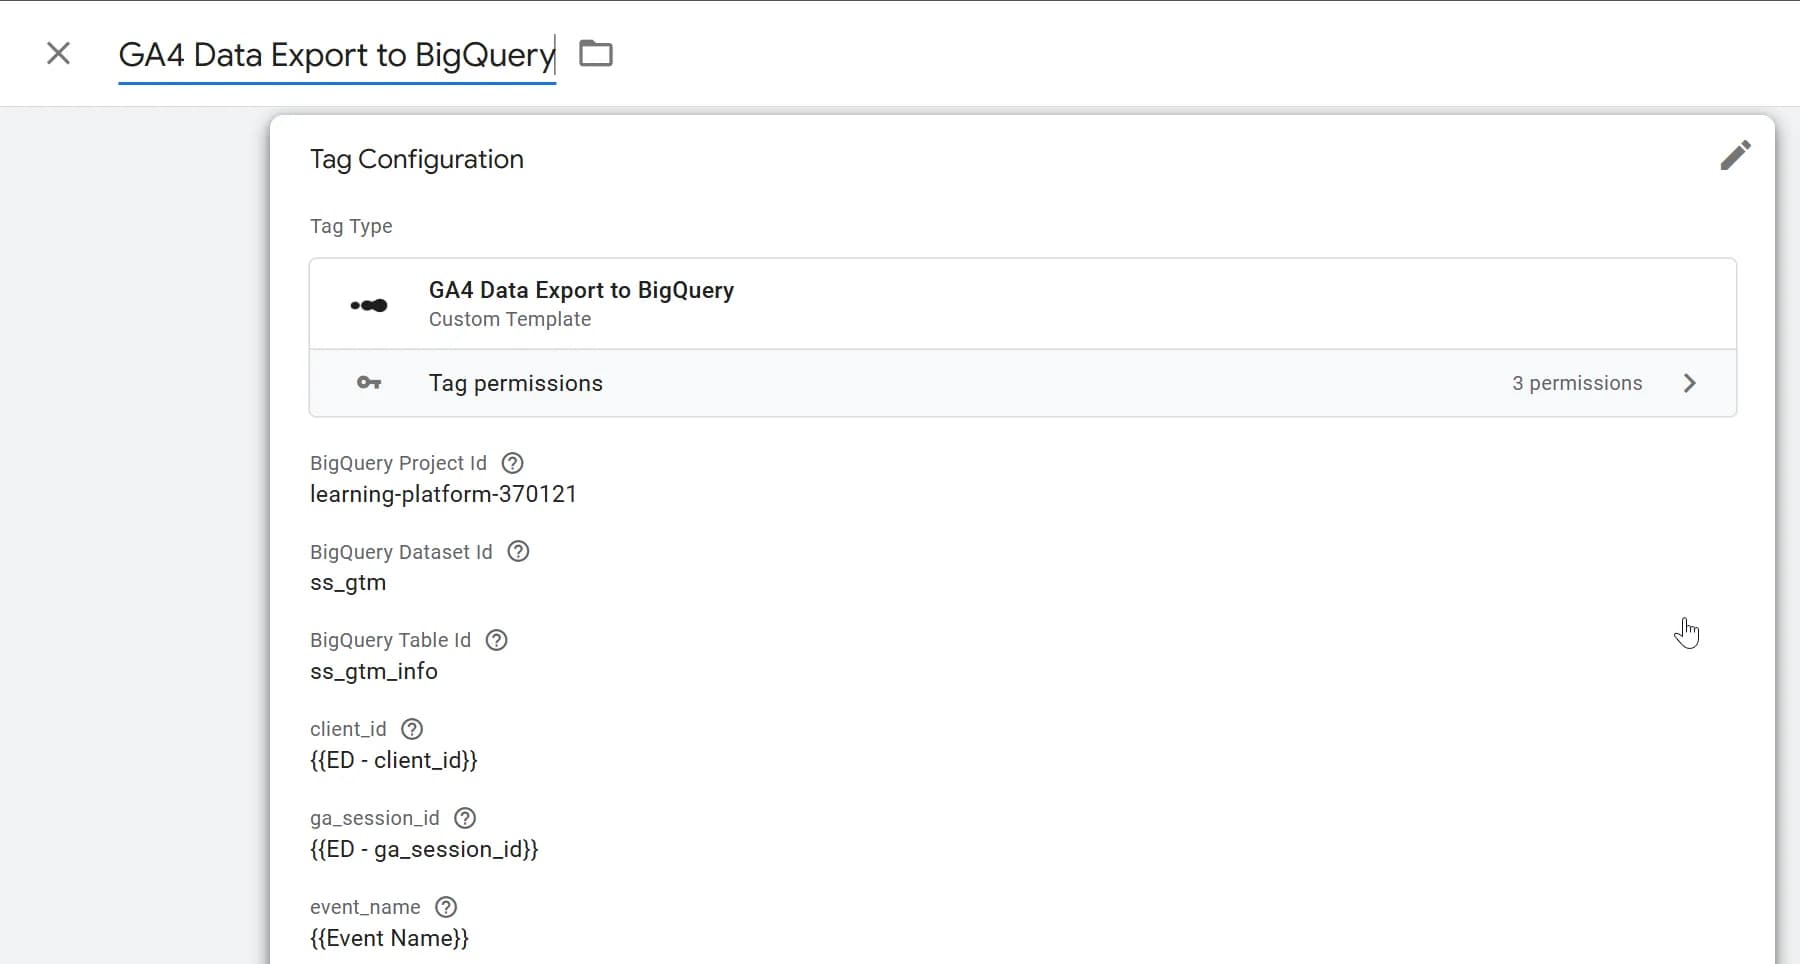
2. Fill in all required tag fields with data:
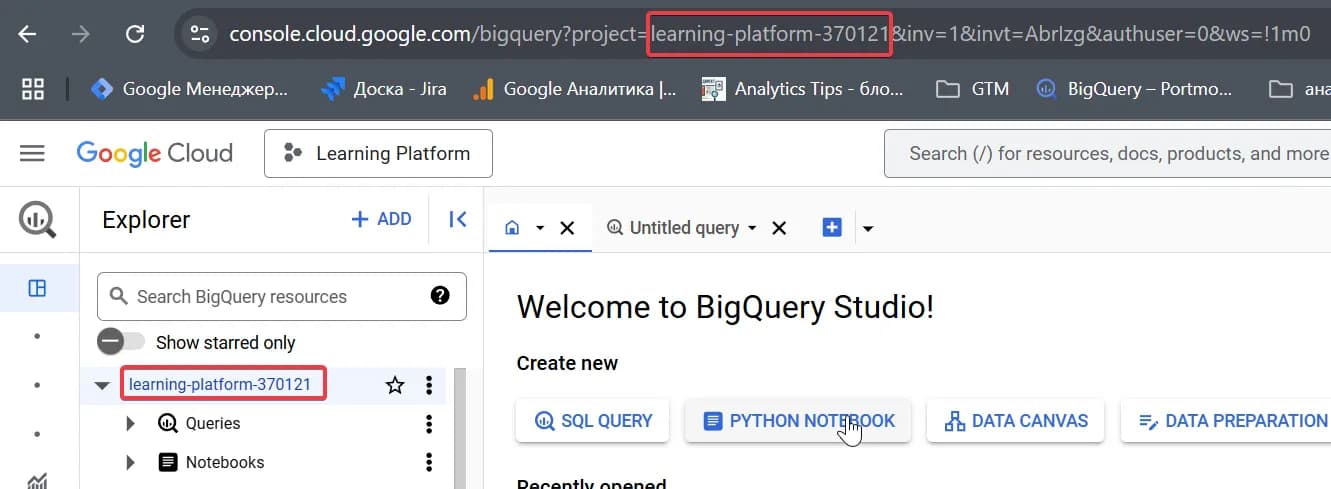
- BigQuery project (can be found in the menu or in the URL after project=)
- Dataset containing your table in this BigQuery project (in our example, this is ss_gtm).
- Table ID (in our example, this is ss_gtm_info).
- client_id - Create a variable ED - client_id

- ga_session_id - Create a variable ED - ga_session_id

- event_name - use the standard Event name variable.
Of course, default values for client_id, ga_session_id, and event_name could have been set at the template level, but we didn’t implement this in the current version.
As a result, you should get a fully configured tag:
3. Check the correctness of the configuration in the debug console.
If everything is correct, you will see a similar log entry in the console:
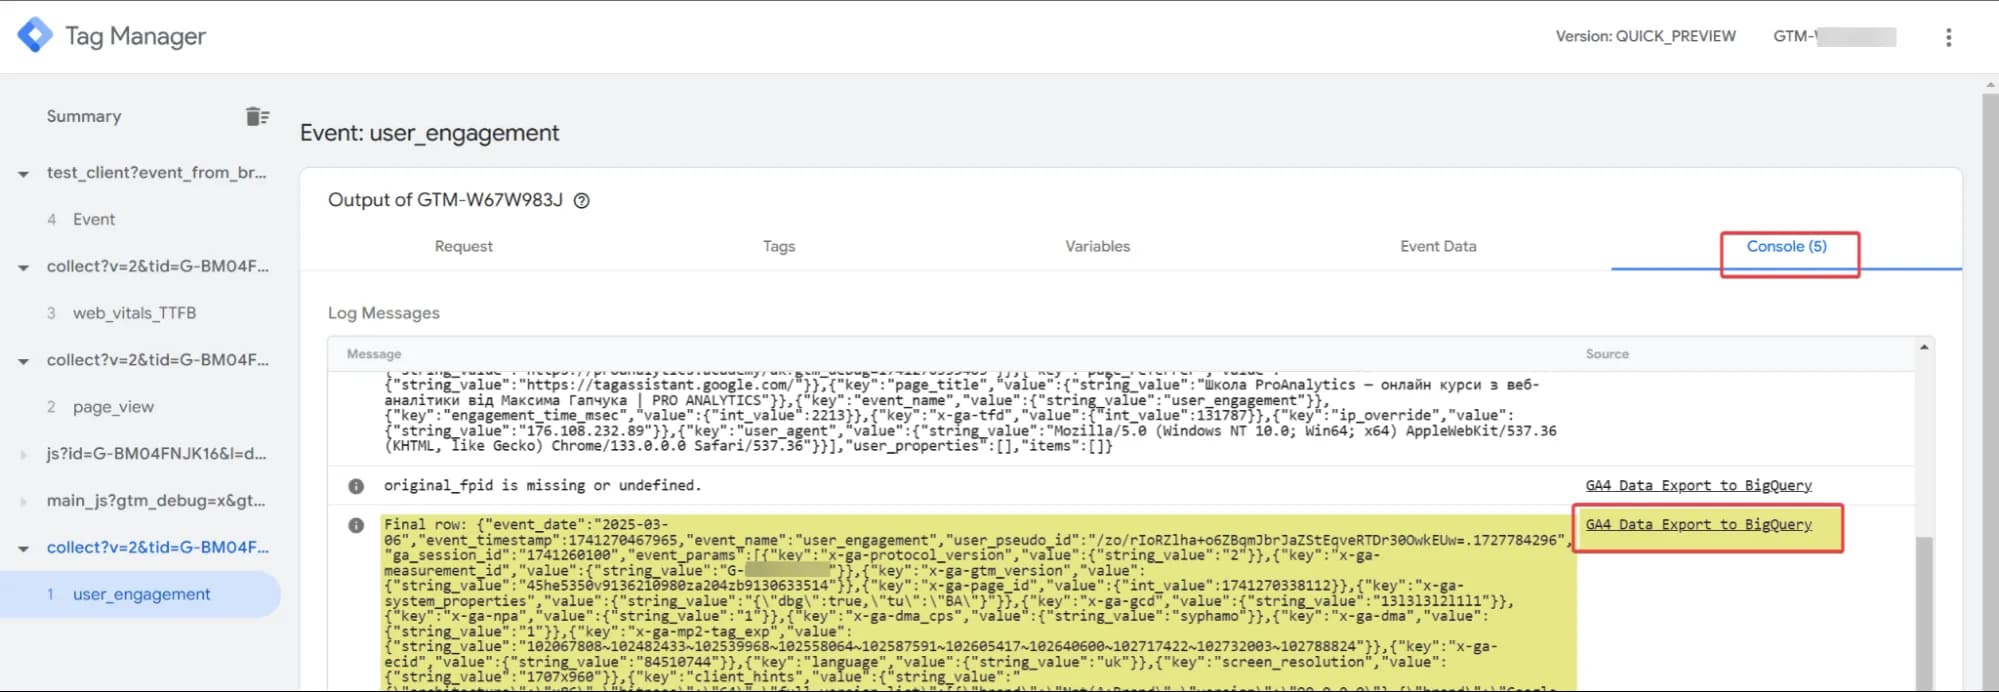
The Source field will show the name of your tag, followed by a large data entry starting with Final row. Don’t worry! The data will look much better in BigQuery.
Pay attention to an additional log entry in the console:

This log does not indicate an error but warns that the original_fpid field is empty. This is expected behavior under current settings. I will explain how to fill it in and why it might be needed later.
4. Verify the presence of data in your BigQuery table (preview mode data will also be recorded in this version).
5. If everything is OK – publish the container.
Key Features to Consider
In our template, we use UTC time zone. We chose this option because UTC is a universal standard for users from different countries, making it easier to convert into another time zone.
For those who need to align with the Ukrainian time zone (Kyiv time), we will provide additional material in the modifications section.
- To reiterate, we do not use all the fields available in GA4 export. Instead, we have extracted specific event-level, user-level, and e-commerce data separately while isolating the key fields: event_name, event_timestamp, event_date, user_pseudo_id та ga_session_id. These fields are, in our opinion, the most commonly used in queries, so we included them explicitly.
- We also processed additional useful parameters, such as original_fpid and original_cid (stored in event_params). These can be used later for post-processing. (More details on their use cases will be discussed in the modifications section.)
Before diving into modifications, let’s first break down how the template works.
How the Template Works
First, let's analyze the code.
- Import the necessary modules.
const log = require('logToConsole');
const BigQuery = require('BigQuery');
const makeString = require('makeString');
const makeInteger = require('makeInteger');
const JSON = require('JSON');
const getTimestampMillis = require('getTimestampMillis');
const getAllEventData = require('getAllEventData');
const getType = require('getType');
const Object = require('Object');
const Math = require("Math");
2. Use date functions to convert timestamps to the DATE format. This complexity arises because the GTM Server-Side API operates in a sandbox environment, where some standard JavaScript functions are not available.
function calculateUTCDateFromTimestamp(timestampInMillis) {
  const secondsInDay = 86400;
  let timestampInSeconds = Math.floor(timestampInMillis / 1000);
  return calculateDateFromTimestamp(timestampInSeconds);
}

function calculateDateFromTimestamp(timestampInSeconds) {
  const daysInMonth = [31, 28, 31, 30, 31, 30, 31, 31, 30, 31, 30, 31];
  const epochYear = 1970;
  const secondsInDay = 86400;

  let dayssinceEpoch = Math.floor(timestampInSeconds / secondsInDay);
  let year = epochYear;

  while (dayssinceEpoch >= (isLeapYear(year) ? 366 : 365)) {
    dayssinceEpoch = dayssinceEpoch - (isLeapYear(year) ? 366 : 365);
    year = year + 1;
  }

  let month = 0;
  while (dayssinceEpoch >= (month === 1 && isLeapYear(year) ? 29 : daysInMonth[month])) {
    dayssinceEpoch = dayssinceEpoch - (month === 1 && isLeapYear(year) ? 29 : daysInMonth[month]);
    month = month + 1;
  }

  const day = dayssinceEpoch + 1;
  return year + "-" + padToTwoDigits(month + 1) + "-" + padToTwoDigits(day);
}


function isLeapYear(year) {
  return (year % 4 === 0 && year % 100 !== 0) || (year % 400 === 0);
}


function padToTwoDigits(number) {
  return (number < 10 ? "0" : "") + number;
}
3. Convert all data into three formats: integer, string, float
function isValidValue(value) {
  return value !== undefined && value !== null && value !== '';
}

function identifyDataType(fieldValue) {
  if (typeof fieldValue === 'number') {
    return makeInteger(fieldValue) === fieldValue ? 'int_value' : 'float_value';
  }
  return 'string_value';
}

function changeDataType(fieldValue) {
    if (fieldValue === undefined || fieldValue === null) {
        return null;     }
    if (typeof fieldValue === 'boolean') {
        return fieldValue ? 1 : 0; // Convert true → 1, false → 0
    }
    if (typeof fieldValue === 'object') {
        return JSON.stringify(fieldValue); // Convert objects to JSON string
    }
    return fieldValue;
}
4. Create an object for insertion - defining the table structure.
const row = {
  event_date: calculateUTCDateFromTimestamp(getTimestampMillis()),
  event_timestamp: getTimestampMillis(),
  event_name: makeString(data.eventName),
  user_pseudo_id: makeString(data.client_id),
  ga_session_id: makeString(data.session_id),
  event_params: [],
  user_properties: [],
  items: []
};
5. Process items.
Record the data stored in the items array. If the parameters belong to standard product-level fields, they will be recorded in separate reserved fields in the items table (predefinedItemFields). If they are custom fields, they will be stored in items.item_params with the corresponding data type.
const predefinedItemFields = [
  "item_id",
  "item_name",
  "item_brand",
  "item_variant",
  "item_category",
  "item_category2",
  "item_category3",
  "item_category4",
  "item_category5",
  "price_in_usd",
  "price",
  "quantity",
  "item_revenue",
  "item_refund",
  "coupon",
  "affiliation",
  "location_id",
  "item_list_id",
  "item_list_name",
  "item_list_index",
  "promotion_id",
  "promotion_name",
  "creative_name",
  "creative_slot"
];

function extractItems(eventData) {
  if (!eventData.items || getType(eventData.items) !== 'array') {
    return;
  }

  eventData.items.forEach(function (item) {
    var processedItem = {};

    Object.keys(item).forEach(function (key) {
      var value = item[key];

      if (getType(predefinedItemFields) === 'array' && predefinedItemFields.indexOf(key) > -1) {
        processedItem[key] = isValidValue(value) ? changeDataType(value) : null;
      }

      else if (isValidValue(value)) {
        var param = {
          key: key,
          value: {}
        };
        var fieldType = identifyDataType(value);

if (fieldType === 'int_value') {
  param.value.int_value = changeDataType(value);
} else if (fieldType === 'float_value') {
  param.value.float_value = changeDataType(value);
} else {
  param.value.string_value = changeDataType(value);
}

        processedItem.item_params = processedItem.item_params || [];
        processedItem.item_params.push(param);
      }
    });

    row.items.push(processedItem);
  });
}
6. Process event_params - this includes all data except for fields already captured in user_properties, items, and core fields.
function extractEventParams(eventData) {
  Object.keys(eventData).forEach((key) => {
    if (key !== 'items' && key !== 'x-ga-mp2-user_properties'&& key !== 'event_name' && key !== 'client_id' && key !== 'ga_session_id') {
      const value = eventData[key];
      if (isValidValue(value)) {
        const param = {
          key: key,
          value: {}
        };
        const fieldType = identifyDataType(value);

        if (fieldType === 'int_value') {
  param.value.int_value = changeDataType(value);
} else if (fieldType === 'float_value') {
  param.value.float_value = changeDataType(value);
} else {
  param.value.string_value = changeDataType(value);
}

        row.event_params.push(param);
      }
    }
  });
  }
7. Process FPID (if available) in the GA4-compatible format and add it to event_params.
Below is an example of how FPID appears in cookies (highlighted in red). For comparison, (highlighted in yellow) is how it appears in analytics after decoding.
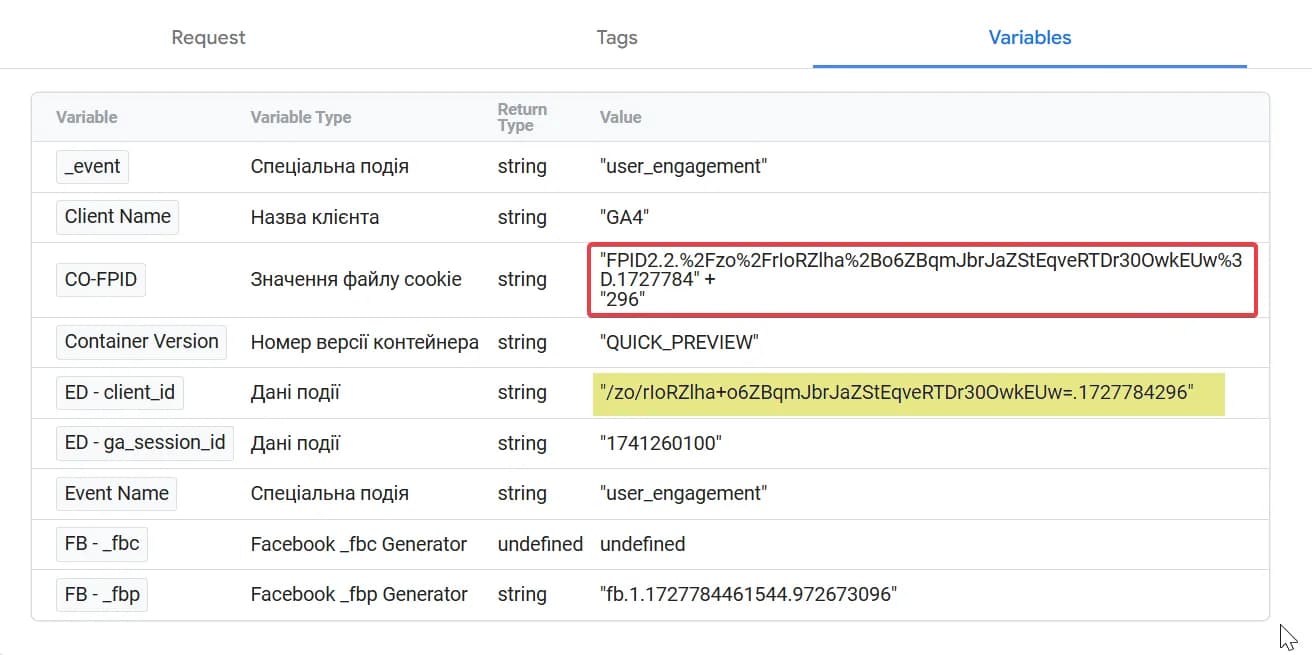
We remove the FPID2.2 prefix and decode URL-encoded characters.
if (data.original_fpid) {
    var rawFpid = data.original_fpid.replace("FPID2.2.", "");// Remove prefix FPID2.2.
    var decodedFpid = decodeURIComponentPolyfill(rawFpid);// Decode the value
    log("Processed original_fpid: " + decodedFpid);

    var originalFpidParam = { key: "original_fpid", value: {} };
    originalFpidParam.value.string_value = makeString(decodedFpid);
    row.event_params.push(originalFpidParam);
  } else {
    log("original_fpid is missing or undefined.");
  }

function decodeURIComponentPolyfill(encodedStr) {
  return encodedStr
    .split("%2B").join("+")
    .split("%2F").join("/")
    .split("%3D").join("=")
    .split("%20").join(" ")
    .split("%3A").join(":")
    .split("%2C").join(",")
    .split("%3B").join(";")
    .split("%40").join("@");
}
8. Process user_properties - receive data from x-ga-mp2-user_properties and store it in the correct format.
function extractUserProperties(eventData) {
  if (
    eventData['x-ga-mp2-user_properties'] &&
    typeof eventData['x-ga-mp2-user_properties'] === 'object'
  ) {
    const userProps = eventData['x-ga-mp2-user_properties'];
    Object.keys(userProps).forEach((key) => {
      const value = userProps[key];
      if (isValidValue(value)) {
        const param = {
          key: key,
          value: {}
        };
        const fieldType = identifyDataType(value);

         // Explicitly assign data type key
        if (fieldType === 'int_value') {
  param.value.int_value = changeDataType(value);
} else if (fieldType === 'float_value') {
  param.value.float_value = changeDataType(value);
} else {
  param.value.string_value = changeDataType(value);
}

        row.user_properties.push(param);
      }
    });
  }
}
9. Collect all data and call processing functions for products, events, and user data.
const eventData = getAllEventData();
if (eventData && typeof eventData === 'object') {

  extractItems(eventData);
  extractEventParams(eventData);
  extractUserProperties(eventData);
}
10. Log the final object.
log("Final row: " + JSON.stringify(row));11. Configure the primary BigQuery table.
const connectionInfo = {
  projectId: data.bqProject,
  datasetId: data.bqDataset,
  tableId: data.bqTable
};
12. Configure the backup BigQuery table (error log).
const connectionInfoFallback = {
  projectId: data.bqProject,
  datasetId: data.bqDataset,
  tableId: data.bqFallbackTable // table name for logs(the same datasetId)
};
13. Ignore unknown fields to avoid errors.
const options = { ignoreUnknownValues: true };14. Insert data into the primary BigQuery table. If an error occurs, the system logs it and records it in the backup table. If successful, it triggers gtmOnSuccess(). If the failure persists, it calls gtmOnFailure().
BigQuery.insert(connectionInfo, [row], options, data.gtmOnSuccess, (err) => {
  if (err) {
    log("BigQuery insert error: " + JSON.stringify(err));
    const rowFallback = {
  timestamp: Math.ceil(getTimestampMillis() / 1000),
  logs: JSON.stringify(err)
};
    BigQuery.insert(connectionInfoFallback, [rowFallback], options, data.gtmOnSuccess, (err) => {
  if (err) {
    log("BigQuery insert error: " + JSON.stringify(err));
    data.gtmOnFailure();
  } else {
    log("BigQuery InfoFallback insert successful");
    data.gtmOnSuccess();
  }
});
    data.gtmOnFailure();
  } else {
    log("BigQuery insert successful");
    data.gtmOnSuccess();
  }
});
Apart from the code, there are two additional tabs that are worth commenting on:
- Fields
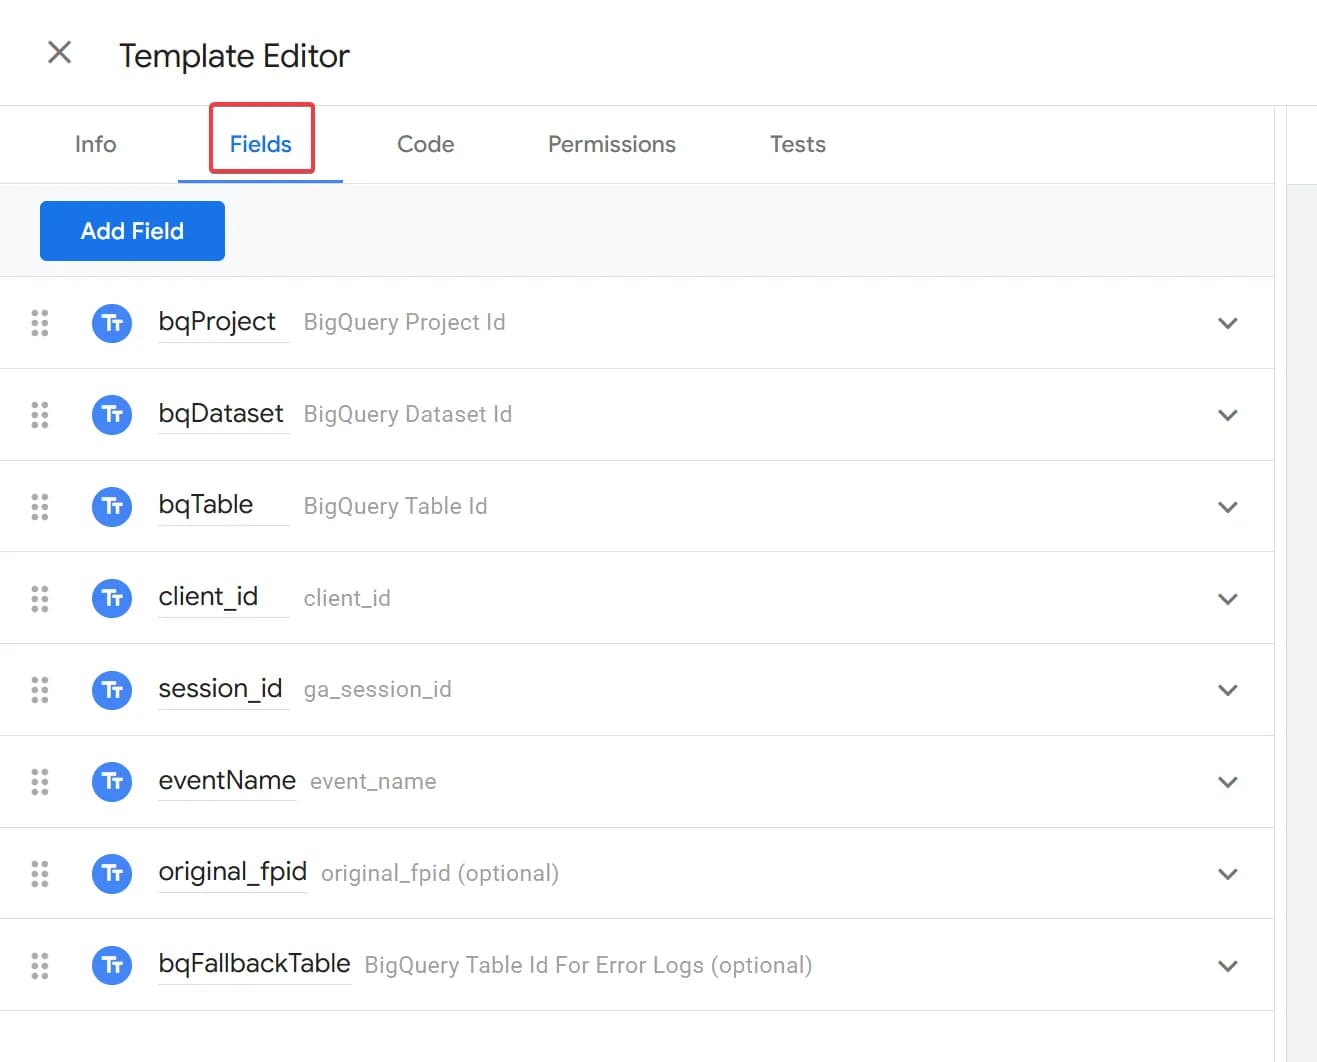
All fields of the Text input type follow this filling principle: the first name (in bold) is the variable name from our code, the second name (in gray) is the name you want to display in the tag for the corresponding field.
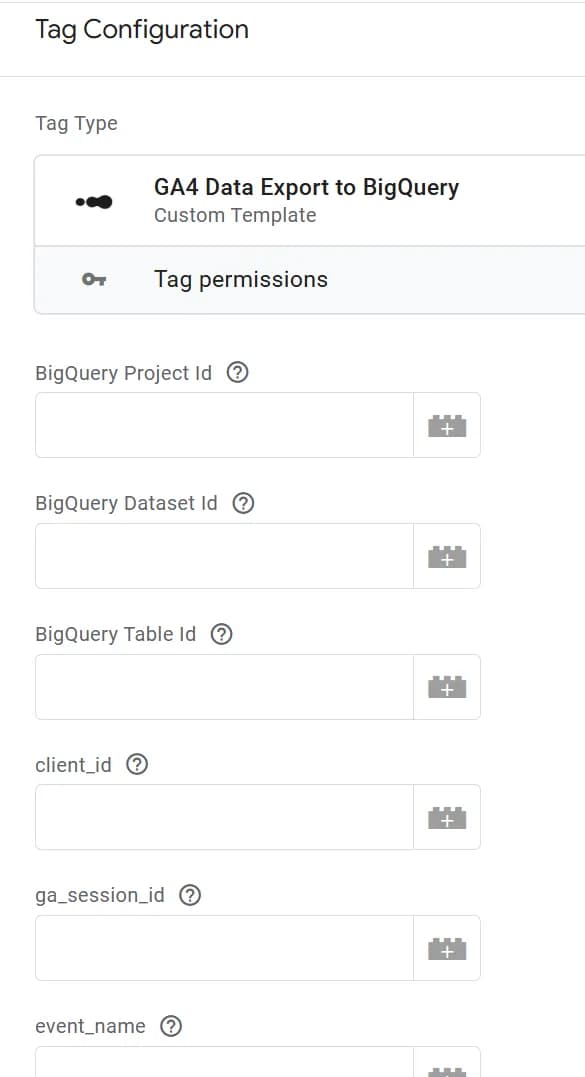
These are the fields that appear in the tag based on the template:
2. Permissions
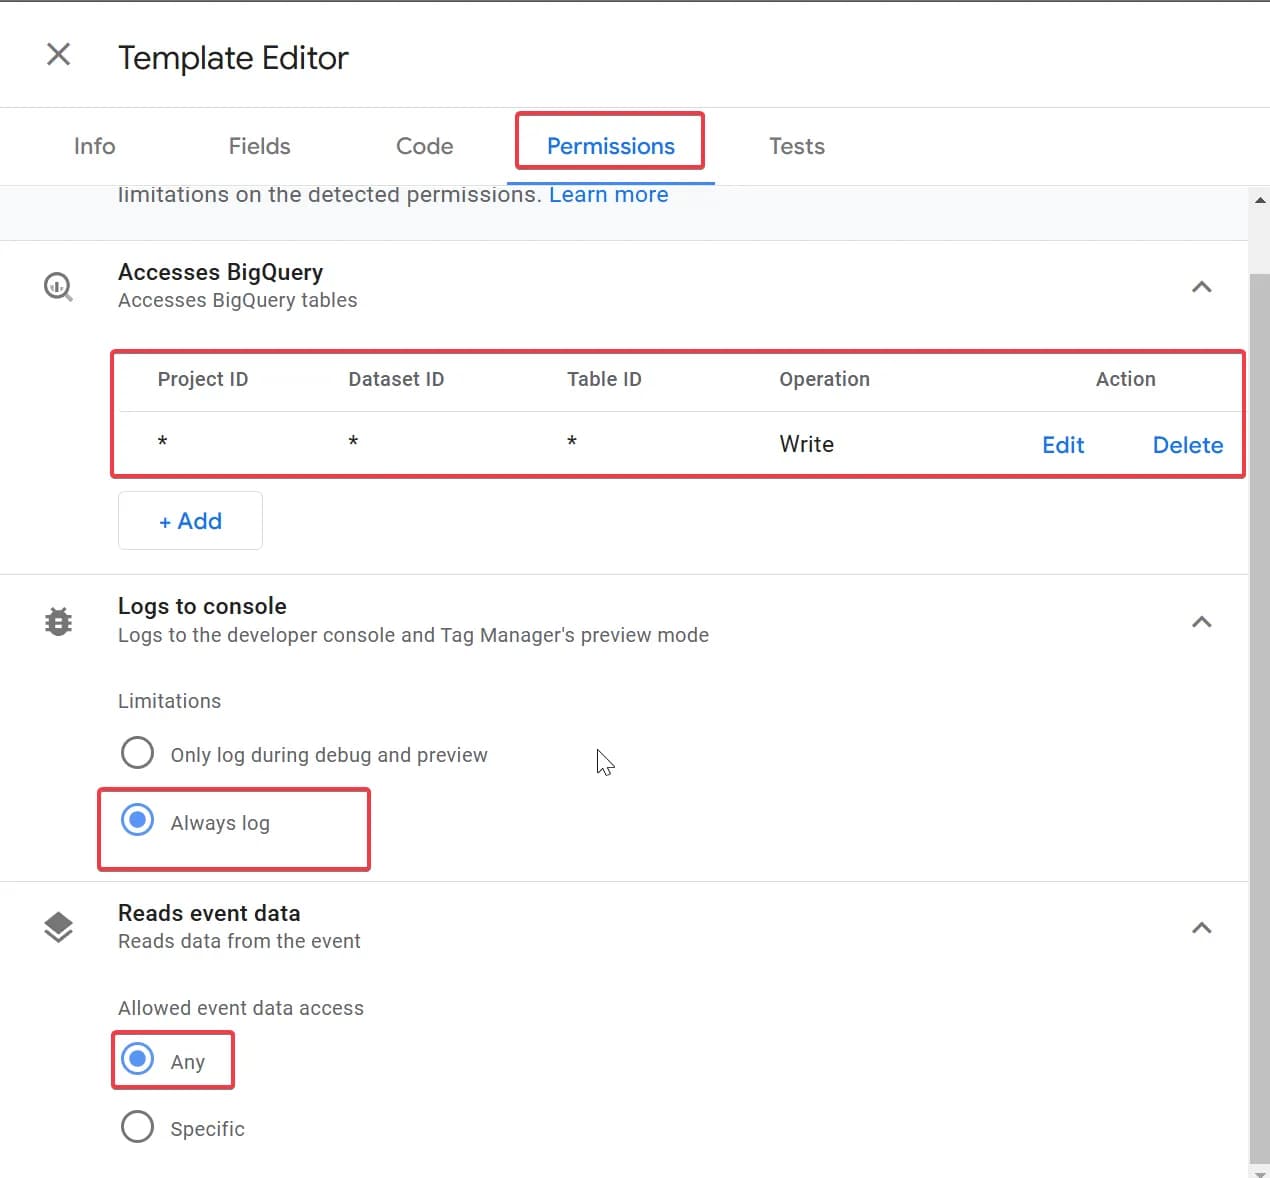
- Accesses BigQuery we have enabled the ability to write data to any project, dataset, and table. The necessary IDs are specified separately in the tag fields.
- Logs to console the template is set to Always log by default, but to reduce the number of logs, you can configure it to log only in debug mode.
- Reads event data we did not impose any restrictions since we want to capture all available event data.
Possible Template Modifications
Transmitting Original FPID and CID in Parameters
According to the diagram below (taken from Simo Ahava's article), analytics should receive cid (the final client identifier) based on the following logic:
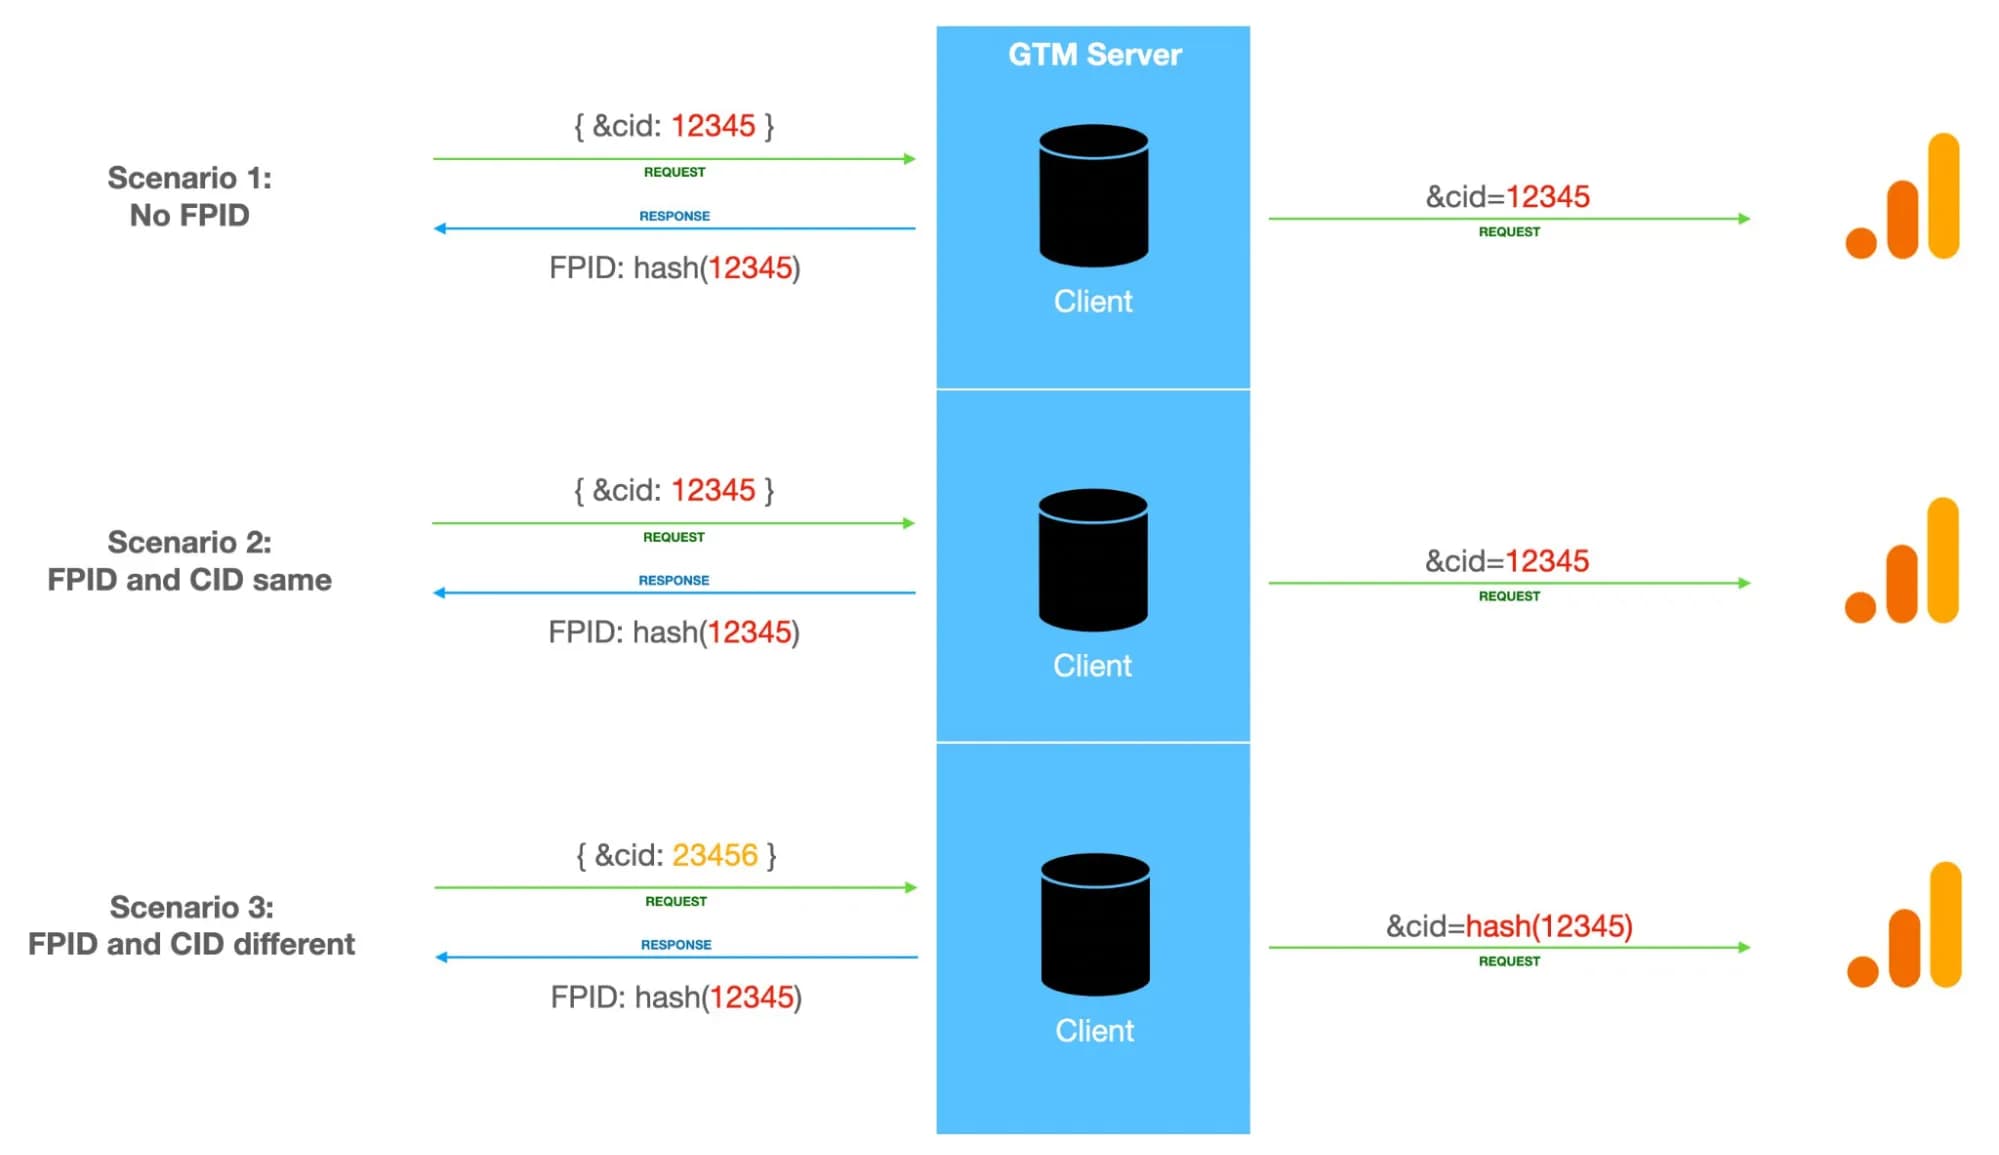
- If fpid is not yet assigned, the original cid (e.g., 12345) is sent to GA4, and in response, the server-side GTM assigns fpid as a hashed version of cid (hash(12345)).
- If fpid equals the hashed cid (hash(12345)), then the original cid (12345) is sent to GA4.
- If the current fpid is no longer equal to the hashed cid (hash(12345) <> 23456), meaning the cid has changed, the original fpid (hash(12345)) is sent instead.
By "original," we mean the values that come with the incoming request to the server-side GTM.
Even though the diagram shows that this is the same user whose _ga cookie has changed, GA4 will still treat them as two separate users:
- The first user will aggregate actions from scenarios 1 and 2.
- The second user will only contain events from scenario 3.
If you are satisfied with GA4’s built-in user identification, no changes are necessary. However, if you want even more precise user identification, you can use pair matching within containers.
By having all pairs of original cid and fpid, you can identify users even more accurately by forming a final_fpid (container) that combines all variations:
| original_cid | original_fpid | final_cid | final_fpid |
|---|---|---|---|
12345 | - | 12345 | hash(12345) |
12345 | hash(12345) | 12345 | hash(12345) |
23456 | hash(12345) | hash(12345) | hash(12345) |
- original_cid - the cid from the incoming request
- original_fpid - the fpid from the incoming request
- final_cid - the cid that GA4 will use for user identification
- final_fpid - the final client identifier derived from the first two columns
Since passing these original parameters is optional, we have structured the template so that these values will only be recorded in the database if they are explicitly added. Otherwise, they will not appear.
How to Extract FPID?
Create a custom variable in GTM to retrieve the value from the FPID cookie (variable CO - FPID). Insert this variable into a dedicated tag field within the template. The template will then process and decode the FPID value from the tag field.
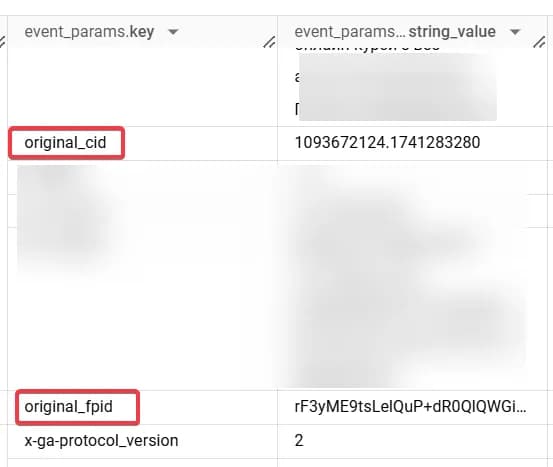
After proper setup, the original_fpid parameter will appear in the event_params of your BigQuery table.

If you have configured everything correctly, the original_fpid parameter will appear in event_params in your BigQuery table.
Of course, there are alternative ways to extract FPID from the cookie, such as those described in the API documentation.
How to Extract original_cid?
One method is similar to FPID extraction, as described above. In server-side GTM, you can create a variable to extract data from the _ga cookie.
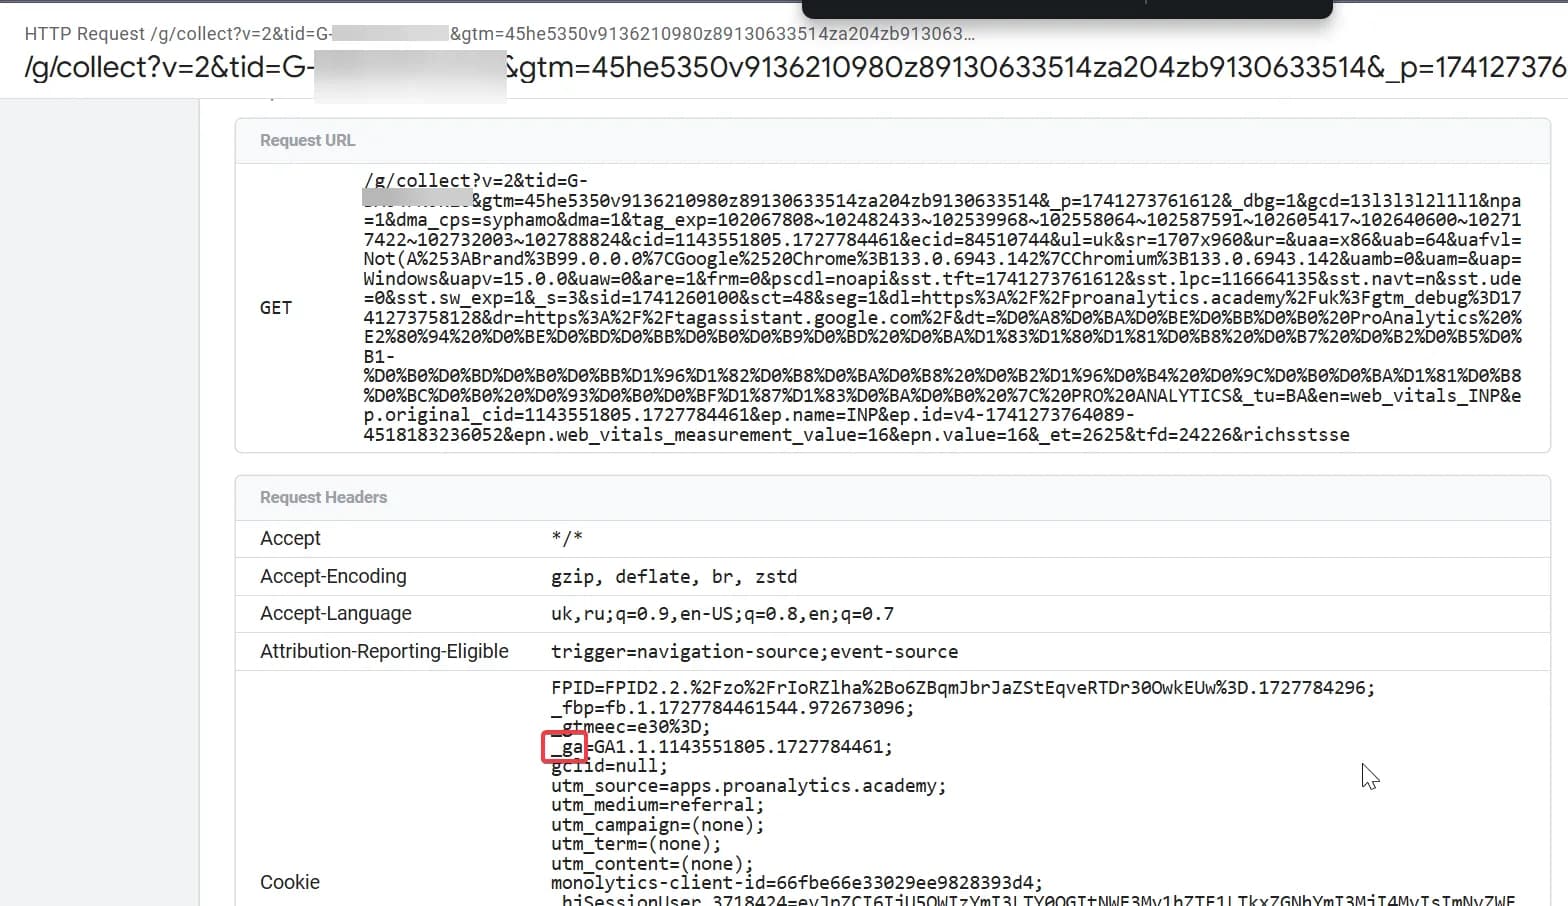
But to demonstrate the variety of ways to solve this problem, I will show another example—on the client-side GTM.
We create a Custom JavaScript variable based on the value from the _ga cookie:

Then, we convert it to the required format.
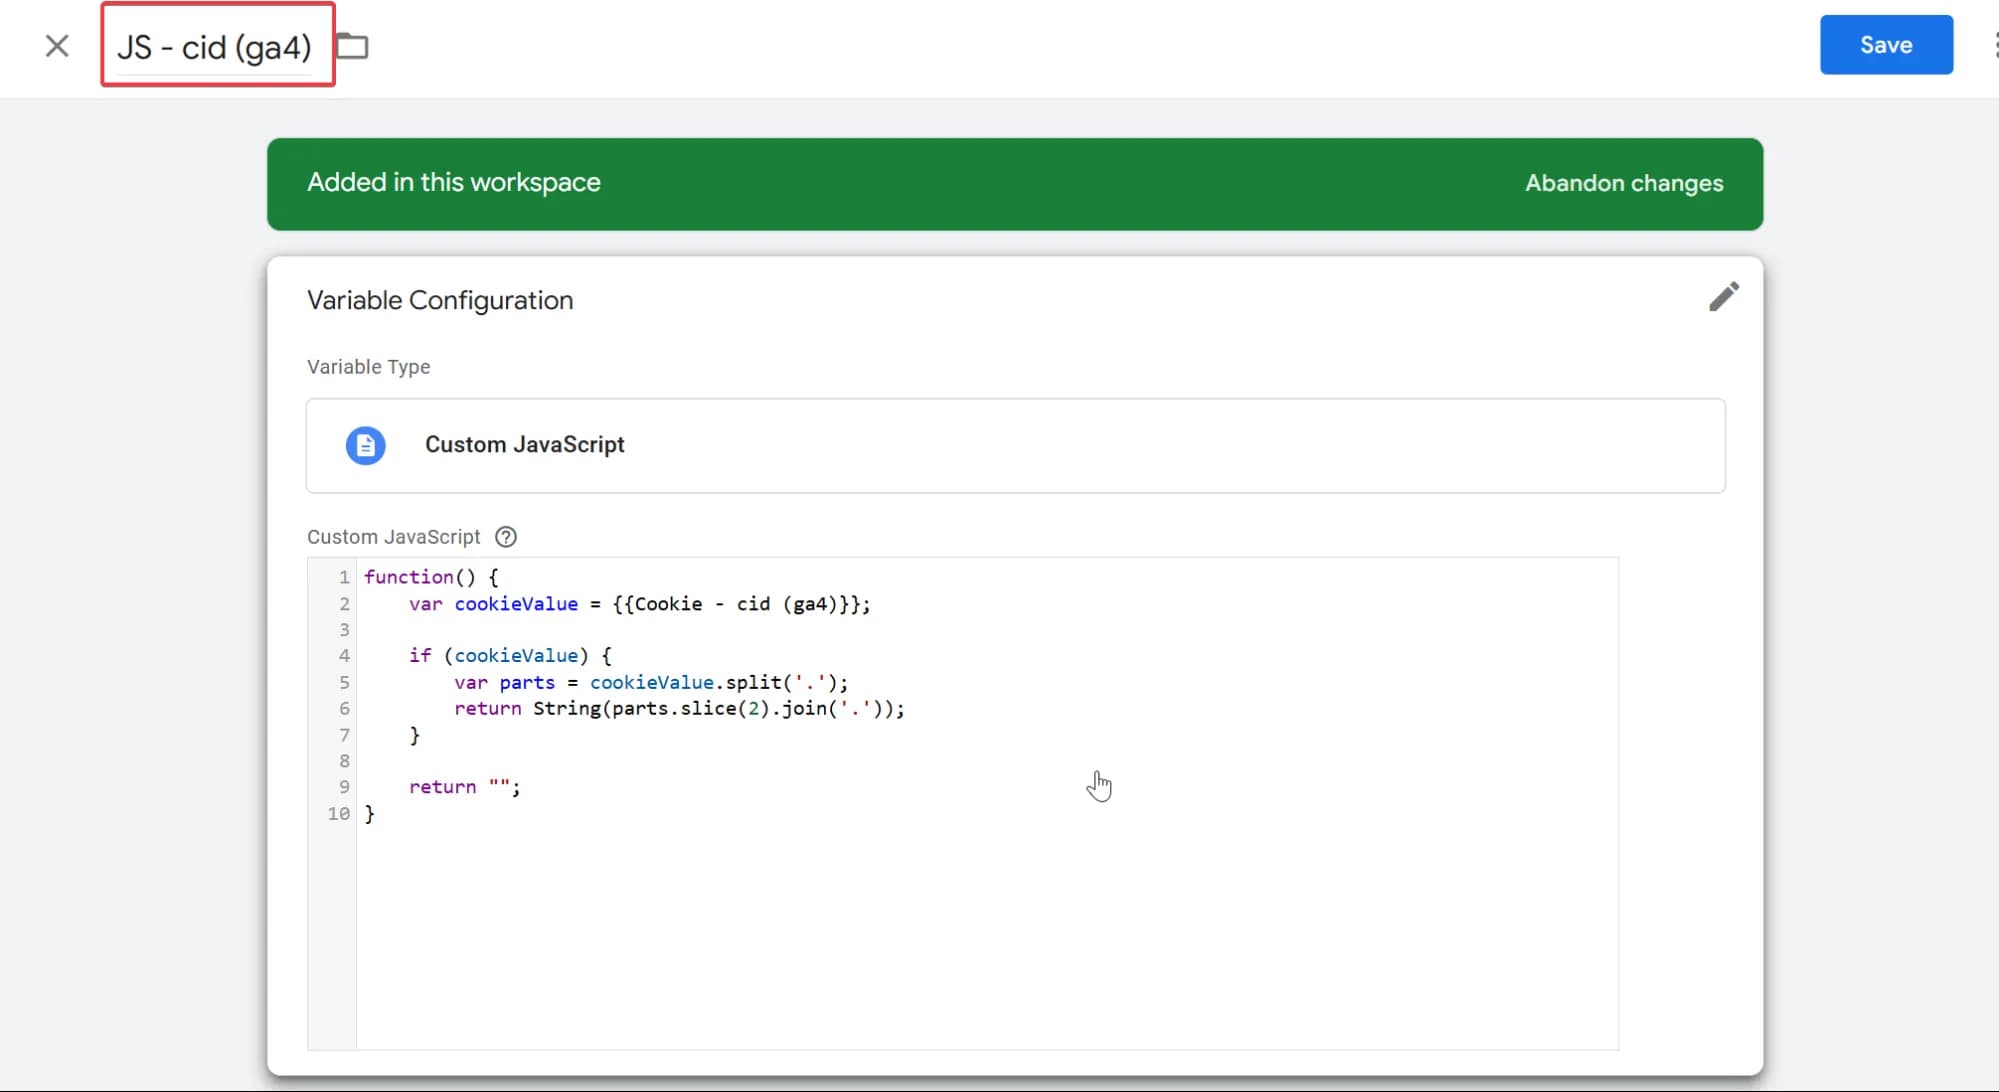
Code for extracting cid:
function() {
    var cookieValue = {{Cookie - cid (ga4)}};

    if (cookieValue) {
        var parts = cookieValue.split('.');
        return String(parts.slice(2).join('.'));
    }

    return "";
}
And that's it; no additional configuration in Server-Side GTM is required. This parameter will appear in event_params in your BigQuery table.
Whichever method you choose, here are the parameters you will see after configuration:
Separating/Filtering Debug Data
Along with events, we receive system parameters, among which there is a parameter that indicates debug mode.
Here is where you can find it in Event Data:
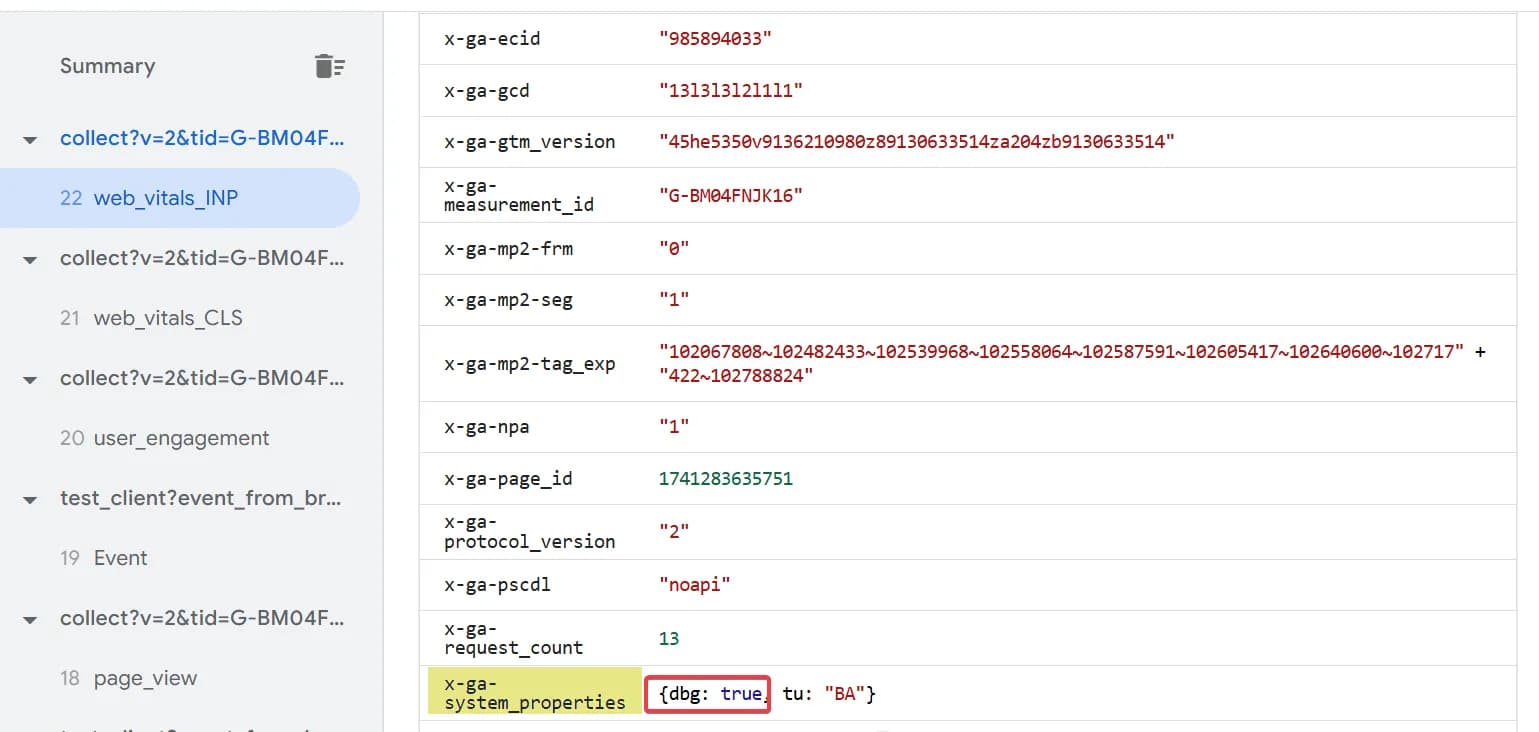
For real events, dbg will be absent.
So, if you want to prevent preview data from being sent to your table, you can add a small piece of code in the template to filter such events and block their transfer to BigQuery.
Alternatively, you can filter these events in BigQuery queries by referencing this value:

Defining the Date in the GA4 Time Zone
As I mentioned earlier, in the current template, the date is recorded in UTC.
However, if you need to align the data with the GA4 export, it is better to obtain event_date according to the time zone used in the GA4 interface.
Since we have many clients from Ukraine, we have already prepared a ready-made solution to define the date based on Kyiv time.
If you think that changing just a couple of lines of code will be enough, you're mistaken :)
Server-Side GTM does not have access to the full set of standard JavaScript APIs, so we had to put in some extra effort to implement this.
To obtain the date in Kyiv time, simply replace a section of the script in this point with the following:
// Function to calculate the Kyiv date (YYYY-MM-DD)
function calculateKyivDateFromTimestamp(timestampInMillis) {
  const secondsInDay = 86400; // Секунди в добі
  const utcOffsetSeconds = 2 * 60 * 60; // Зміщення UTC+2 у секундах
  const dstOffsetSeconds = 1 * 60 * 60; // Літній час: +1 година

  // Convert timestamp to seconds
  let timestampInSeconds = Math.floor(timestampInMillis / 1000);

  // Add UTC+2 offset
  timestampInSeconds = timestampInSeconds + utcOffsetSeconds;

  // Check if daylight saving time (DST) applies
  const year = calculateYearFromTimestamp(timestampInSeconds);
  const dstStart = calculateDstStartTimestamp(year); // Початок DST
  const dstEnd = calculateDstEndTimestamp(year); // Кінець DST

  if (timestampInSeconds >= dstStart && timestampInSeconds < dstEnd) {
    timestampInSeconds = timestampInSeconds + dstOffsetSeconds; // Додаємо 1 годину, якщо DST
  }

  return calculateDateFromTimestamp(timestampInSeconds);
}

// Function to calculate the Kyiv date and time (YYYY-MM-DD HH:MM:ss)
function calculateKyivDateTimeFromTimestamp(timestampInMillis) {
  const secondsInDay = 86400; // Секунди в добі
  const utcOffsetSeconds = 2 * 60 * 60; // Зміщення UTC+2 у секундах
  const dstOffsetSeconds = 1 * 60 * 60; // Літній час: +1 година

  // Convert timestamp to seconds
  let timestampInSeconds = Math.floor(timestampInMillis / 1000);

  // Add UTC+2 offset
  timestampInSeconds = timestampInSeconds + utcOffsetSeconds;

  // Check if daylight saving time (DST) applies
  const year = calculateYearFromTimestamp(timestampInSeconds);
  const dstStart = calculateDstStartTimestamp(year); // Початок DST
  const dstEnd = calculateDstEndTimestamp(year); // Кінець DST

  if (timestampInSeconds >= dstStart && timestampInSeconds < dstEnd) {
    timestampInSeconds = timestampInSeconds + dstOffsetSeconds; // Додаємо 1 годину, якщо DST
  }

  // Determine date
  const date = calculateDateFromTimestamp(timestampInSeconds);

  // Determine hours, minutes, and seconds
  const hours = Math.floor((timestampInSeconds % secondsInDay) / 3600);
  const minutes = Math.floor((timestampInSeconds % 3600) / 60);
  const seconds = timestampInSeconds % 60;

  // Format time as HH:MM:SS
  const formattedTime =
    padToTwoDigits(hours) +
    ":" +
    padToTwoDigits(minutes) +
    ":" +
    padToTwoDigits(seconds);

  // Combine date and time
  return date + " " + formattedTime;
}

// Function to calculate the year from a timestamp
function calculateYearFromTimestamp(timestampInSeconds) {
  const secondsInDay = 86400;
  const epochYear = 1970;
  let dayssinceEpoch = Math.floor(timestampInSeconds / secondsInDay);
  let year = epochYear;

  while (dayssinceEpoch >= (isLeapYear(year) ? 366 : 365)) {
    dayssinceEpoch = dayssinceEpoch - (isLeapYear(year) ? 366 : 365);
    year = year + 1;
  }
  return year;
}

// Function to calculate DST start (last Sunday of March)
function calculateDstStartTimestamp(year) {
  const secondsInDay = 86400;
  const marchDays = 31 + 28; // Дні до березня
  const daysInYearBeforeMarch = isLeapYear(year) ? marchDays + 1 : marchDays;

  // DST start — last Sunday of March
  const lastSundayMarch = daysInYearBeforeMarch + 24 - (daysInYearBeforeMarch % 7);
  return lastSundayMarch * secondsInDay;
}

// Function to calculate DST end (last Sunday of October)
function calculateDstEndTimestamp(year) {
  const secondsInDay = 86400;
  const octoberDays = 31 + 30 + 31 + 30 + 31 + 30 + 31 + 31 + 30; // Дні до жовтня
  const daysInYearBeforeOctober = isLeapYear(year) ? octoberDays + 1 : octoberDays;

  // DST end — last Sunday of October
  const lastSundayOctober = daysInYearBeforeOctober + 24 - (daysInYearBeforeOctober % 7);
  return lastSundayOctober * secondsInDay;
}

// Function to calculate date in YYYY-MM-DD format
function calculateDateFromTimestamp(timestampInSeconds) {
  const daysInMonth = [31, 28, 31, 30, 31, 30, 31, 31, 30, 31, 30, 31];
  const epochYear = 1970;
  const secondsInDay = 86400;

  let dayssinceEpoch = Math.floor(timestampInSeconds / secondsInDay);
  let year = epochYear;

  // Determine year
  while (dayssinceEpoch >= (isLeapYear(year) ? 366 : 365)) {
    dayssinceEpoch = dayssinceEpoch - (isLeapYear(year) ? 366 : 365);
    year = year + 1;
  }

  // Determine month
  let month = 0;
  while (dayssinceEpoch >= (month === 1 && isLeapYear(year) ? 29 : daysInMonth[month])) {
    dayssinceEpoch = dayssinceEpoch - (month === 1 && isLeapYear(year) ? 29 : daysInMonth[month]);
    month = month + 1;
  }

  // Determine day
  const day = dayssinceEpoch + 1;

  // Format date as YYYY-MM-DD
  return year + "-" + padToTwoDigits(month + 1) + "-" + padToTwoDigits(day);
}

// Функція для перевірки високосного року
function isLeapYear(year) {
  return (year % 4 === 0 && year % 100 !== 0) || (year % 400 === 0);
}

// Функція для форматування числа до двох цифр
function padToTwoDigits(number) {
  return (number < 10 ? "0" : "") + number;
}
Yes, this piece of code turned out to be quite large, but it takes into account all the nuances of daylight saving time transitions, which many other time zones do not have. I hope you find this useful. :)
Modifying the Code and Template Fields
You can make additional changes to our template and track the correctness of execution in the error log.
If you make any modifications and something goes wrong, you will most likely see errors in the console of your tag in Server-Side GTM Debug View.
Example of an error:

This is to emphasize that if you modify the table schema or script code, always carefully check the data in preview mode to ensure there are no issues with data recording after the changes.
However, there are cases where debugging in preview mode does not reveal an error, and in such situations, the only way to "catch" it is with real data.
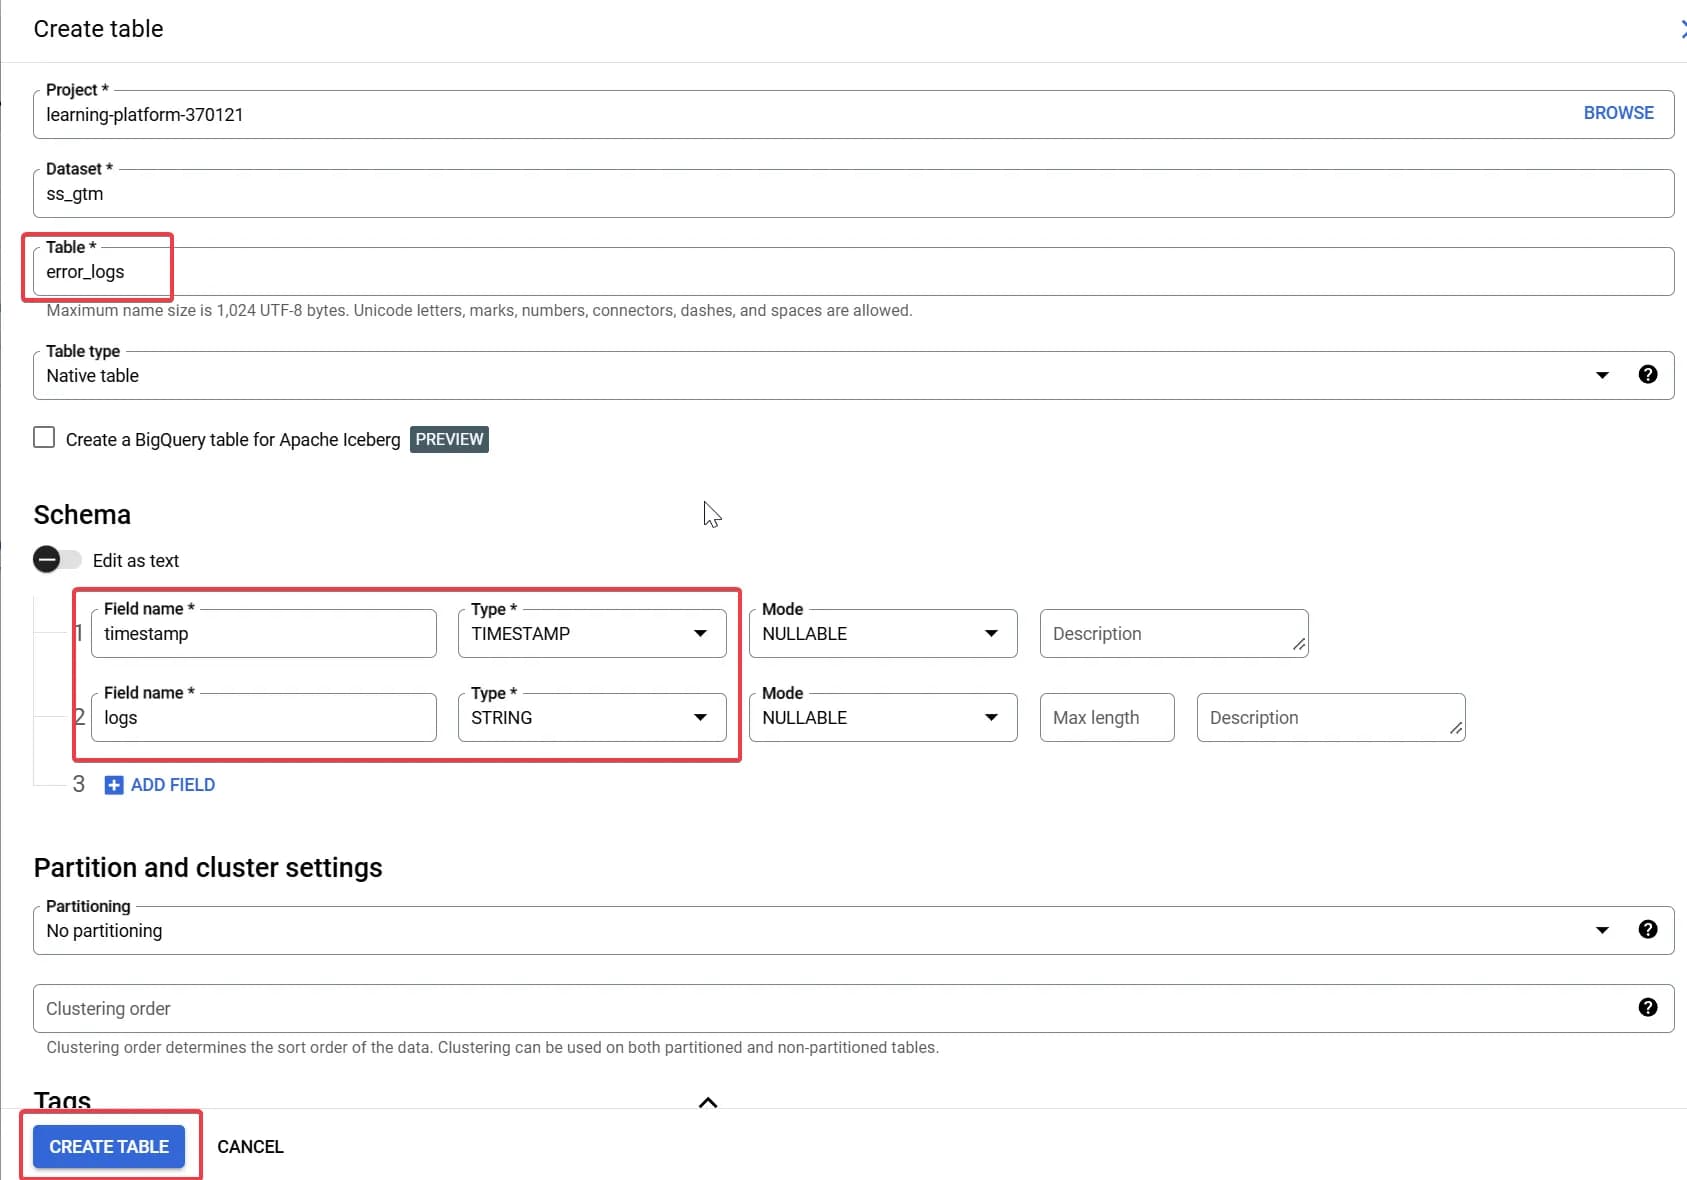
To handle such cases, we implemented the option to record data into a backup table, which serves as an error log in BigQuery.
This means that even if you do not notice anything suspicious in debug mode, there is still a chance that, for some reason, the data will not be written to the main table.
For this reason, we strongly recommend always creating an additional table for logging errors in such cases.
This table should have the following schema:
[
      {
    "name": "timestamp",
    "type": "TIMESTAMP",
    "mode": "NULLABLE"
  },
  {
    "name": "logs",
    "type": "STRING",
    "mode": "NULLABLE"
  }
]
IMPORTANT! With the current code logic, the table should be created in the same dataset as the main one.
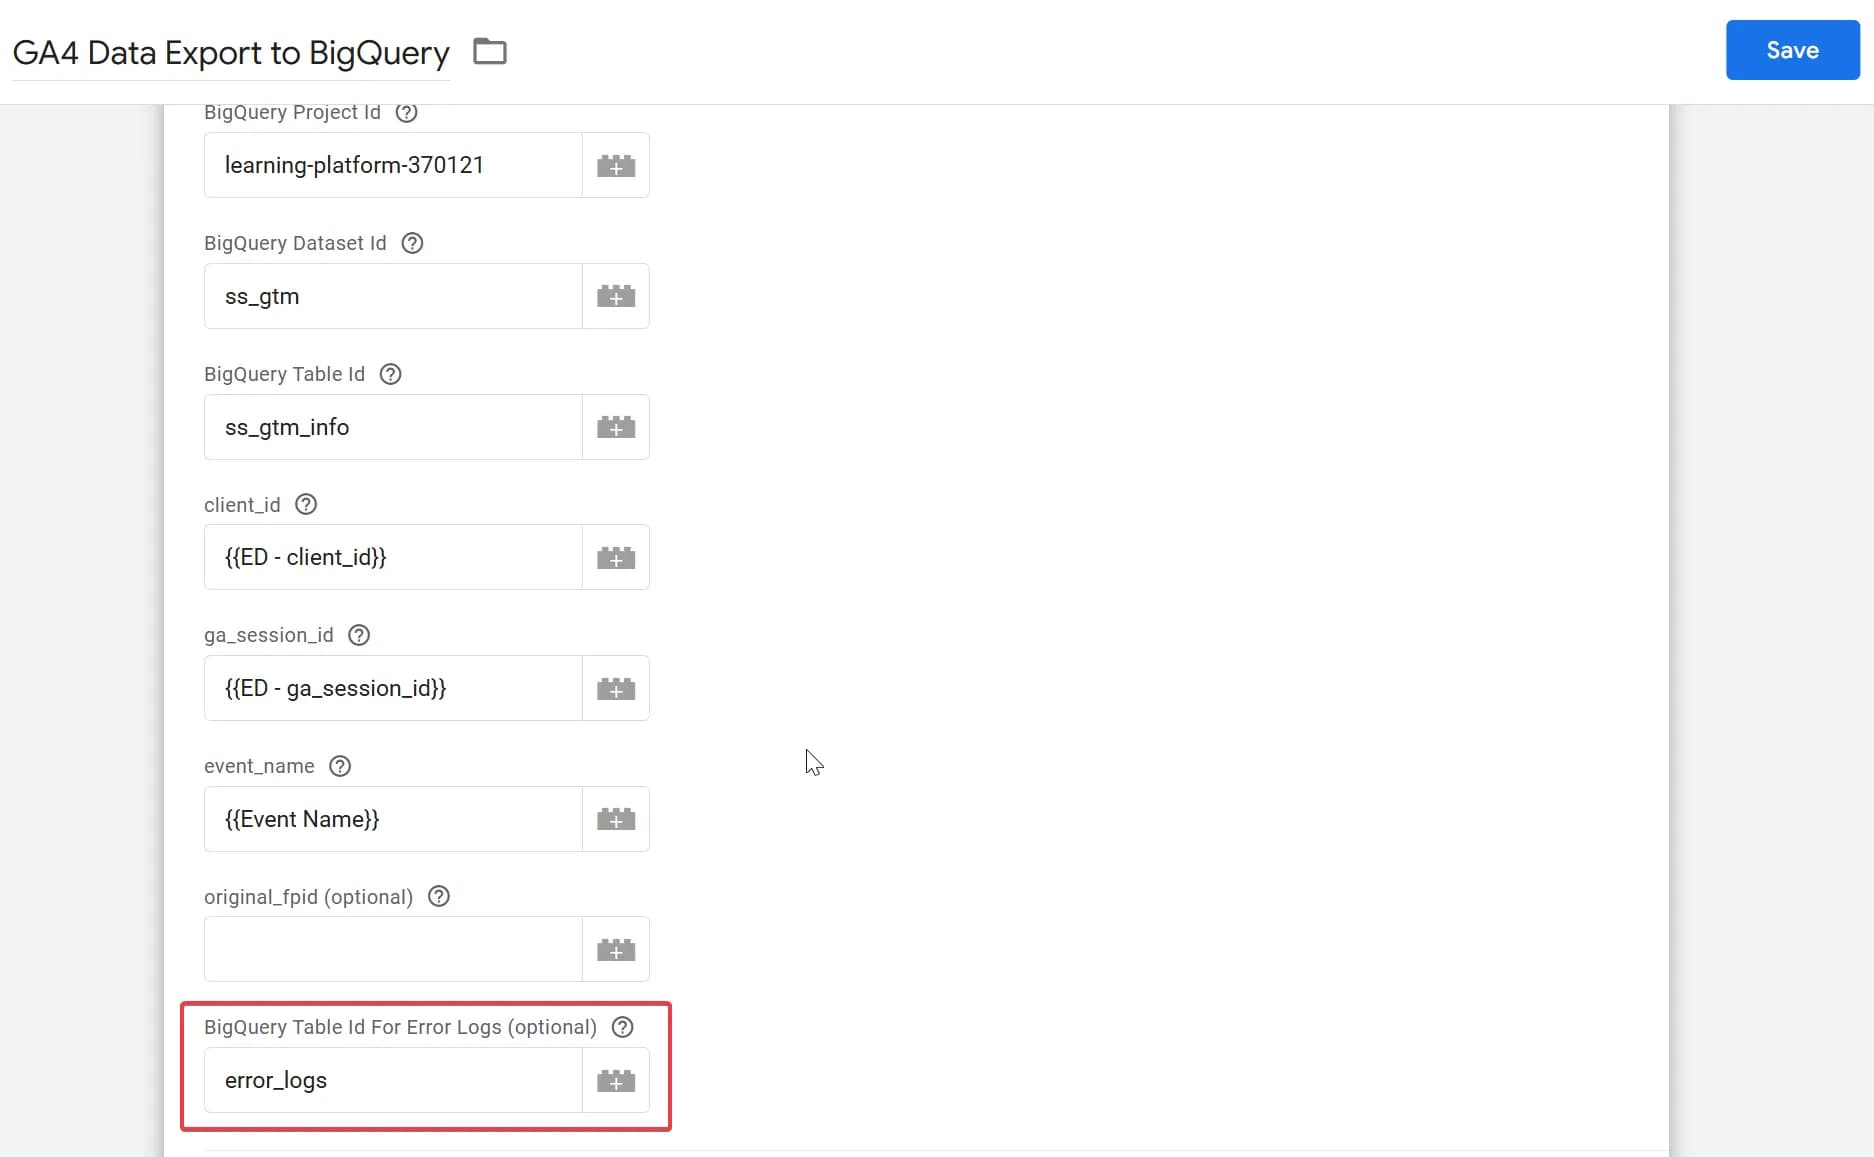
Next, insert the table ID into the tag field and save it:
You will see all raw data along with an additional error message at the end:

The provided error message may not be very helpful in this case, but at least you will have all the data available for a more detailed investigation into why some records failed to be written to your existing structure.
Additionally, if you attempt to write this data to the table via API, you may be able to see a detailed error description.
By the way, if needed, you can still write this data to your main table, as incorrect records are not lost.
Of course, this is not the final list of possible modifications.
If you have any interesting ideas for modifications at this stage—feel free to share them in the comments!
Obtained Results and Data Processing
The data obtained directly from Server-Side GTM to BigQuery using our template should be more accurate than the data from the standard GA4 export.
To ensure your settings are working correctly, it would be useful to compare the data: take the data from standard export (whether it's daily export or streaming) and compare it to the data obtained directly.
As a result, you should see a positive picture—the data either matches the GA4 interface or even exceeds it.
Below is a screenshot of such a comparison from one of our projects.

Two new fields have been added to our previous table:
- SS GTM Export (ss_gtm_info) – data from our table that receives information directly from Server-Side GTM.
- SS GTM Export (ss_gtm_info) Deviation (%) – percentage deviation of this table's data relative to the GA4 interface.
In most cases, we obtain more data compared to the GA4 interface. As a reminder, our goal was to match the data with the analytics interface, so we can consider this method highly effective.
If you want to bring the data even closer to the GA4 format or improve our solution, here are a few ideas and ways to implement them:
- Add first_visit and session_start events
Since these events appear during GA4's data processing, we do not receive them in the direct Server-Side GTM export, but they can be added to the table via queries.
- first_visit – determine the first recorded event for each user_pseudo_id and copy its data, replacing the event name.
- session_start – same approach but applied at the session level (user_pseudo_id + ga_session_id).
2. Add traffic sources based on the appropriate attribution model
Our structure does not have separate fields for traffic sources, so to determine them, we need to use data from page_location та page_referrer.
Then, depending on the attribution model, you can extract the sources in the format you need.
3. User Identification
As mentioned earlier, using original cid + fpid pairs allows for more precise user identification than GA4. Additionally, you can include your internal user_id for further detailing.
Let's model a situation:
A user visits your website, browses pages, interacts with content, and at some point, logs in and continues interacting. Initially, they had an empty user_id, but later, we identify them.
With this data, you can further refine user tracking based on combinations of cid + fpid + user_id:
| original_cid | original_fpid | final_cid | user_id | container_id |
|---|---|---|---|---|
12345 | - | 12345 | - | 1111 |
12345 | hash(12345) | hash(12345) | 1111 | 1111 |
23456 | hash(12345) | hash(12345) | - | 1111 |
33456 | - | 33456 | 1111 | 1111 |
- original_cid - cid з вхідного запиту
- original_fpid - fpid з вхідного запиту
- final_cid - cid, що летить в аналітику (визначає юзера по логіці GA4)
- user_id - ваш внутрішній ідентифікатор клієнта
- container_id - фінальний ідентифікатор контейнера, який визначається за допомогою додаткової обробки значень з перших двох колонок + user_id
Additional manipulations can be designed based on your project's needs and feasibility.
For our use case, we emphasized the ability to capture full GA4 data in the format we need. Thus, this setup is applicable to multiple projects.
Pros of this solution:
- Complete data acquisition, allowing for more accurate decision-making.
- Real-time data availability – crucial for building real-time reports.
- Flexibility and adaptability to any custom data structure—you are free to modify our template and create a tailored solution.
- Cost is comparable to GA4 streaming export.
Cons:
- Requires post-processing, but GA4 data also needs post-processing. In some cases, GA4 itself produces inaccuracies, such as traffic source misidentification (our colleague wrote a detailed article about these discrepancies). Because of this, we always apply our own data processing logic.
- Requires a Server-Side Tag Manager (SS GTM). If you haven't set it up yet, this solution may be more expensive initially. You’ll need to deploy a Server-Side GTM container, which adds costs that you didn’t have before.
However, Server-Side GTM offers much more than just this solution. It has multiple additional benefits, including:
- Reducing page load time by minimizing JavaScript codes, resulting in faster website performance.
- Shifting analytics & marketing cookies from third-party to first-party, leading to better and more accurate user identification.
- Many other advantages, but that’s a topic for another article )
I hope this article piqued your interest, and if you made it this far—thank you for reading! 😊 Let me know your thoughts in the comments. What do you think about this solution?
