

Maks Hapchuk
Web analyst, marketer, founder of ProAnalytics Team and PROANALYTICS.ACADEMY, author of the AnalyticsTipsServer-Side GTM in Cloud Run: Step-by-Step Setup, Cost, and Subdomain Connection
Server-Side GTM is no longer a “trend” but a practical tool that allows you to better control your data, reduce dependency on browser limitations, and improve your website loading speed. When we talk about migrating to Server-Side Google Tag Manager, it is important to understand that this is not just about creating a new container (as in the case of browser-based GTM), but about deploying a full-fledged server infrastructure that must operate stably, predictably, and under control.
In this article, I will show in detail how to deploy Server-Side Google Tag Manager in Cloud Run, how to properly configure a subdomain through Load Balancer and DNS, and I will also cover cost and optimization considerations. The plan will be as follows:
Deploying Server-Side GTM in Cloud Run
Step 1. Create a preview service
Server-side GTM has two operating modes: production (live mode) and preview (debug mode). In regular, client-side GTM, you simply click Preview and see the debug panel in the browser. In a server-side architecture, everything works differently — the server requires a separate entry point for debug sessions.
The preview server performs exactly this role: it receives requests in debug mode, stores the debug session, and allows you to see which events are reaching the server and which tags are firing.
We will follow this instruction from the documentation. And, of course, we start by navigating to Cloud Run. Next, you:
- Select the project you need.
- Open the Services section.
- Click Deploy container.

4. Copy the link from Google’s setup documentation. For convenience, I am leaving it here: gcr.io/cloud-tagging-10302018/gtm-cloud-image:stable

5. Paste the link into the Container image URL field.

6. Next, in the Service name field, give your service a name (since we are setting up a preview service, let’s name it “ssgtm-preview”).
7. Slightly below, in the Region field, select a region as close as possible to your main audience. If most of your users are in Ukraine, it makes sense to choose, for example, Warsaw.

8. In the Authentication block, select Allow public access, since we do not need authorization.
9. For Billing, select Instance-based. We need the instance to always be running, not only when there is a request.

10. Autoscaling — in the case of the preview service, we can set it to 0. Since this service is only used in preview mode, it does not handle real production traffic and does not require a constantly running instance. Therefore, in the autoscaling settings, set:
- Minimum number of instances — 0
- Maximum number of instances — 1
0 instances will lead to a cold start, which means that theoretically, when clicking the Preview button in GTM, you may occasionally receive an error. However, a repeated request after a few seconds will already work correctly. If there are no requests for some time (around 20–30 minutes), the service will stop again, and you will not need to pay for idle time.
11. For Ingress, leave All so that all traffic can reach our containers.

12. Next, open the Containers, Networking, Security block by clicking the arrow, and below select the Variables & Secrets tab.

13. Now check the documentation to see which Environment variables we need:
- The first variable:
RUN_AS_PREVIEW_SERVERwith the valueTRUE. - The second variable:
CONTAINER_CONFIG. Its value is your container configuration string, which you get from your Google Tag Manager. To find it, open Admin → Container settings → Set up your tagging server → Manually provision tagging server → copy Container config.

14. Now create the variables and click Create.

The first service is ready. Now let’s create the next one.
Step 2. Create the main server service
After we have created the preview service, we create a second one — the main service, which will handle requests from the website. The settings almost completely repeat those for the preview service up to step 10 — Auto Scaling. Therefore, follow the same steps, changing only the service name (for example, “ssgtm”), and then continue with scaling configuration:
- Auto Scaling - here the choice depends on the number of visitors to your website. According to Google’s documentation, one container can handle approximately 35 requests per second and costs around 45 dollars per month.
- Minimum instances — in the official Google documentation, the recommendation is to set at least 2. This ensures that requests always have somewhere to go — and that you have a “backup” service in case several dozen requests arrive at the same time. For very small projects, you can try reducing it to 1, but carefully.
- Maximum — the Google documentation recommends 10, which would allow handling up to approximately 350 requests per second. However, a website with traffic of 50 thousand users is unlikely to need such capacity (I understand that this refers to the maximum, but it is still excessive). If the number of visitors is small, 3–4 instances will be sufficient.

- Environment variables — check the documentation to see which variables we need:
The first variable: PREVIEW_SERVER_URL. Its value should be the link from our preview service, which we created first. To get it, go to Services, select the newly created preview service, and copy the link as shown in the screenshot below.

The second variable: CONTAINER_CONFIG. Its value is the same as for the preview service — the Container config from your GTM.
- Create the variables by clicking Create.

Step 3. Configure a subdomain / subdirectory
After both services in Cloud Run are created and configured, we move on to the next stage — connecting the subdomain. Through it, our server-side container will receive requests from the website.
To do this, you need to:
- Create a Load Balancer that will receive HTTPS requests and forward them to Cloud Run.
- Add a DNS record so that the subdomain points to the created IP address.
Below, I review the option of configuring the server-side tag manager on a subdomain, and for this implementation you will need to configure a Load Balancer in the Google Cloud Platform infrastructure. If you want to configure server-side GTM via a subdirectory (for example, site.com/metrics) (which is actually a more complex but Google-recommended implementation for most cases), you do not need to create a Load Balancer (most likely, you already have one).
You will need to configure routing on the server side from your main domain to the URL of your main server service that you created in step 2 (you can find it in Google Cloud → Cloud Run → Services by selecting the corresponding service (the URL field at the top of the page)).
3.1 Create a Load Balancer
Our next steps are:
- obtain a static IP address;
- connect a custom subdomain;
- configure HTTPS with a managed certificate;
- start consistently forwarding requests to Cloud Run.
This is exactly what the Load Balancer is used for.
Cloud Run has a simplified Domain Mapping mechanism that allows you to directly map a domain to a service without a Load Balancer. However, this approach has limitations (at least while it remains in beta) and is not recommended for stable use even in Google’s documentation. That is why in this guide we use the classic architecture with an External Application Load Balancer — this is the Google-recommended approach for production environments.
We will also follow the documentation for configuration. Go to the link and click Go to load balancing.

- Make sure the correct project is selected — the same one where the Cloud Run services are deployed. Then click Create Load Balancer.

2. In the Type of load balancer section, leave Application Load Balancer selected.
Network Load Balancer is a lower-level mechanism (TCP/UDP) used for other scenarios. It is not needed for server-side GTM.

3. In the next step, select Public Facing, since it must receive requests from users’ websites — that is, from the internet. Internal is suitable only if the service is used exclusively inside a VPC.

4. Next, select Best for global workloads. In the regional configuration (Best for regional workloads), Google-managed SSL certificates are not supported. This means you would have to create the certificate manually and renew it yourself later. This approach complicates the configuration.

5. Next — Global external Application Load Balancer.

6. Finish by clicking Configure.

Now we see another block of frontend settings for our load balancer.
Frontend is the entry point of your service. This is where it is defined how requests from the internet enter the system: which protocol is used, which IP address will be assigned to the balancer, which port will accept traffic, and which SSL certificate will provide the HTTPS connection.
We start by:
- giving it a name, for example, ssgtm-lb;
- giving a name for Frontend IP and port, for example, ssgtm-frontend;
- and changing Protocol to HTTPS (includes HTTP/2 and HTTP/3).

4. Next, we need to create a new IP address.

Let’s name it ssgtmip.

5. Now we create a certificate.

In the certificate settings, we:
- Give it a name.
- Select Create Google-managed certificate.
- Enter the domain you want to use for server-side GTM. For example,
sg.proanalytics.academy - Click Create.

6. Click Done and move to the Backend Configuration section. Backend defines where exactly the Load Balancer will forward the requests.

7. In the Backend Services & backend buckets field, click Create a backend service.

8. In the settings, select:
- The service name.
- The type Serverless network endpoint group.
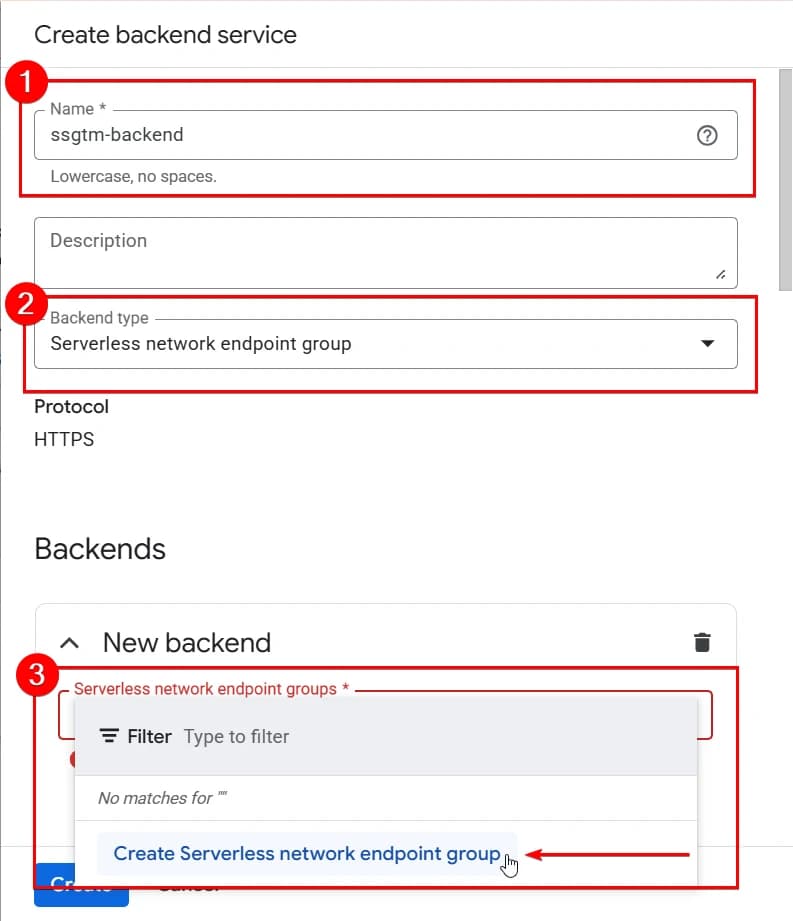
Next, configure the group:
- Give it a name, for example, ssgtm-neg.
- Select the same region that was used when configuring the service.
- Choose Cloud Run as the group type.
- And specify your main service (NOT the preview one).
- Click Create.

Then uncheck Enable Cloud CDN and click Create.
Cloud CDN is a caching mechanism used to accelerate the delivery of static content — for example, images, files, or frequently requested pages. CDN stores copies of content closer to users and reduces the load on the main service.
In the case of Server-Side GTM, we do not work with static content and do not serve cached resources. The container processes requests and forwards events, rather than distributing files. Therefore, using CDN here provides no practical benefit and can often even cause issues.
In addition, Cloud CDN is a paid option, so leaving it enabled without a real need means creating unnecessary costs. That is why in this scenario we uncheck Enable Cloud CDN.

9. Click Create.

3.2 Add a DNS record
While the Load Balancer is being created, move to your domain settings.
Open your domain or hosting control panel and go to the DNS section. Create a new record:

Add an A record:
- Type — A
- Name — subdomain (for example, sg)
- Value — the IP address created for the Load Balancer.
- And click Add.
We create an A record specifically because we are linking the subdomain directly to the IPv4 address assigned to the Load Balancer.
In some cases, when configuring server-side GTM (not the scenario we are reviewing here), you may work with IPv6. In that case, you would need to create an AAAA record.

To find the IP address, go back to the Load Balancer, open the Frontends tab, and copy the address. The address is displayed in the format ip:port, so copy everything up to the “:”.

After adding the record, you need to wait for DNS propagation.
Step 4. Verify that everything works
Go back to the Load Balancer. Open it and check the certificate status.

At first, it will have the status Provisioning. You need to wait until the status changes to Active. This may take up to 30 minutes. Here, you simply need to wait.

When the status changes to Active, we can check our URL via the health check endpoint. In the browser, open: https://your-subdomain/healthz. In our case, this is https://sg.proanalytics.academy/healthz

If you receive OK in response, as shown in the screenshot above, it means the server is configured correctly and is ready to work.
In fact, this method only verifies the main server. To check the preview server, you should use https://your-subdomain/preview/healthz. However, we will perform this check in a slightly different way.
Step 5. Add the URL in Google Tag Manager
Once the subdomain is working, the certificate is active, and /healthz returns OK, the final technical step is to inform Google Tag Manager that this specific URL should be used as the server container address.
Go to your server container in Google Tag Manager and open Admin → Edit container → add the subdomain, for example https://sg.proanalytics.academy → Save.

Go to Preview and verify that everything works. If everything is configured correctly, the preview session will open without errors, and if you open your website in another tab, requests will start appearing.

If preview does not connect, it is worth checking:
- whether the SSL certificate is active;
- whether the DNS record was added correctly;
- whether the correct Server Container URL is specified in the GTM settings;
- whether the correct value is set for the
PREVIEW_SERVER_URL variable in the server settings.
How Much Does It Cost and How to Optimize Expenses
The cost here is not a fixed amount — it consists of three components. It is important to understand each of them separately in order to properly estimate the budget.
Number of running containers
The first and main cost component is the number of containers running in Cloud Run. One container costs approximately 45 dollars per month. So if you set a maximum of 4 instances and all 4 are constantly running, the maximum cost for containers will be around 200 dollars per month.
However, it is important to understand that you pay only for the instances that are actually running.
For example, if your minimum is set to 2 instances and most of the time the system runs on these two, the actual amount will be lower than the estimated 200 dollars. Four instances may scale up only during peak load periods, rather than running continuously.
In other words, the maximum number of instances is your upper cost limit, but not a mandatory monthly amount.
That is why, when configuring scaling, it is important to find a balance: set a sufficient minimum for stable operation and a reasonable maximum that will handle peak loads without creating unnecessary expenses.
Traffic in Google Cloud
Traffic in Google Cloud (outbound traffic)
The second cost component is traffic. But there is a very important nuance: not all traffic is counted — only outbound traffic (in Google documentation, the term Egress is used).
Inbound traffic (when a user visits the website and the request goes to your server-side container) is completely free. You are charged only for outbound traffic — that is, what your server returns in response or sends externally.
In other words, you do not pay for how much data “enters” the server, but for the volume of data it generates and sends out in response.
For most mid-sized projects, this is not the largest cost component, but it must be taken into account. The cost depends on which tags are configured and how much data is transmitted externally, so it is difficult to forecast an exact amount. More details on calculation can be found in Google’s documentation.
From our experience, with standard configurations in mid-sized projects, Egress costs average around 40–50 dollars per month, but this figure should be regularly monitored in Google Cloud Billing.
Load Balancer and IP address
In addition to Cloud Run, the use of a Load Balancer is billed separately. It has a base hourly charge (for forwarding rules). More details about pricing can be found in the documentation.
A static IP address is charged only if it is reserved but not used. If the IP is attached to the Load Balancer and actually serves traffic, there is no additional fee specifically for the IP. More details are available in the documentation.
A Google-managed SSL certificate is provided completely free of charge — the system issues it automatically and renews it without any additional cost. The official documentation is available as well.
Log storage
The final cost component is log storage. By default, Cloud Run stores service logs: information about requests, responses, errors, and technical events. This is useful for debugging and monitoring, but it is important to understand that storing these logs is also billed. So even if the containers operate stably, part of the cost may be generated by log accumulation.
However, this is a configurable parameter.
If you do not plan to regularly analyze logs or use them for monitoring, you can:
- fully disable log storage (see the documentation for details);
- or reduce the retention period.
This way, you can reduce expenses without affecting the operation of the server-side container itself.
This way, you can reduce expenses without affecting the operation of the server-side container itself.
More details about pricing can be found in the documentation.
Instead of a conclusion
As a result of the setup, you get a full-fledged server infrastructure that operates through your subdomain, has managed scaling, and a transparent cost structure. The foundation is ready — now you need to at least complete the following steps:
- decide which events to send and to which systems;
- configure first-party loading of Google scripts;
- set up data transmission to server-side GTM;
- configure the GA4 client to receive data;
- configure proper data transmission to Google Analytics 4;
- configure proper data transmission to advertising platforms, such as Meta and Google Ads.
If you want to implement Server-Side GTM systematically and without technical risks in your projects, submit a request by filling out the form.
Comments
Share your thoughts and ask a question
Loading comments...