

Maks Hapchuk
Web analyst, marketer, founder of ProAnalytics Team and PROANALYTICS.ACADEMY, author of the AnalyticsTipsStep-by-step guide: How to Set Up Automatic Import of Advertising Costs into Google Analytics 4 using Facebook Ads as an example
Once upon a time, Universal Analytics had one very popular feature: importing cost data from various advertising accounts into Google Analytics. Many services offered their own solutions, and there were many custom solutions on the Internet (I described my version in R on my blog, but I won't link it, as it is no longer relevant). With the advent of Google Analytics 4, I see that the popularity of the function has dropped significantly: either everyone started working with BigQuery and forgot about the GA4 interface, or everyone is simply afraid of the dreaded SFTP letters through which the GA4 team proposes to automate this process.
If you're like me and love working with BigQuery, I understand, and I understand why you might not even know about the data import function in GA4. Usually, we want to upload everything to BigQuery and do everything we need there without the limitations of the interface. But sometimes there are advantages of the opposite way, which I will discuss below.
If you've been wanting to set up such an import for a long time, but didn't know how to approach SFTP, then this article is definitely for you.
In any case, I think we can all agree that running around different ad accounts and GA4 to analyze marketing activities is very tiring for a marketer, and therefore this process definitely needs to be automated. This is what we will talk about next:
- Why it's important to automate the import of non-Google ad spend Google Analytics 4
- General overview of the process of importing data into GA4
- Prepare data for import
- Detailed overview of manual import settings
- Step-by-step instructions for setting up automatic import of expenses to GA4
- General overview of the process
- Step-by-step guide to setting up automatic import based on Google Cloud Platform
- Set up OpenSSH
- Create a separate user for SFTP
- Set up the folder where the desired file will be stored
- Update SSH configurations to set up a restricted SFTP connection
- Set up data transfer from BigQuery to the server
- Setting up a data source in GA4 and adding an SSH key to the server
- How to add an SSH key to the server?
- Set up access rights to keys
- Instead of conclusion
If you are only interested in a step-by-step guide for automating the process, you only need to read the following two points:
Why it's important to automate the import of non-Google ad spend Google Analytics 4
I've already written a little about this above, but here's a full list of reasons:
- Saving time. I think everything is clear here: a marketer doesn't need to run around to different advertising offices and waste time on it. And it's not like delegation, when a PPC specialist prepares daily reports instead of a marketer. The system will do everything for you.
- Familiar interface. Marketers don't need to study the Facebook or LinkedIn advertising account to find out where to look for the necessary cost indicators. Everything is available in the familiar GA4 interface.
- Metrics that everyone trusts. I think everyone who works in online marketing has at least once faced a situation when the indicators in the advertising account do not match the data in GA4. We will not dwell here on the logical reasons for this difference: different attribution models, the issue of user identification on different platforms, etc. I would like to draw attention to another thing: most specialists trust GA4 data on the number of conversions. Not that it's very correct, but it's a fact. Facebook even integrates with GA4 because of this. The conclusion is that marketers want to see cost data in GA4 because they want to calculate ROAS based on GA4 data, not on ad account data.
- The ability to quickly visualize the data available in GA4. And here I'm not just talking about working in the GA4 interface. As much as I love working with BigQuery and Power BI, the reality is that most marketers don't work with these tools. Marketers love Looker Studio. But adding Facebook data to a Looker Studio report can be a challenge. But pulling data into a report that is already in GA4 is a matter of just a few clicks.
Certainly, visualizing data directly from GA4 in Looker Studio is not the best practice, but I understand why marketers might do this, especially for small and medium-sized businesses. I could also elaborate on the advantages of working with BigQuery for marketers here, but that's not the focus of this article, and there was already an article on this topic earlier. There is even a separate course on working with data in BigQuery— BigQuery for Marketing.
To summarize, marketers often need to have data on advertising costs from all advertising accounts in GA4.
General overview of the process of importing data into GA4
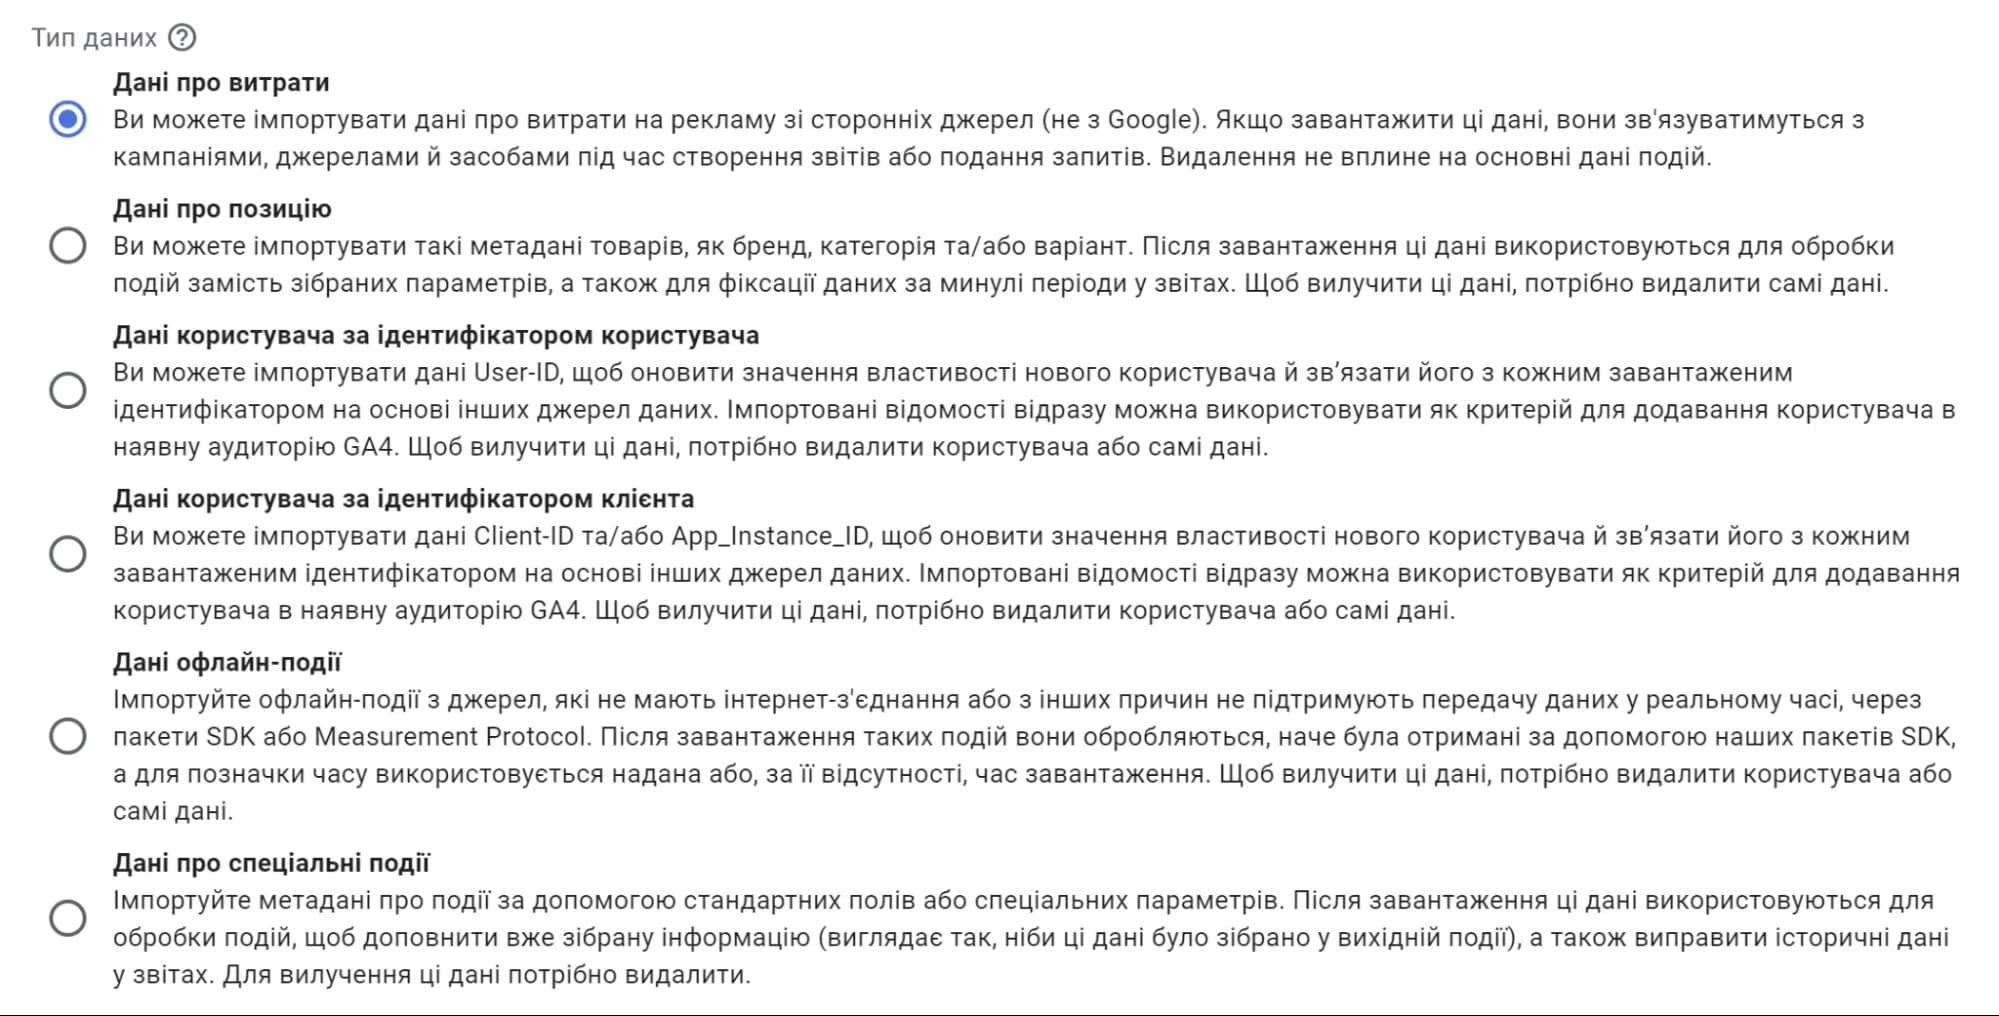
In this article, I focused solely on the import of cost data. This is quite a broad topic, and discussing other types of imports in detail could transform the article into a full-fledged book. However, in GA4, you can import a lot more information. Of course, loading different types of data has its nuances, but the general process will be similar. Here’s a complete list of data types you can import:
- Cost Data: Click, spend, and impression data from third-party advertising platforms (i.e., non-Google advertising platforms). This is the focus of our discussion here.
- Item Data: Despite the presence of a Ukrainian translation, sometimes you might wonder, “Why this?” As the English version of the interface suggests, this allows you to import product metadata such as size, color, style, or other product attributes. Why do this if you have Ecommerce settings? For example, you might have technical difficulties transmitting detailed information during user actions on the site.
- User Data: Information about the user, such as loyalty ratings or LTV. This is used to create segments and remarketing lists. There are two options for import:
- User Data by User ID: Using User ID.
- User Data by Client ID: Using Client-ID and/or App_Instance_ID.
- Offline Events: Allows you to send information about offline events from sources without internet access or that do not support real-time event collection.
- Custom Event Data: Import metadata about events via standard fields and/or custom dimensions.
The overall import process can be described in the following stages:
- Choose the type of data you want to upload to GA4. In our case, it will be Cost data.
- Select the import method. If your CRM is not Salesforce, there are only two options:

If you are interested in a specific option rather than all possible ones, just click on the desired option.
3. Prepare the data for import.
4. Set up the data import into Google Analytics 4. (manual or automatic)
Prepare data for import
Regardless of whether you want to upload your data manually or automatically, you'll need to prepare it in the same format. Why is that? Because in any case, GA4 expects you to provide a CSV file. In the case of manual uploading, you'll also upload it to GA4, while in the case of SFTP configuration, GA4 will automatically retrieve it from your server.
You can download the official file template by clicking here. Please note that the download will start immediately.
You can also see an example in the screenshot below:

Parameters (note that all parameters, except for campaign_name, are mandatory. However, I highly recommend including campaign_name as well – analyzing campaign effectiveness by ID alone is, to put it mildly, not very convenient):
campaign_id: corresponds to the UTM parameterutm_id. Yes, you read that right. You don't often come acrossutm_idin standard UTM tagging rules. But this parameter is essential for importing cost data into GA4.campaign_name: corresponds to the UTM parameterutm_campaign.source: corresponds to the UTM parameterutm_source.medium: corresponds to the UTM parameterutm_medium.date: the date for which you're uploading the data.
Metrics (technically, each metric is optional, but you're likely to want to transmit all of them):
impressions: the number of impressions for the ad campaign on the specified date, represented as an integer.clicks: the number of clicks for the ad campaign on the specified date, represented as an integer.cost: the total amount spent on the ad campaign for the specified date, in the format0,000.00. Note that the decimal separator is a period (.).
In short, to successfully import your data, you'll first need to tag your advertising activities with the necessary parameters and then set up the import itself.
Below is an example of tagging for Facebook. The main idea is that you need to include the required values from the ad platform in the UTM parameters of your URL.
Typically, you'll need to go to the ad level and append the appropriate UTM attributes to the final URL used in the ad. In Facebook, this can be done here:
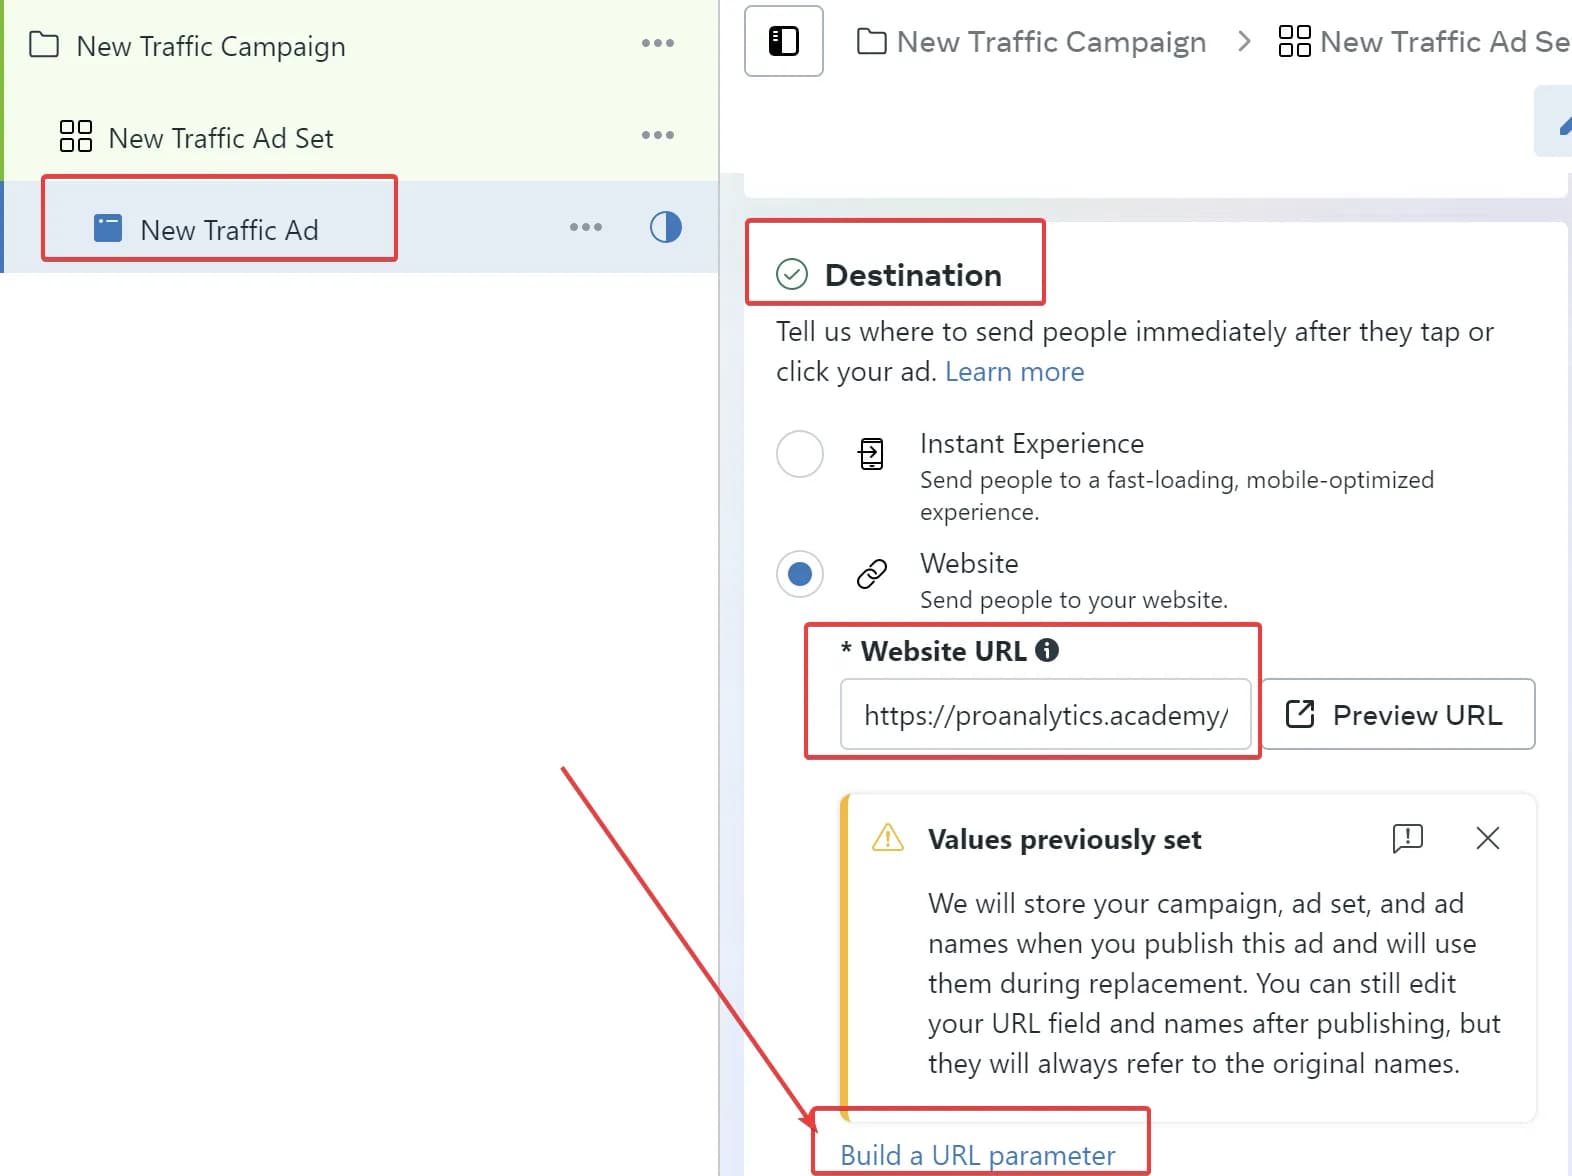
- If you want to manually enter values, input them into the "Website URL" field. In this case, to minimize the risk of errors, I recommend using the Campaign URL Builder.
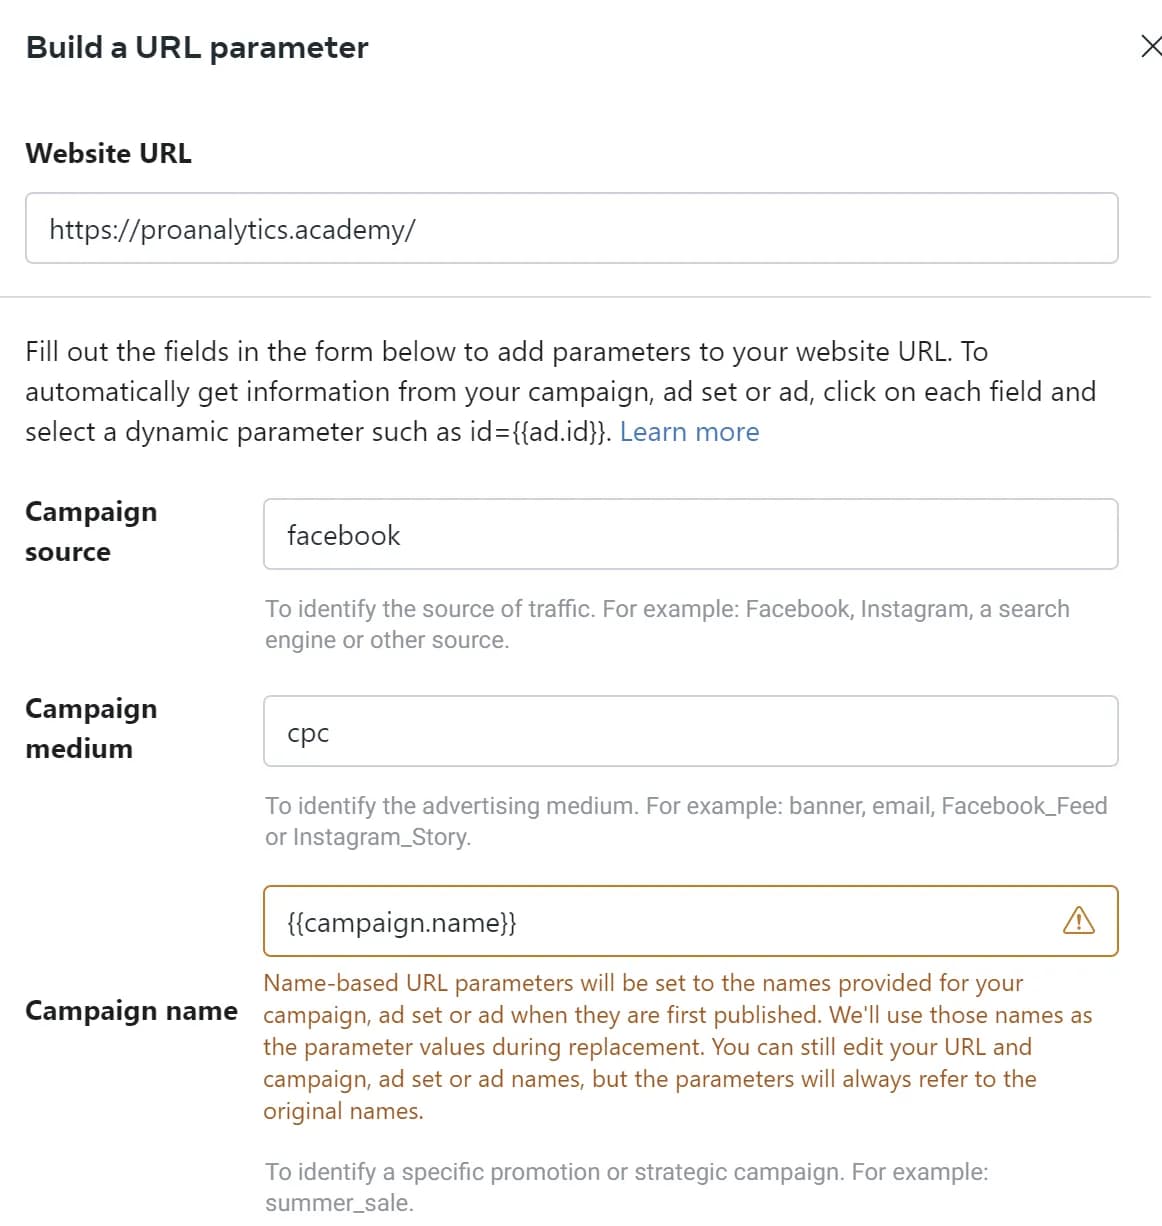
- However, if you'd like to use auto-substitution, use the Build a URL parameter option and configure it according to the settings from the following screenshots:
Standard Parameter Settings:
- Setting up the custom parameter
utm_id
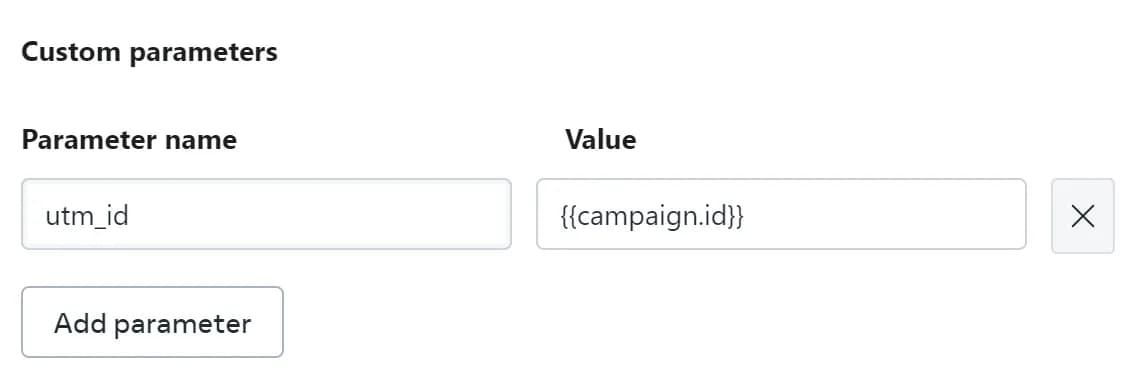
The final URL when using auto-parameter settings should look like this:
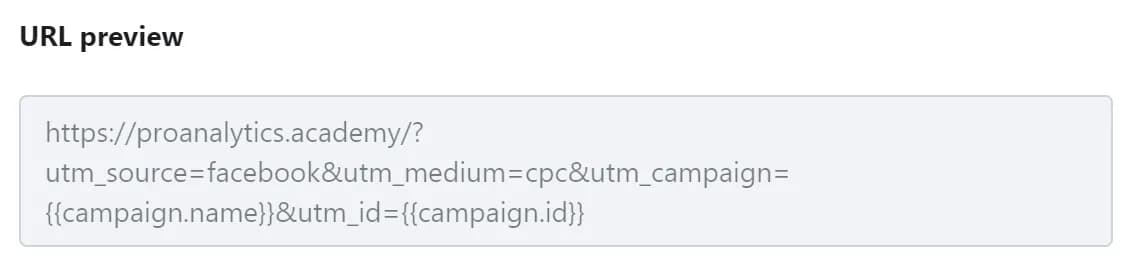
Note that when using the substitution parameter {{campaign.name}}, Facebook will use the campaign name that was in place at the time of the first publication. This will be explicitly stated. This means that auto-substitution will only work correctly for our purposes if campaign names have never changed and will not change. Otherwise, you will encounter issues with the import.
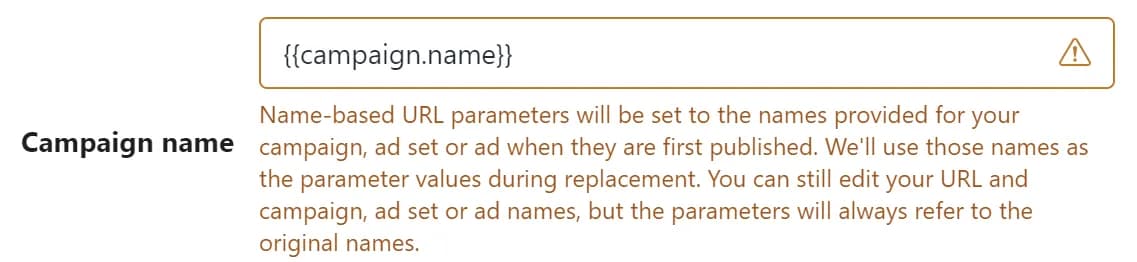
I hope you always follow best practices and never change your campaign names.

Note that setting up cost data import is only meaningful for advertising campaigns that drive traffic to your website. For campaigns focused on messaging in Facebook, Instagram, or other Meta platform activities, it is not useful to pass cost data to GA4, as GA4 does not track such conversions and you will not see ROAS there.
In addition to tagging within the advertising account, you will also need to export data from the advertising account in CSV format. As you understand, there are two options here:
Below, we will discuss both options.
Manual upload from the advertising account
In general, Google has prepared quite good instructions on how to prepare the necessary file in popular advertising systems, but I will demonstrate the process using Facebook as an example below.
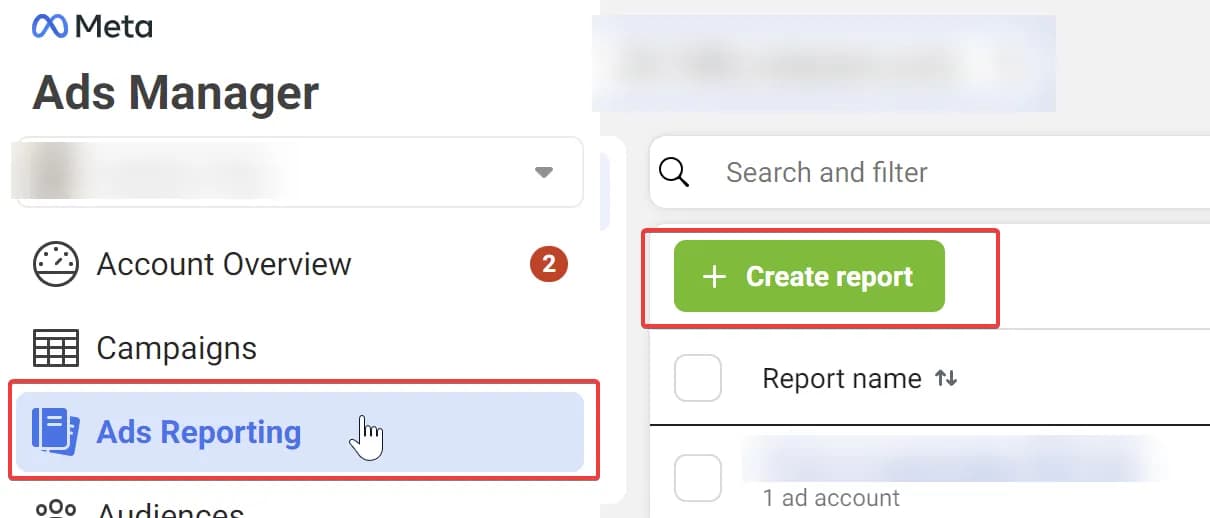
- Go to the Ads Reporting section in the advertising account and click on Create report.
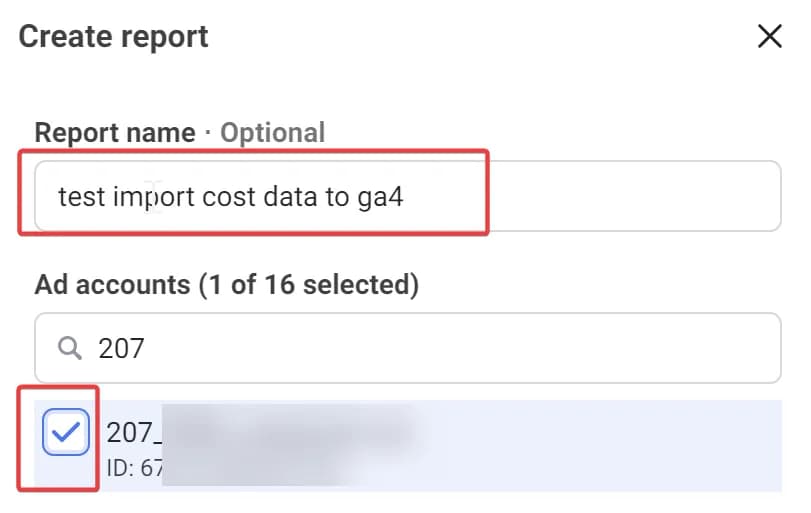
2. Specify the desired report name and select the relevant account.
3. On the right, select the desired metrics and parameters. Your final setup should look like the screenshot.
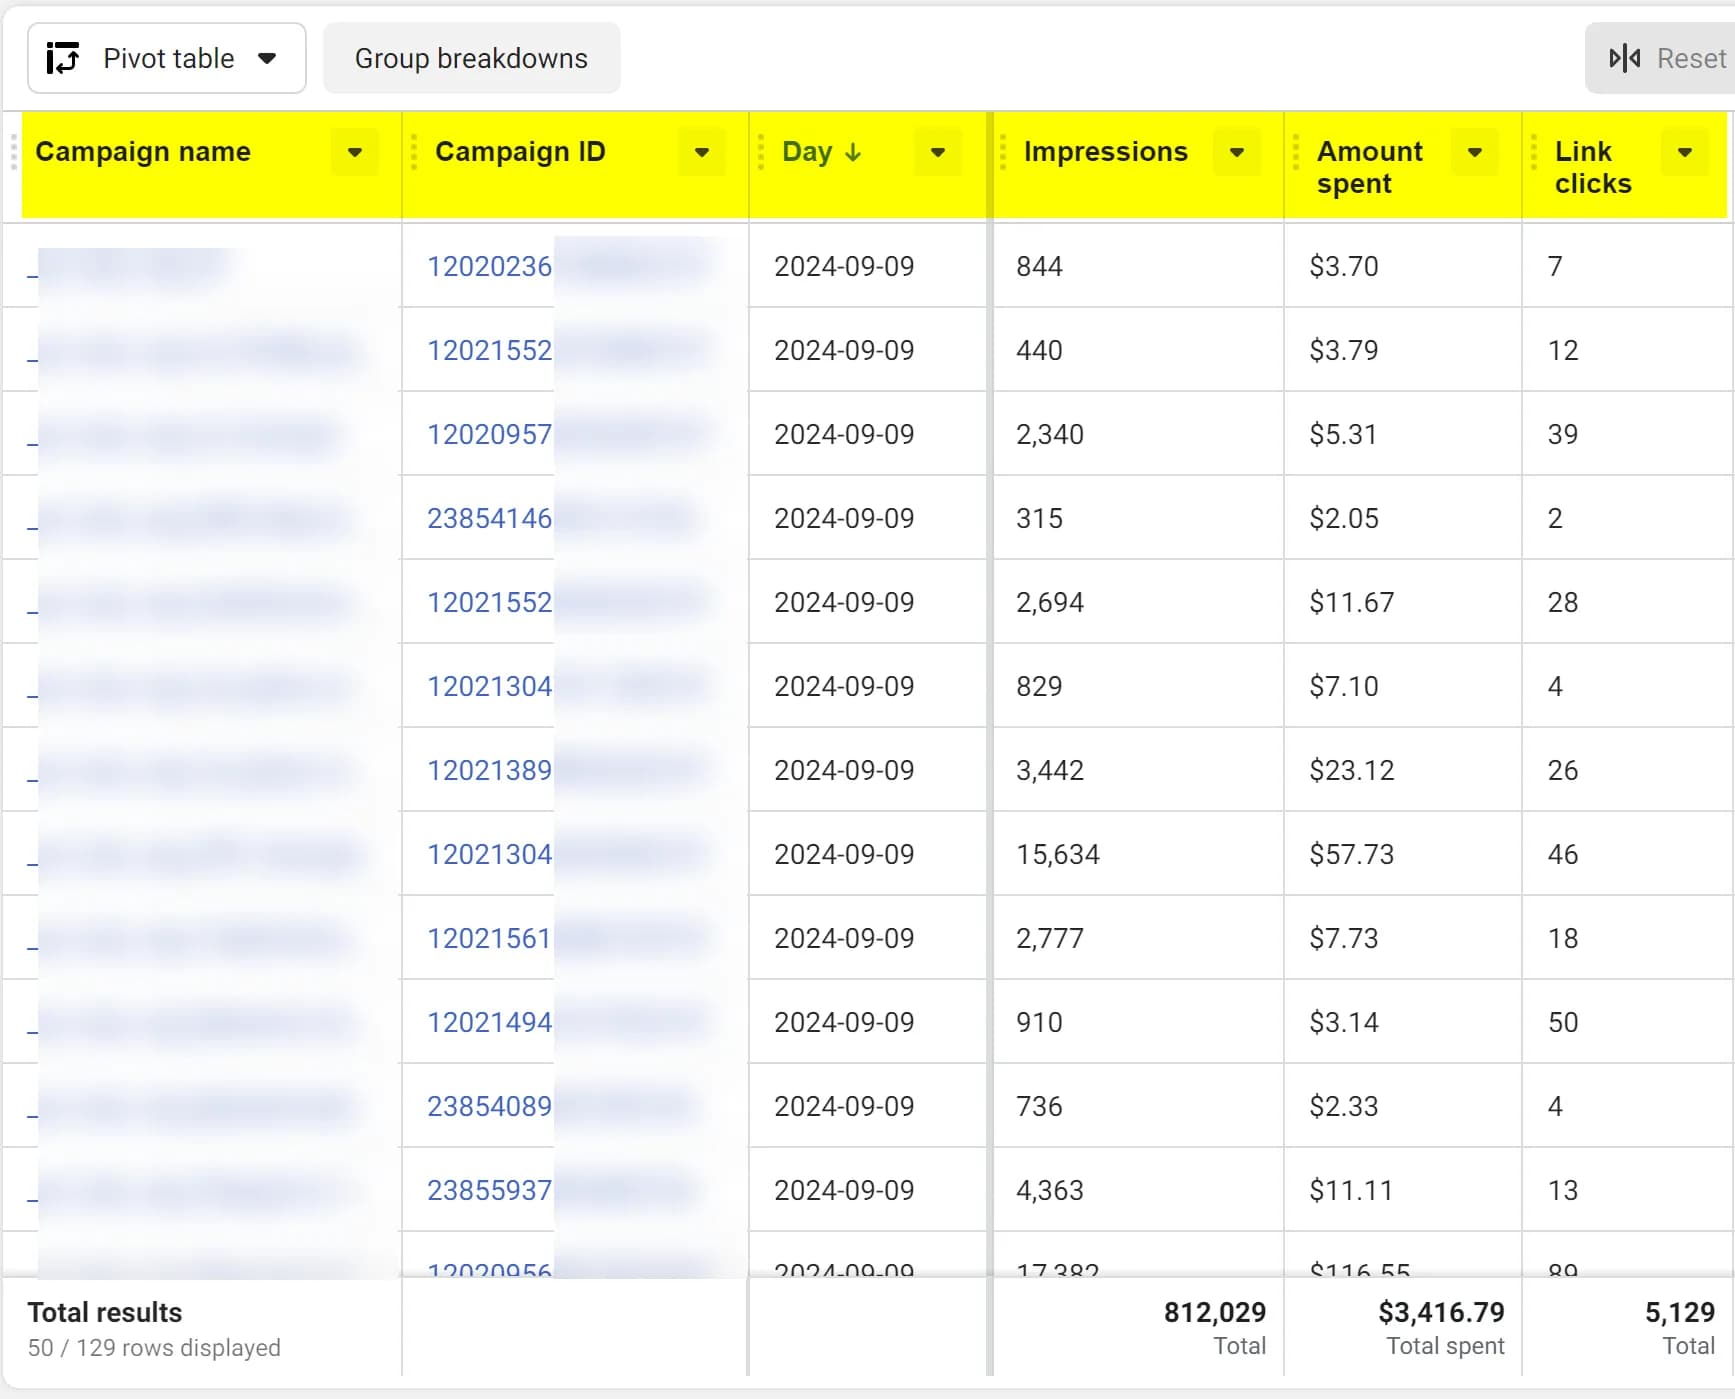
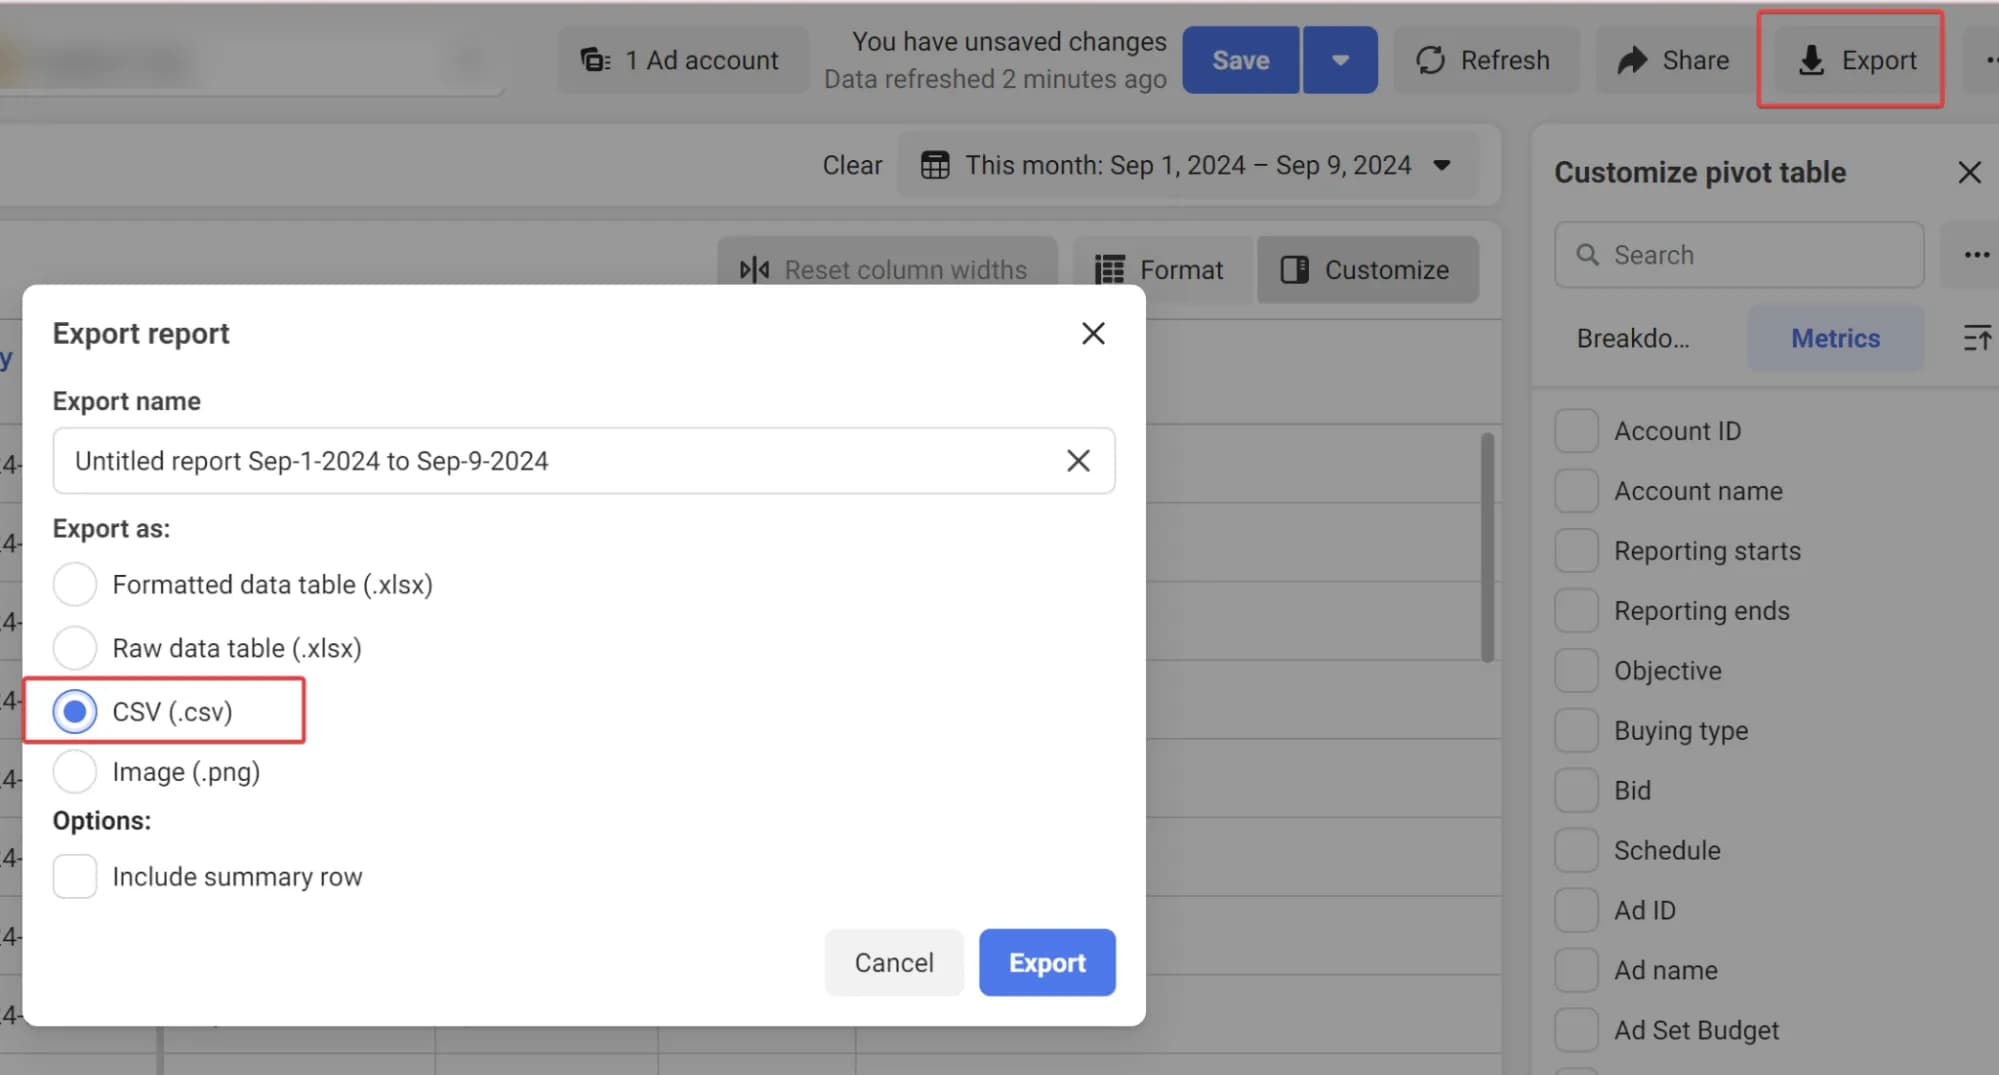
4. Now export the data to a CSV file.
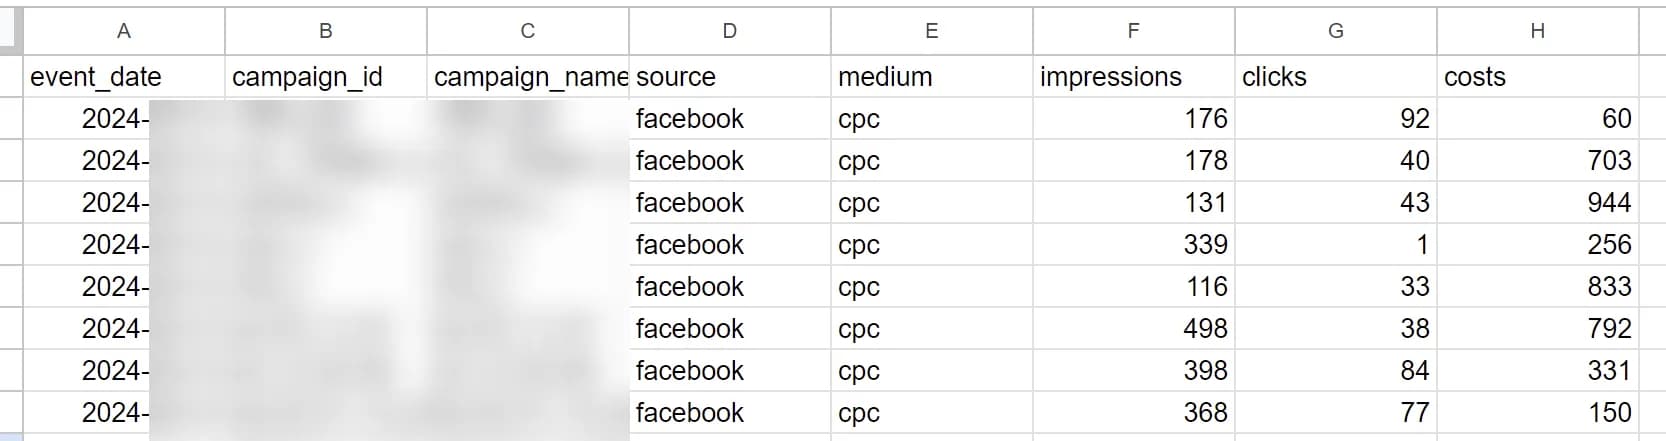
5. Now, open the file, change the column names to the ones we need, and add two new columns: source and medium with the values facebook and cpc, respectively. The resulting CSV file should look approximately like this:
If you want to manually upload the obtained data to GA4, proceed to the section Detailed overview of manual inport setup. If you wish to learn how to automate the data retrieval process, continue reading.
Automatic uploading via API
Of course, doing such routine work manually is not optimal. Therefore, the best solution is to automate it. Since I am aiming to write a step-by-step manual that can be followed by even non-technical specialists, I will use the standard export from Facebook's advertising dashboard to BigQuery, which I have already discussed earlier. If, for some reason, this option does not suit you, you can find many other ways to set up data import from Facebook into a file or database online.
If you use the export method mentioned above, you can obtain the required data using the following query:
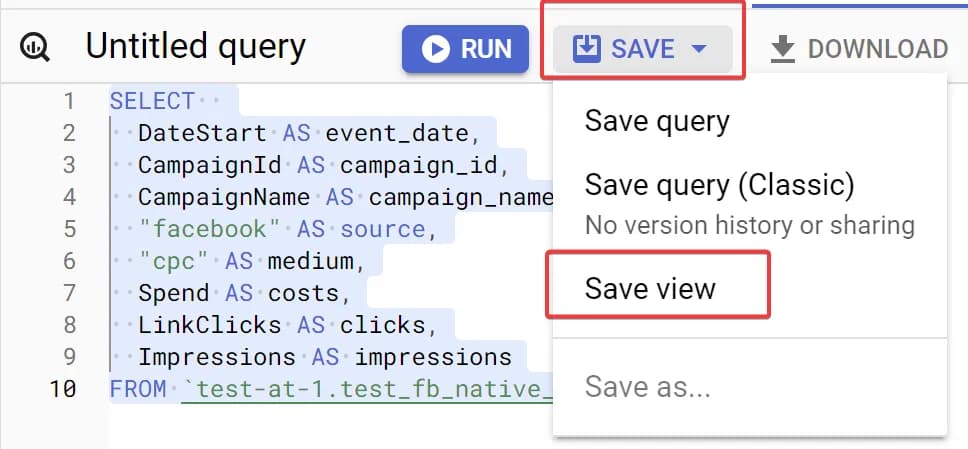
SELECT
  DateStart AS event_date,
  CampaignId AS campaign_id,
  CampaignName AS campaign_name,
  "facebook" AS source,
  "cpc" AS medium,
  Spend AS costs,
  LinkClicks AS clicks,
  Impressions AS impressions
FROM ENTER_YOUR_DATASET_NAME_HERE.AdInsights
In this SQL query, you will only need to replace the value ENTER_YOUR_DATASET_NAME_HERE with your own. You will obtain this value during the transfer setup stage.
You may notice that in the query I use LinkClicks rather than just Clicks, as not all clicks counted by Facebook lead to the website. In GA4, I believe it makes sense to analyze only those clicks that direct to the site. If you have a different opinion, you can replace the metric name in the query.
To obtain the required data for manual upload, use the option to save the result as a CSV file, as shown in the screenshot.
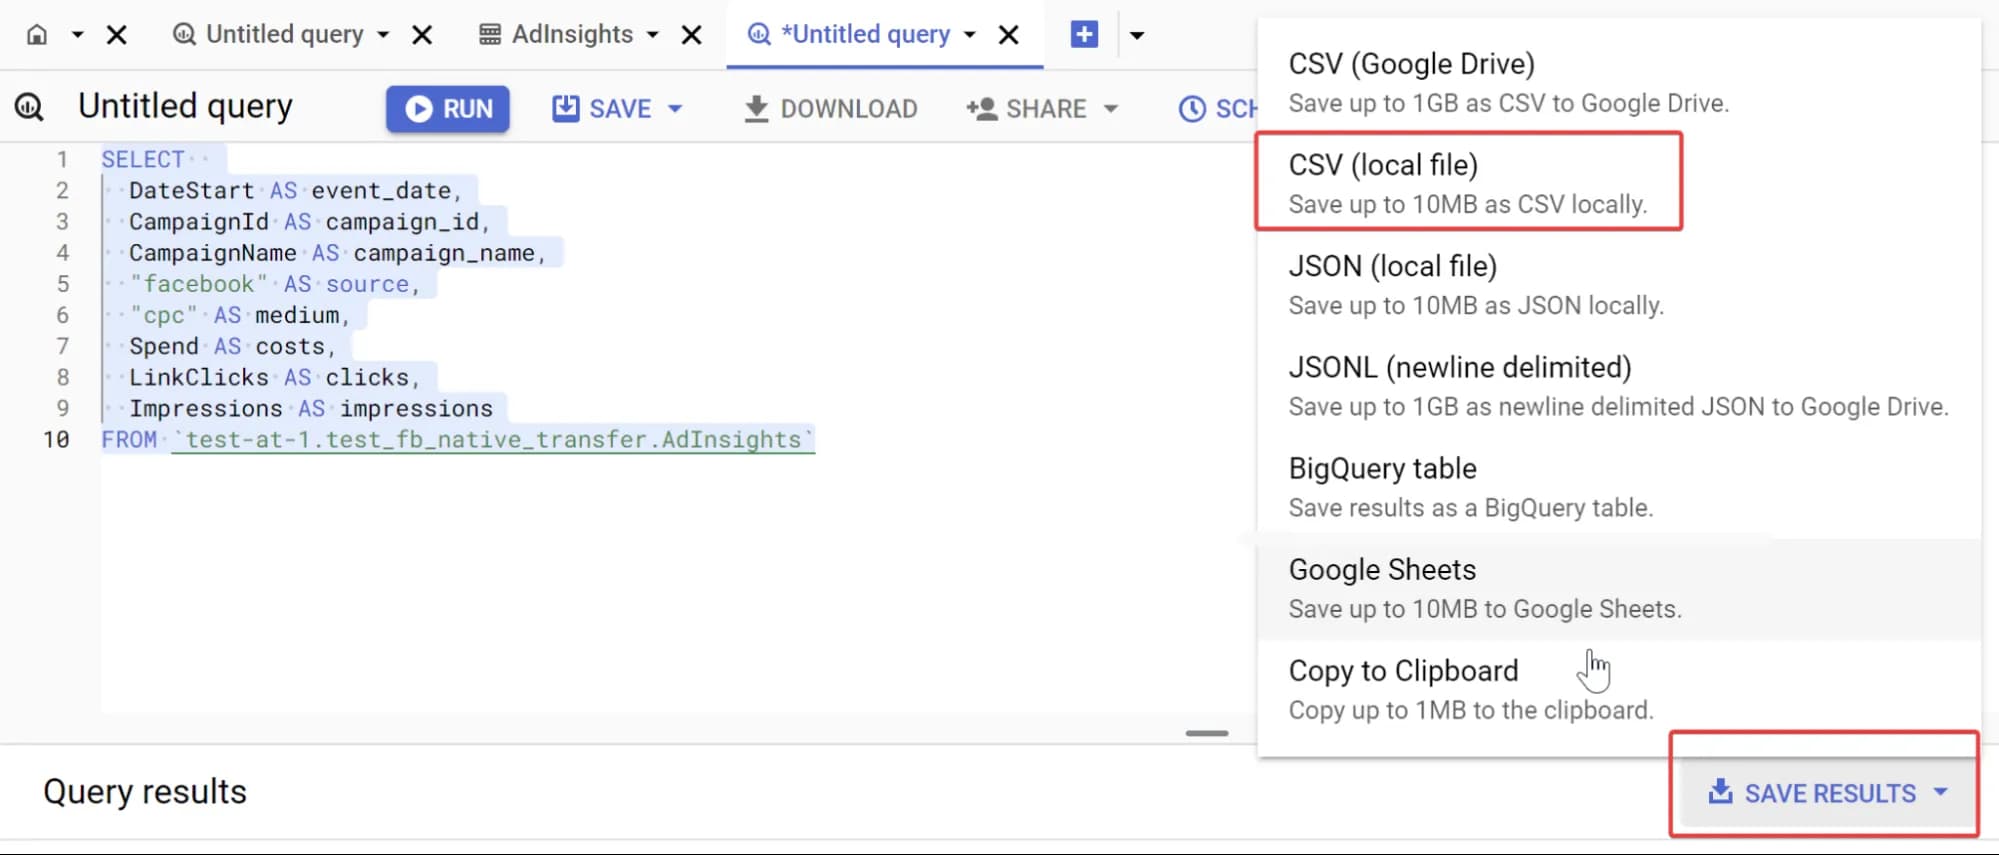
If you want to use this data for automatic export, save the query as a View.
You will likely also need to set a date filter to avoid continuously loading all data into GA4. You can do this by adding the following line at the end of your SQL query:
WHERE TIMESTAMP_TRUNC(_PARTITIONTIME, DAY) = TIMESTAMP(CURRENT_DATE() - 1)where TIMESTAMP(CURRENT_DATE() - 1) corresponds to yesterday. Adjust it as needed.
Well, now you have everything you need, and all that remains is to upload the required data to GA4.
Detailed overview of manual import settings
Now that you have the file with the required data, it’s time to work with GA4.
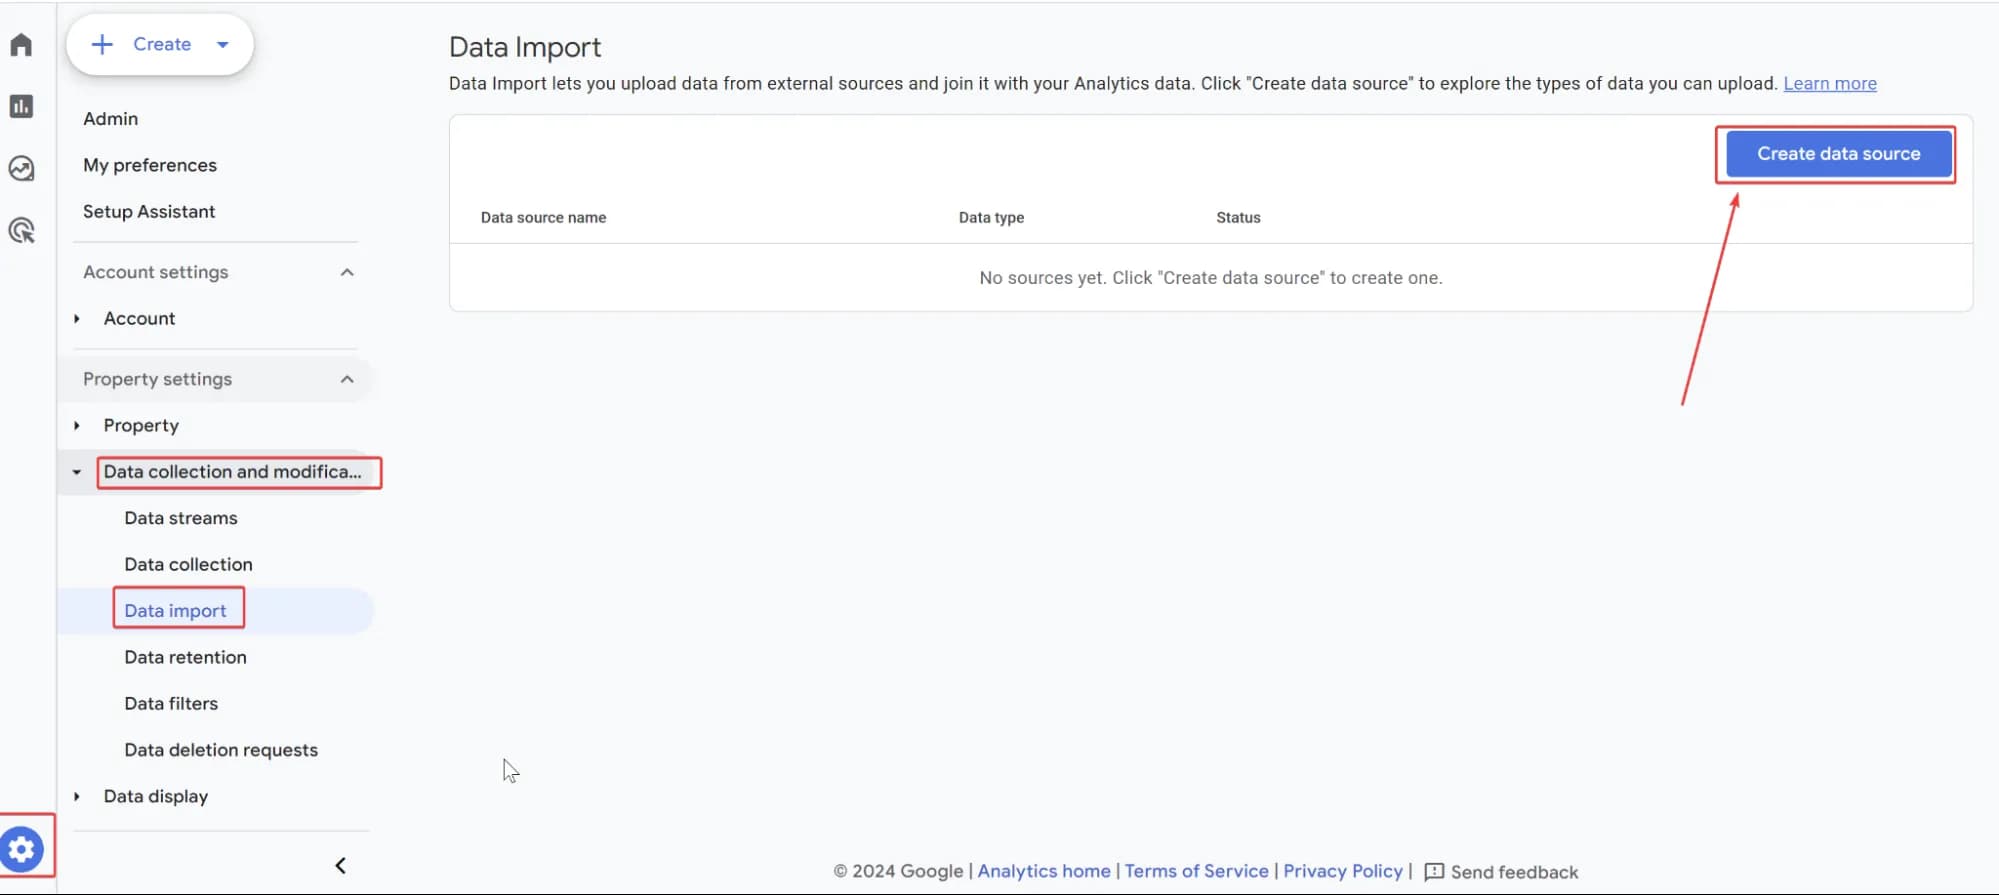
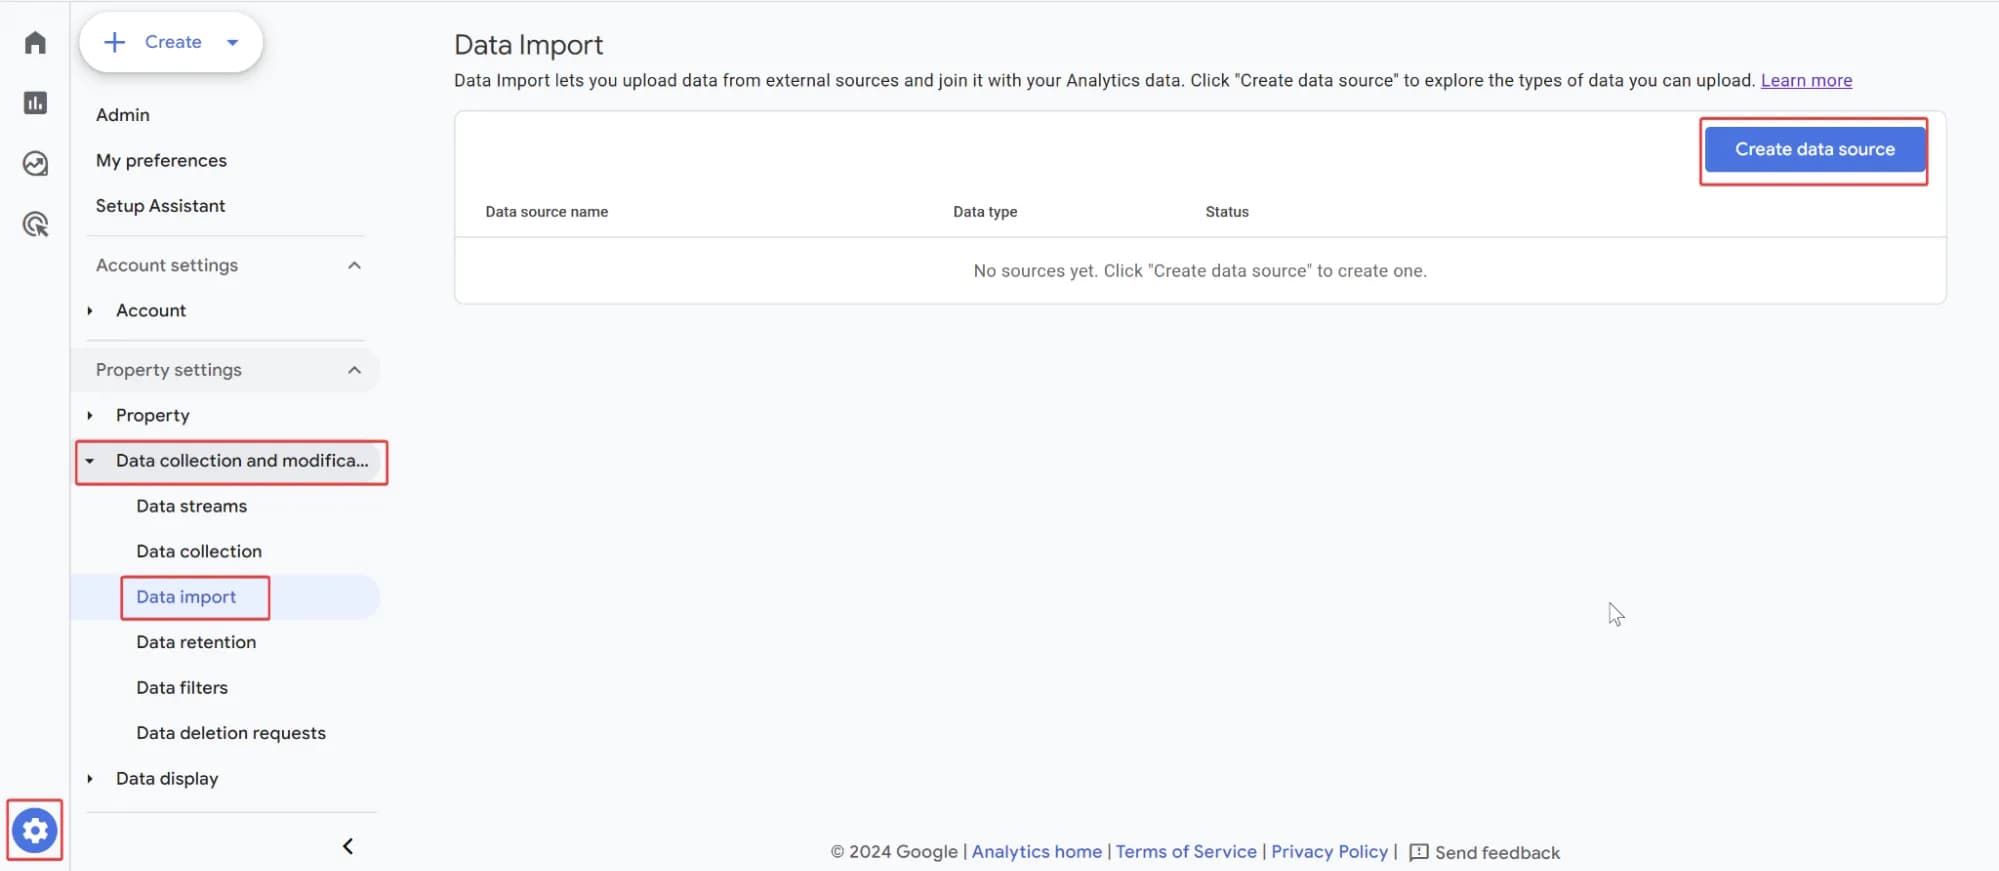
- Go to the Admin section and navigate to Data Import settings. Then click on Create data source.
2. In the window that appears, enter the name of the data source and select Cost Data as the type.
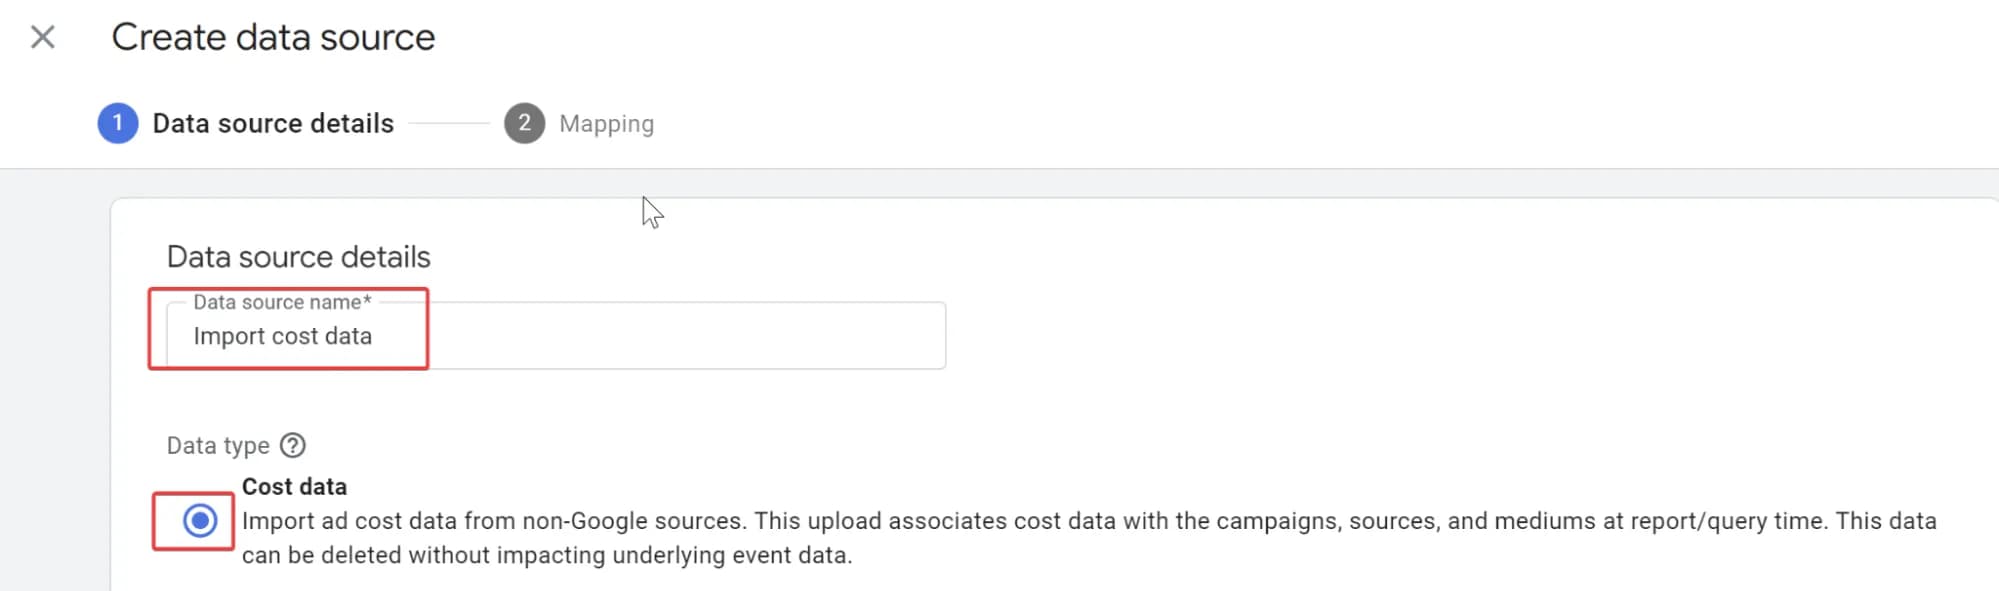
Note that you will have only one dataset for configuring cost data import, so it doesn’t make sense to name it with a reference to the advertising account, such as Facebook data import. It’s better to give it a general name.
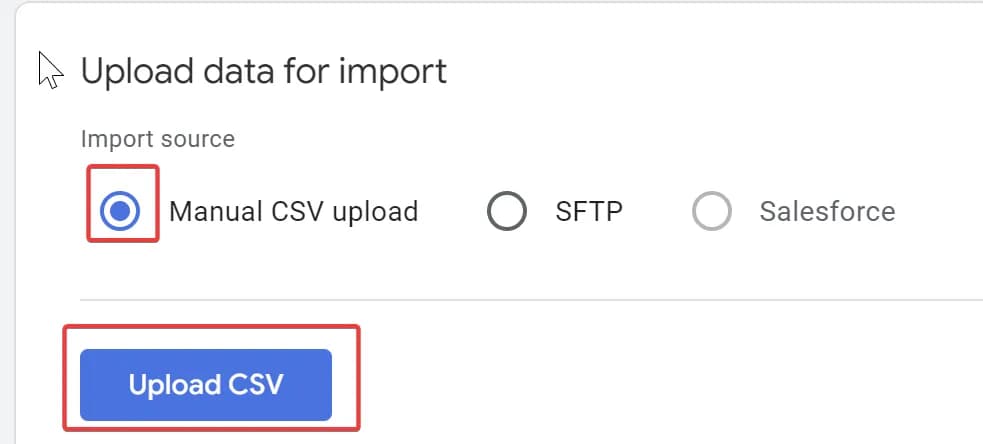
3. In the Upload data for import section, select Manual CSV upload and click Upload CSV. Locate the desired file on your PC and click the Next button in the top right corner.
4. In the Mapping step, you need to match the columns in the file with the import schema. It's quite straightforward, but if you encounter difficulties, refer to the screenshot below. After mapping the schema, make sure to click the Import button.
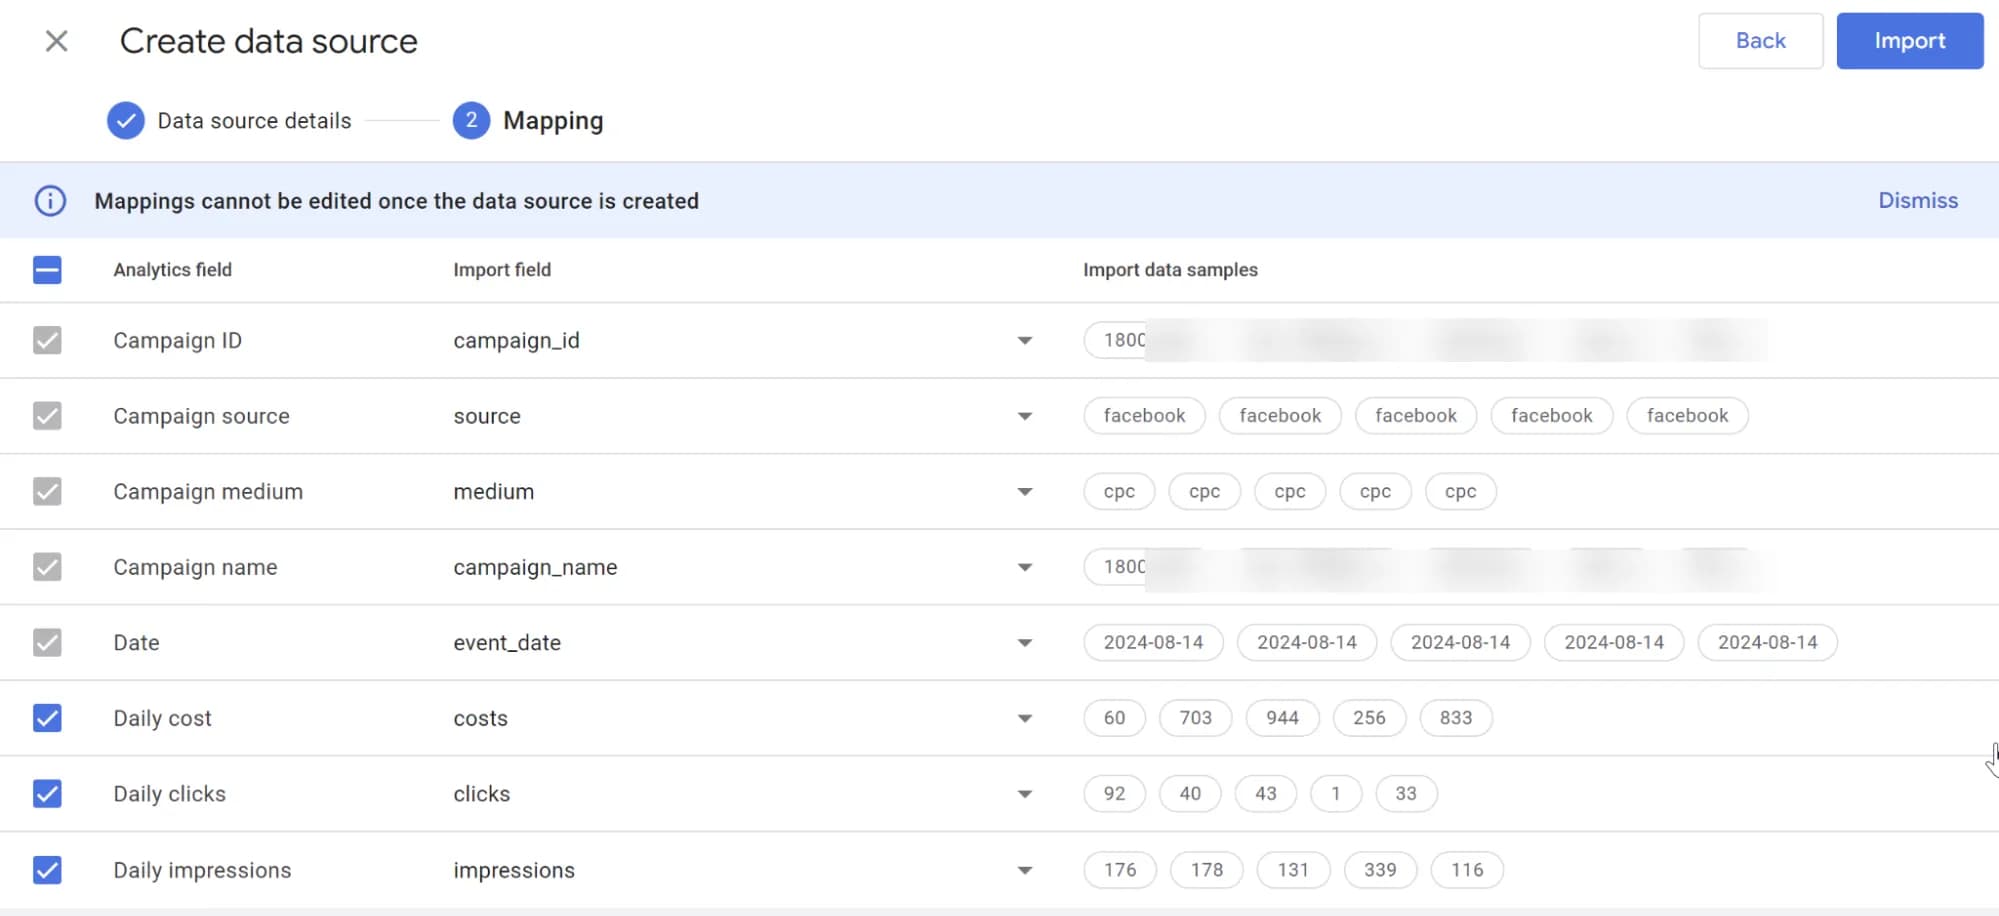
5. If everything has been done correctly, within a few minutes, by opening the import settings, you will see that the data has been imported:

The result of importing cost data to Google Analytics 4
And after a while, you will receive a new report in GA4, under the Acquisition topicю
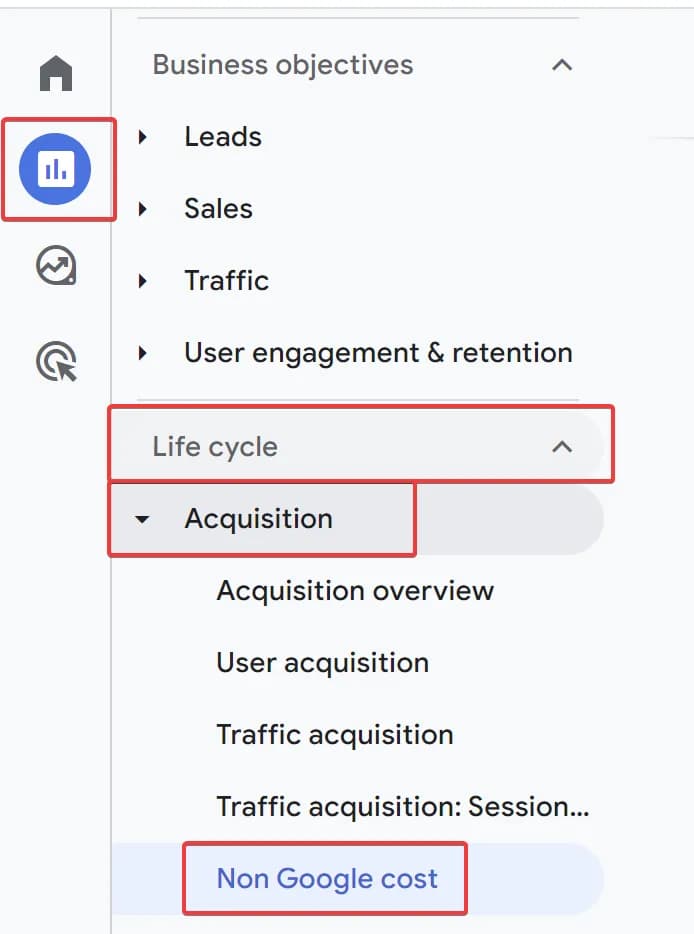
You will be able to see the actual uploaded data there, as shown in the screenshot below:
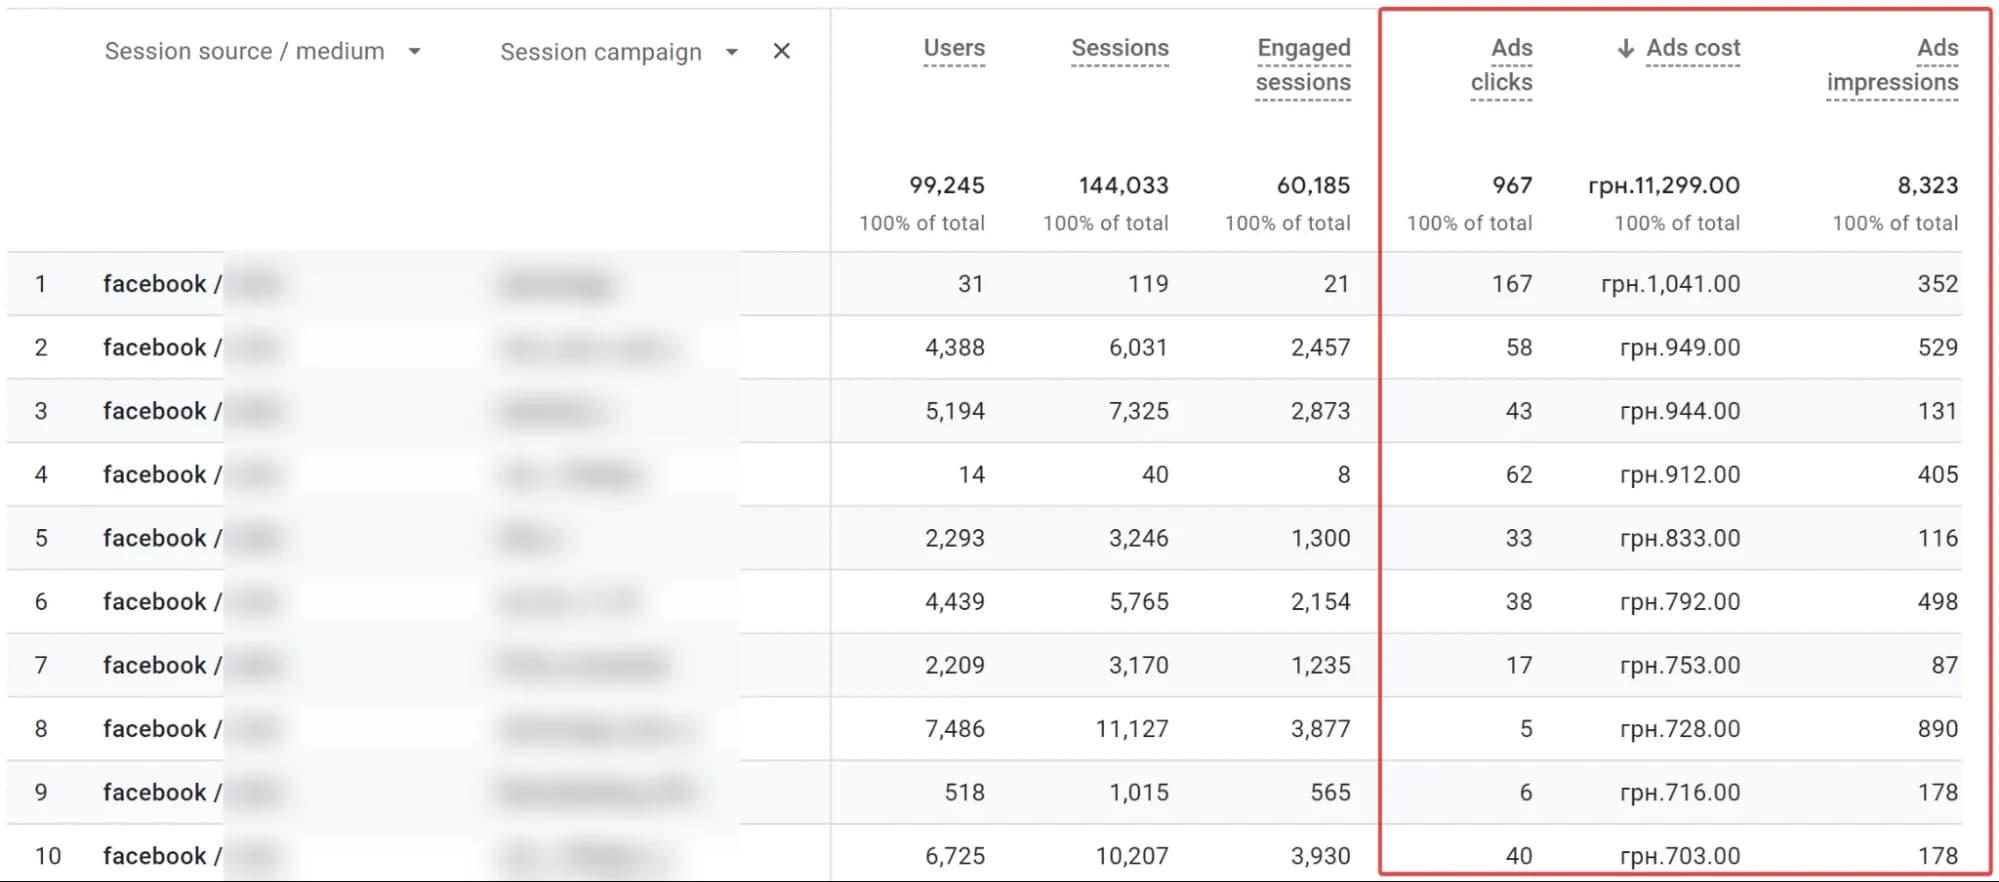
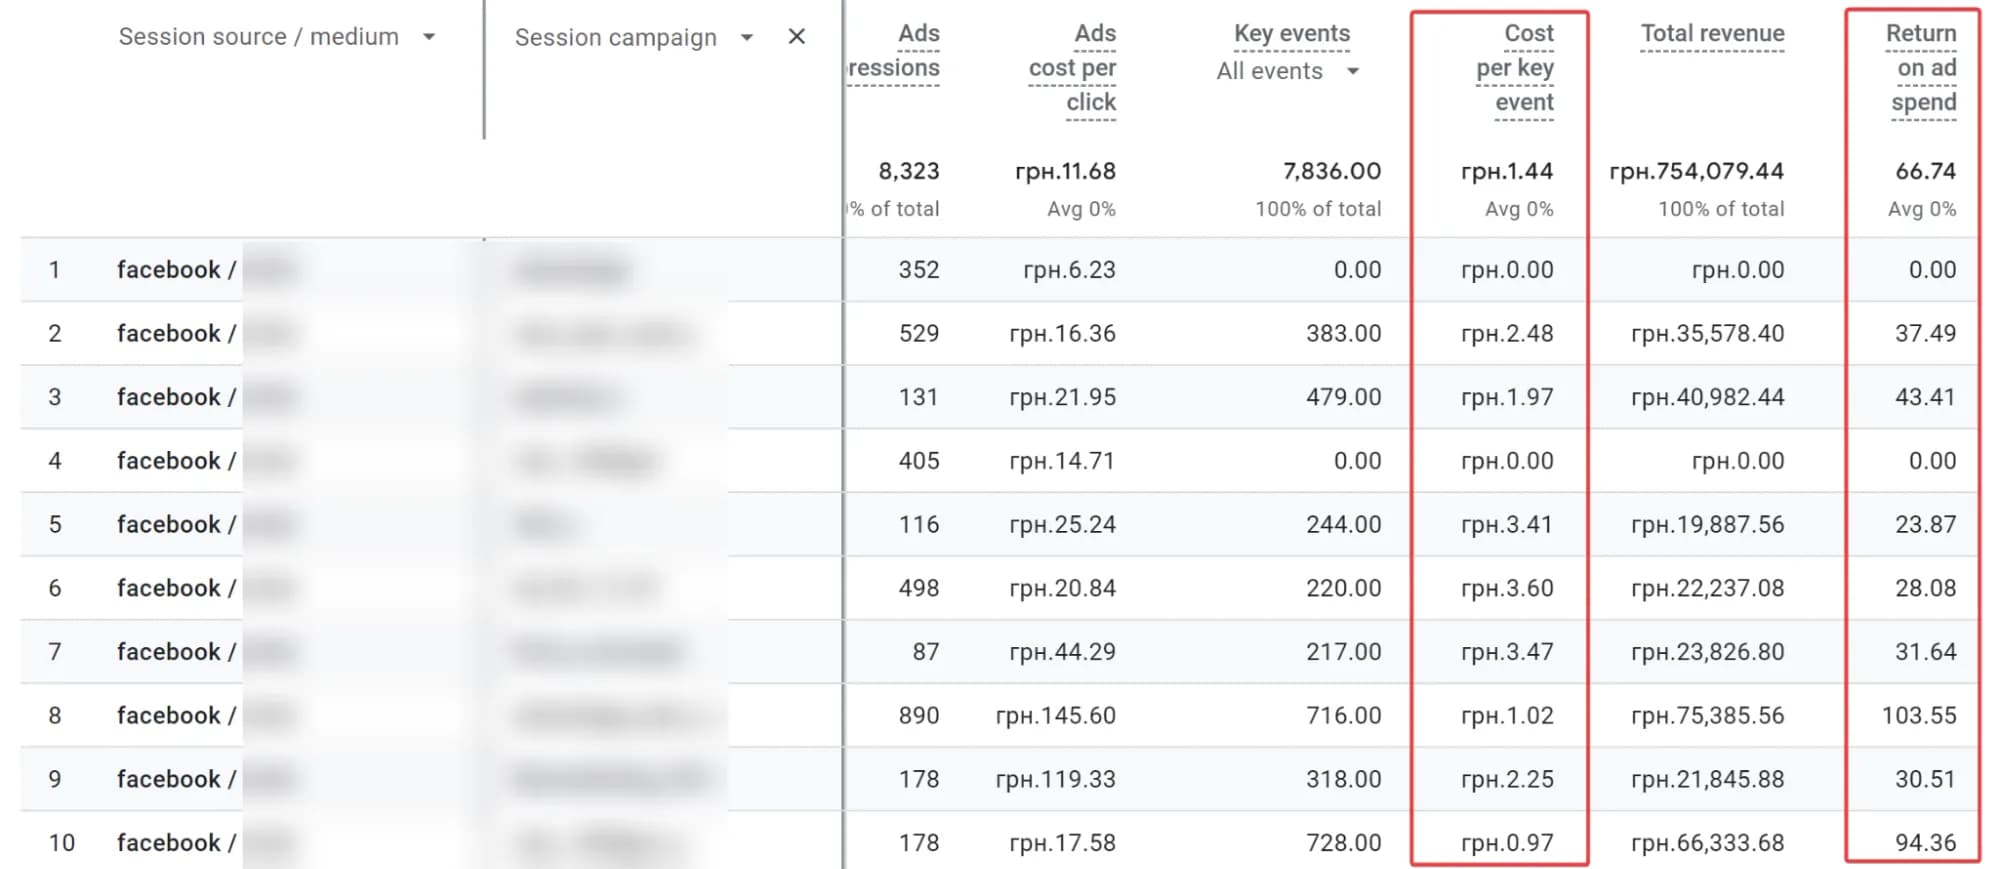
By scrolling the report to the right, you will see the main calculated metrics.
Note that according to GA4's official documentation, it may take up to 24 hours for your data to be processed and start appearing in the report.

Therefore, the best quick check is to look at the Match rate in the import results. If it is NOT 0%, just wait, and the data will start appearing in the report.

Step-by-step instructions for setting up automatic import of expenses to GA4
General overview of the process
Well, it's time for the most interesting part. I think most of you came to read this article specifically for this section.
In general, the process looks like this:
- Set up your SFTP server. You can start from scratch or use an existing one if available.
- Configure the process of transferring or generating the data file on the server.
- Set up an automatic daily data import from the server to GA4.
Below, I will outline a step-by-step plan for cases where your advertising cost data is already in BigQuery and you do not have an SFTP server (which means we will set one up from scratch using Google Cloud Platform).
Step-by-step guide to setting up automatic import based on Google Cloud Platform
Setting up automated data exports to GA4 via SFTP might seem technically complex, but breaking the process down into simple steps makes it much more manageable. Here’s a step-by-step guide:
Note that in GA4, there can be only one data source of the type Cost Data. You cannot modify it later; you can only recreate it.
Set up an SFTP server
Different operating systems may have their nuances. Below, we'll discuss the case with Debian (Linux).
Create a server based on Compute Engine in GCP
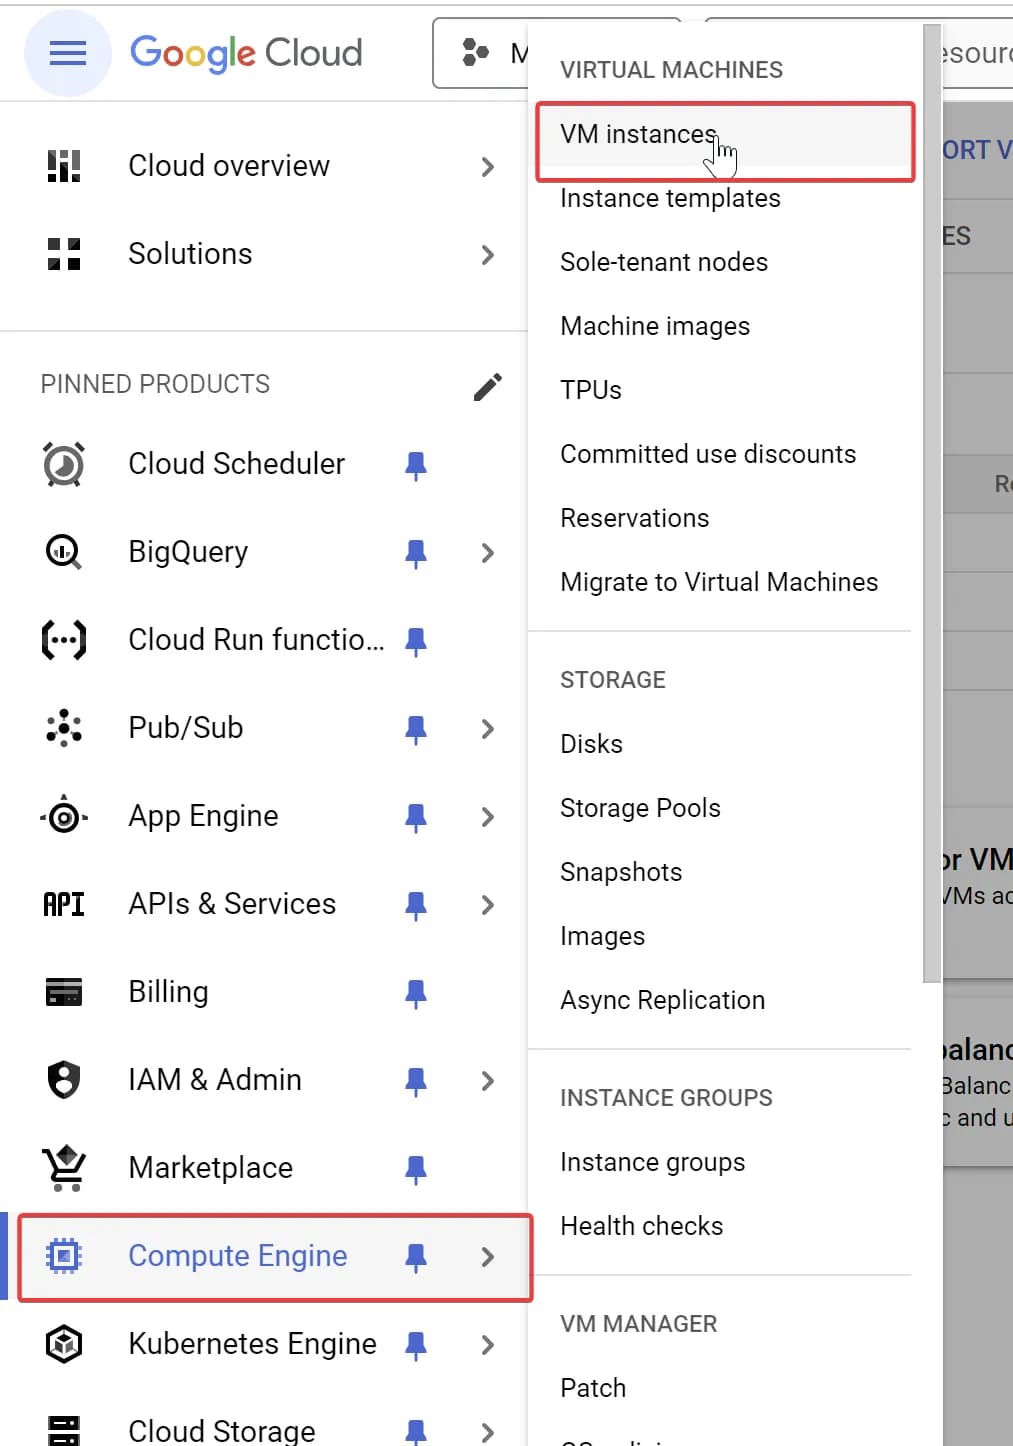
The first step is to set up your server in the Compute Engine environment. To do this, go to Compute Engine > VM Instances and create a new instance.
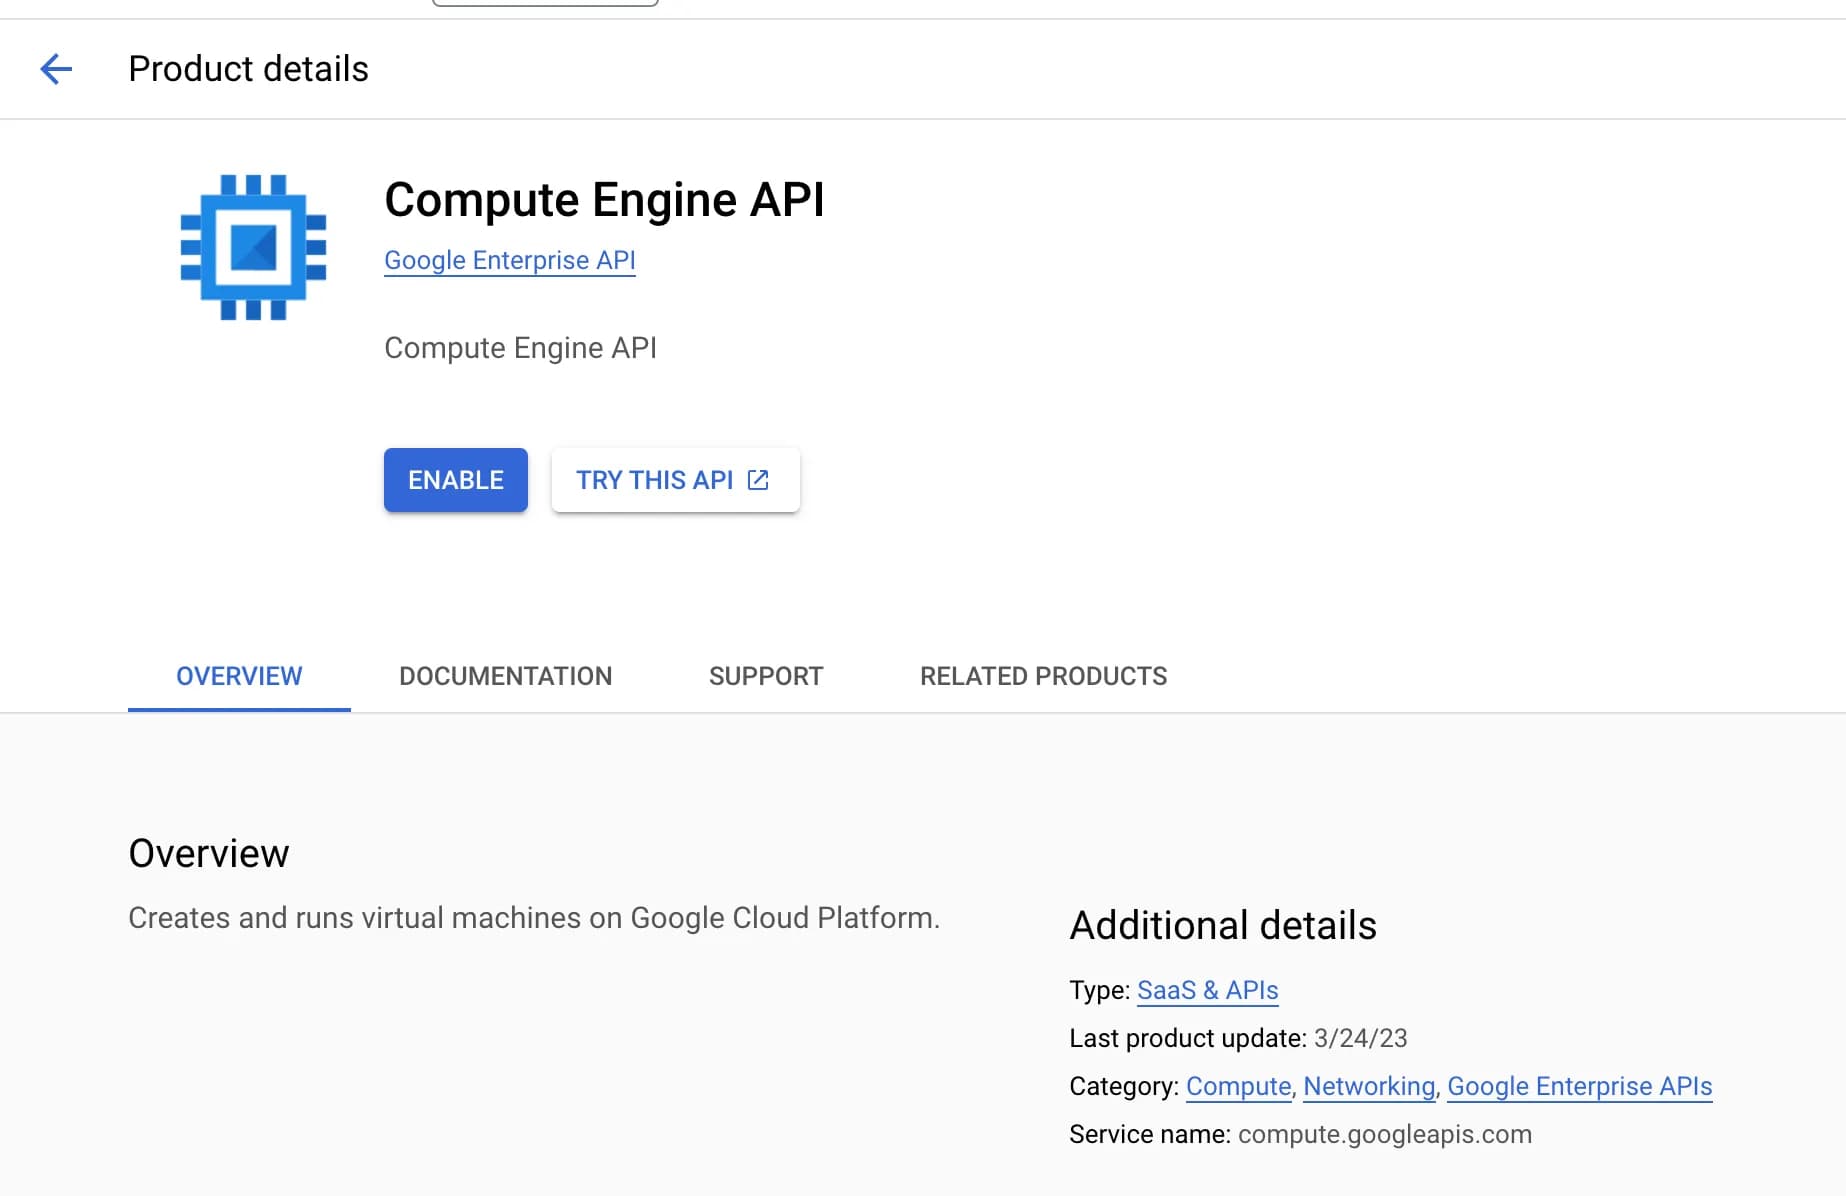
If you haven't used Compute Engine in Google Cloud before, you'll need to enable this service first. Just click Enable and wait a few minutes.
- Click Create Instance.

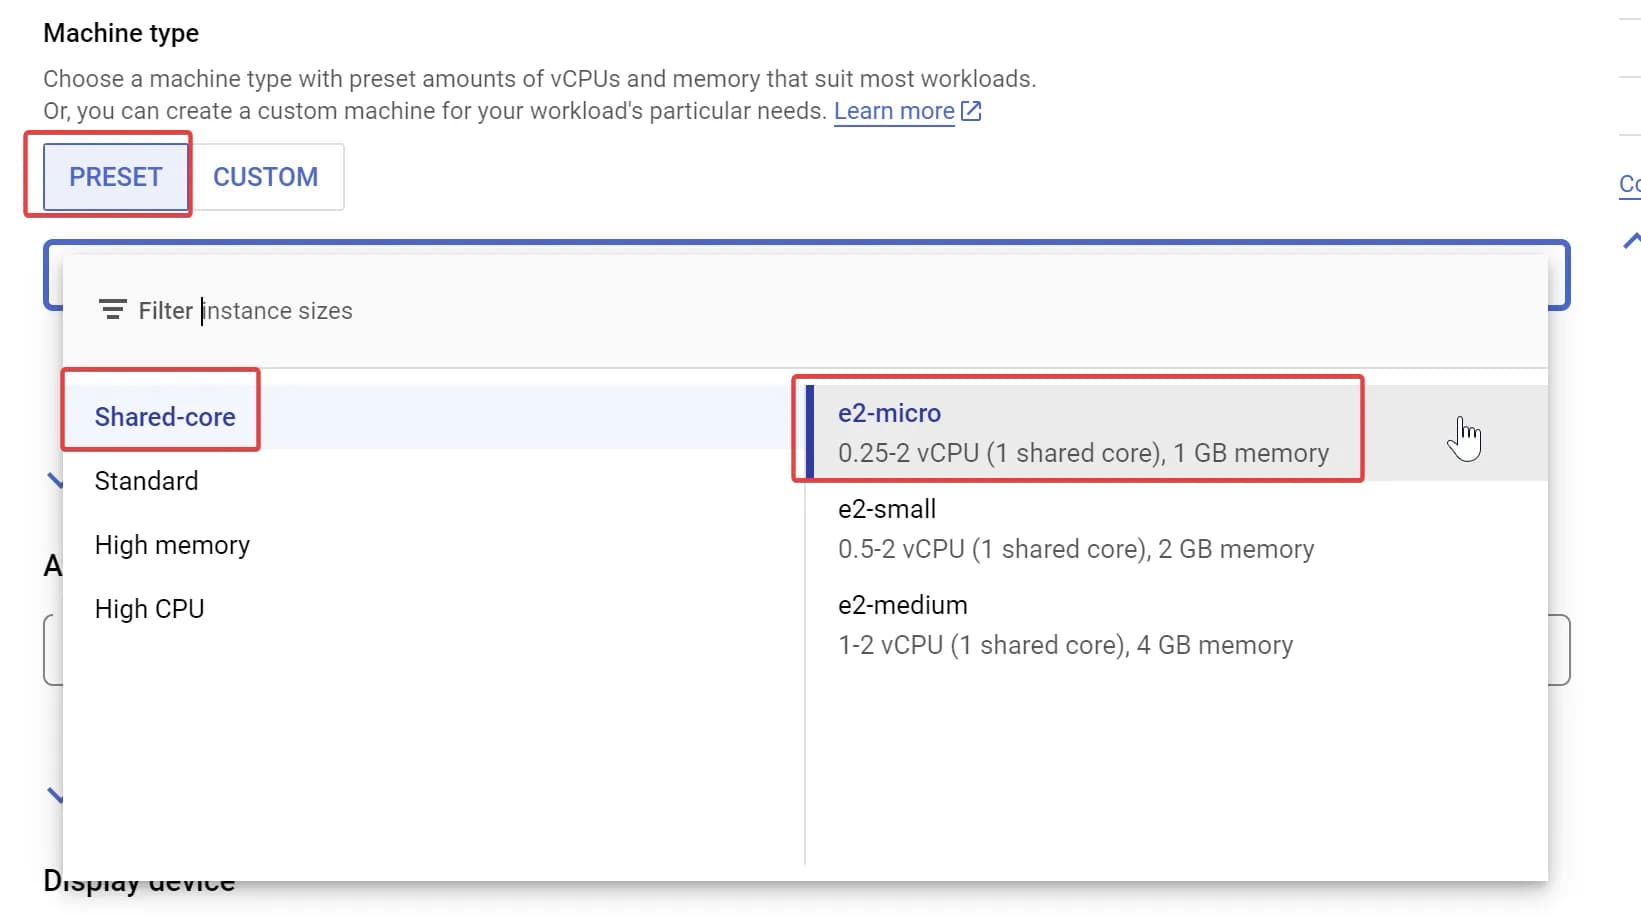
2. We will only need the simplest basic instance, so most of the settings can remain at their default values. The only things you need to change are the Name (enter any name here) and the Machine type. For the latter, we will choose e2-micro. This is the cheapest instance.
On the right side, Google will already provide you with an estimate.
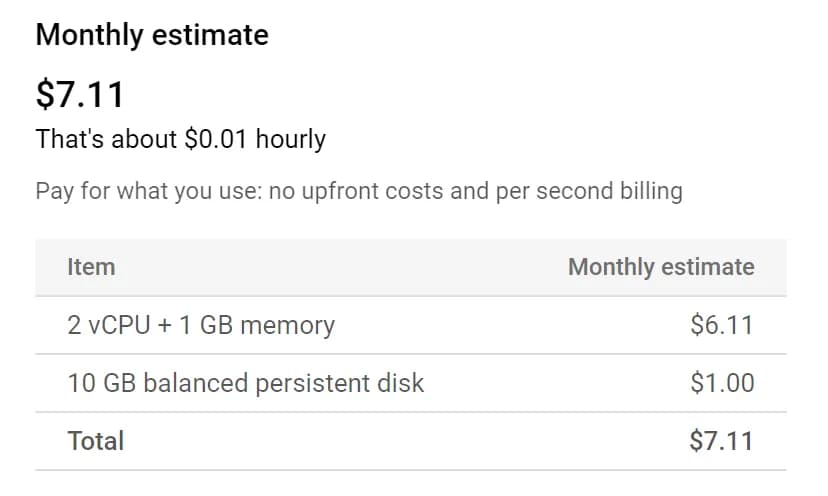
As we can see, the estimated cost per month is $7.11. However, in most cases, this will actually be free for you. If you're curious why, check the note below. But before moving on, click the Create button at the bottom of the page.

GCP offers free services that you can use without charge, a sort of freemium model. Each month, your quotas are refreshed. Among these quotas is the free e2-micro VM instance, which we'll use. Note the region: the free instance is only available in Oregon, Iowa, and South Carolina.
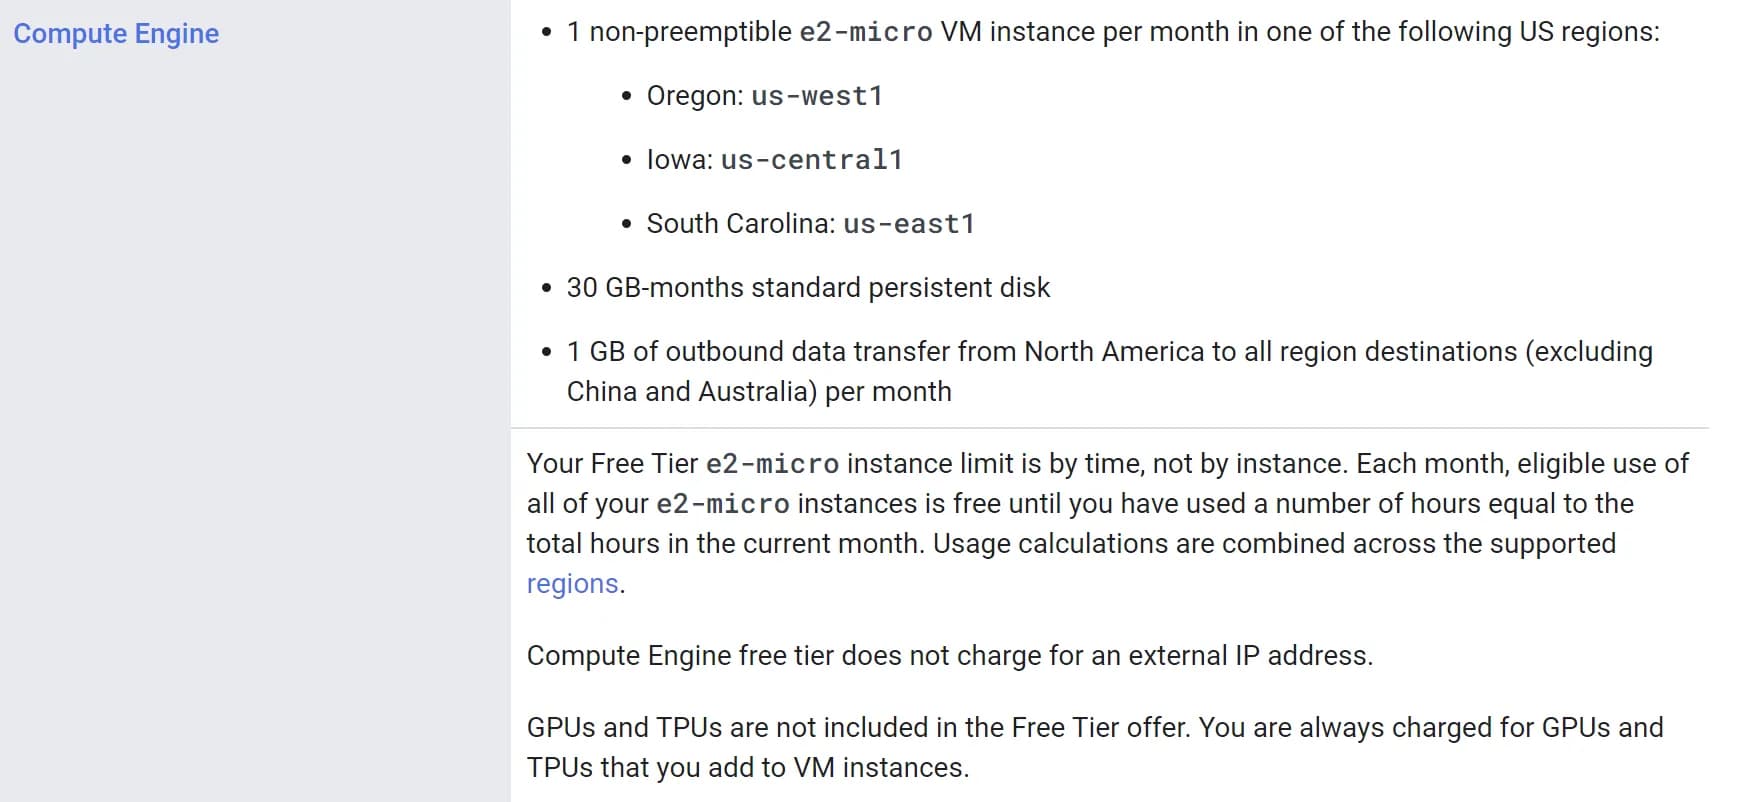
For more details about all free services, refer to the documentation.
If everything went successfully, you will see a new instance within a few minutes.

Now that the server is ready, let’s connect and prepare it. To connect via the browser, click on the SSH button in the Connect column. After authorization and about a minute of setup, you should see something like this:

We will continue working in the console. Don’t worry, I will provide all the necessary commands below.
Set up OpenSSH
The first step is to install OpenSSH on the server. OpenSSH allows you to establish secure connections, ensuring the security of the data transferred between your server and Google Analytics 4. Through this connection, GA4 can retrieve files from your SFTP server without compromising data confidentiality or integrity.
For our server, this step can be skipped, as Google has already set it up for you.
If you are using a different server, you will find instructions on how to install OpenSSH in this note:
First, you need to update the list of available packages on your server to ensure you are installing the latest version of the software. Use the following command:
sudo apt updateAfter that, install the OpenSSH package:
sudo apt install -y openssh-serverThis command will install OpenSSH on your server and start it automatically. If OpenSSH is already installed, you will simply receive a message indicating that it is already present on your system.

Create a separate user for SFTP
The next step is to create a separate user specifically for SFTP connections. Having a separate user for SFTP is also a security measure. This user will only have access to their own directory, and even if they are compromised, access to other parts of the system will be limited.
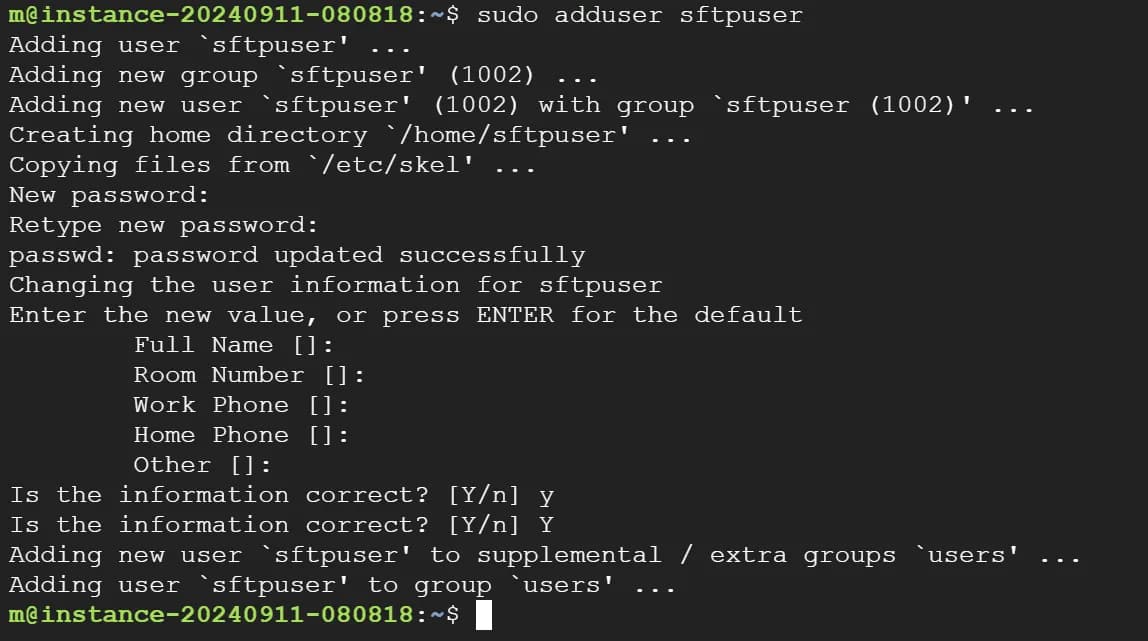
To create a new user, use the following command:
sudo adduser sftpuserThis command will create a new user. Note that the last word in the command is the username. So, in this example, the command will create a user with the name sftpuser.
You will need to set a password for this user and provide a few additional details, such as the name, phone number, and so on. You can leave these fields blank by pressing Enter.
Note that when entering the password, it may seem like nothing is happening—this is a quirk of working with Linux systems. Just continue typing and press Enter when you're done.
If everything went well, you will see something like the following in the console:
Set up the folder where the desired file will be stored
Now you need to create a special directory (folder) where you will store the expense file that you want to transfer to GA4.
Why do you need a separate directory? Again, this is a security issue.
To create a new folder, use the following commands:
sudo mkdir -p /home/sftpuser/uploadsThis command creates the uploads directory for the sftpuser.
The next step is to change the owner of this folder:
sudo chown root:root /home/sftpuser
sudo chmod 755 /home/sftpuser
sudo chown sftpuser:sftpuser /home/sftpuser/uploads
These commands ensure that the sftpuser user has full access to the uploads directory, where he can create and modify files, and that the main /home/sftpuser directory belongs to the root user and is protected from modification by other users.
Update SSH configurations to set up a restricted SFTP connection
The next step is to update the SSH configuration to set up the SFTP connection with restricted access.
Why update the SSH configuration? The answer is security.
By default, SSH is configured to provide full access to the server, which is risky for an SFTP account. Our goal is to restrict access only to necessary directories and commands to reduce potential threats.
To update the configuration, open the SSH settings file using the command:
sudo nano /etc/ssh/sshd_configAfter executing the command, you will see something like this:
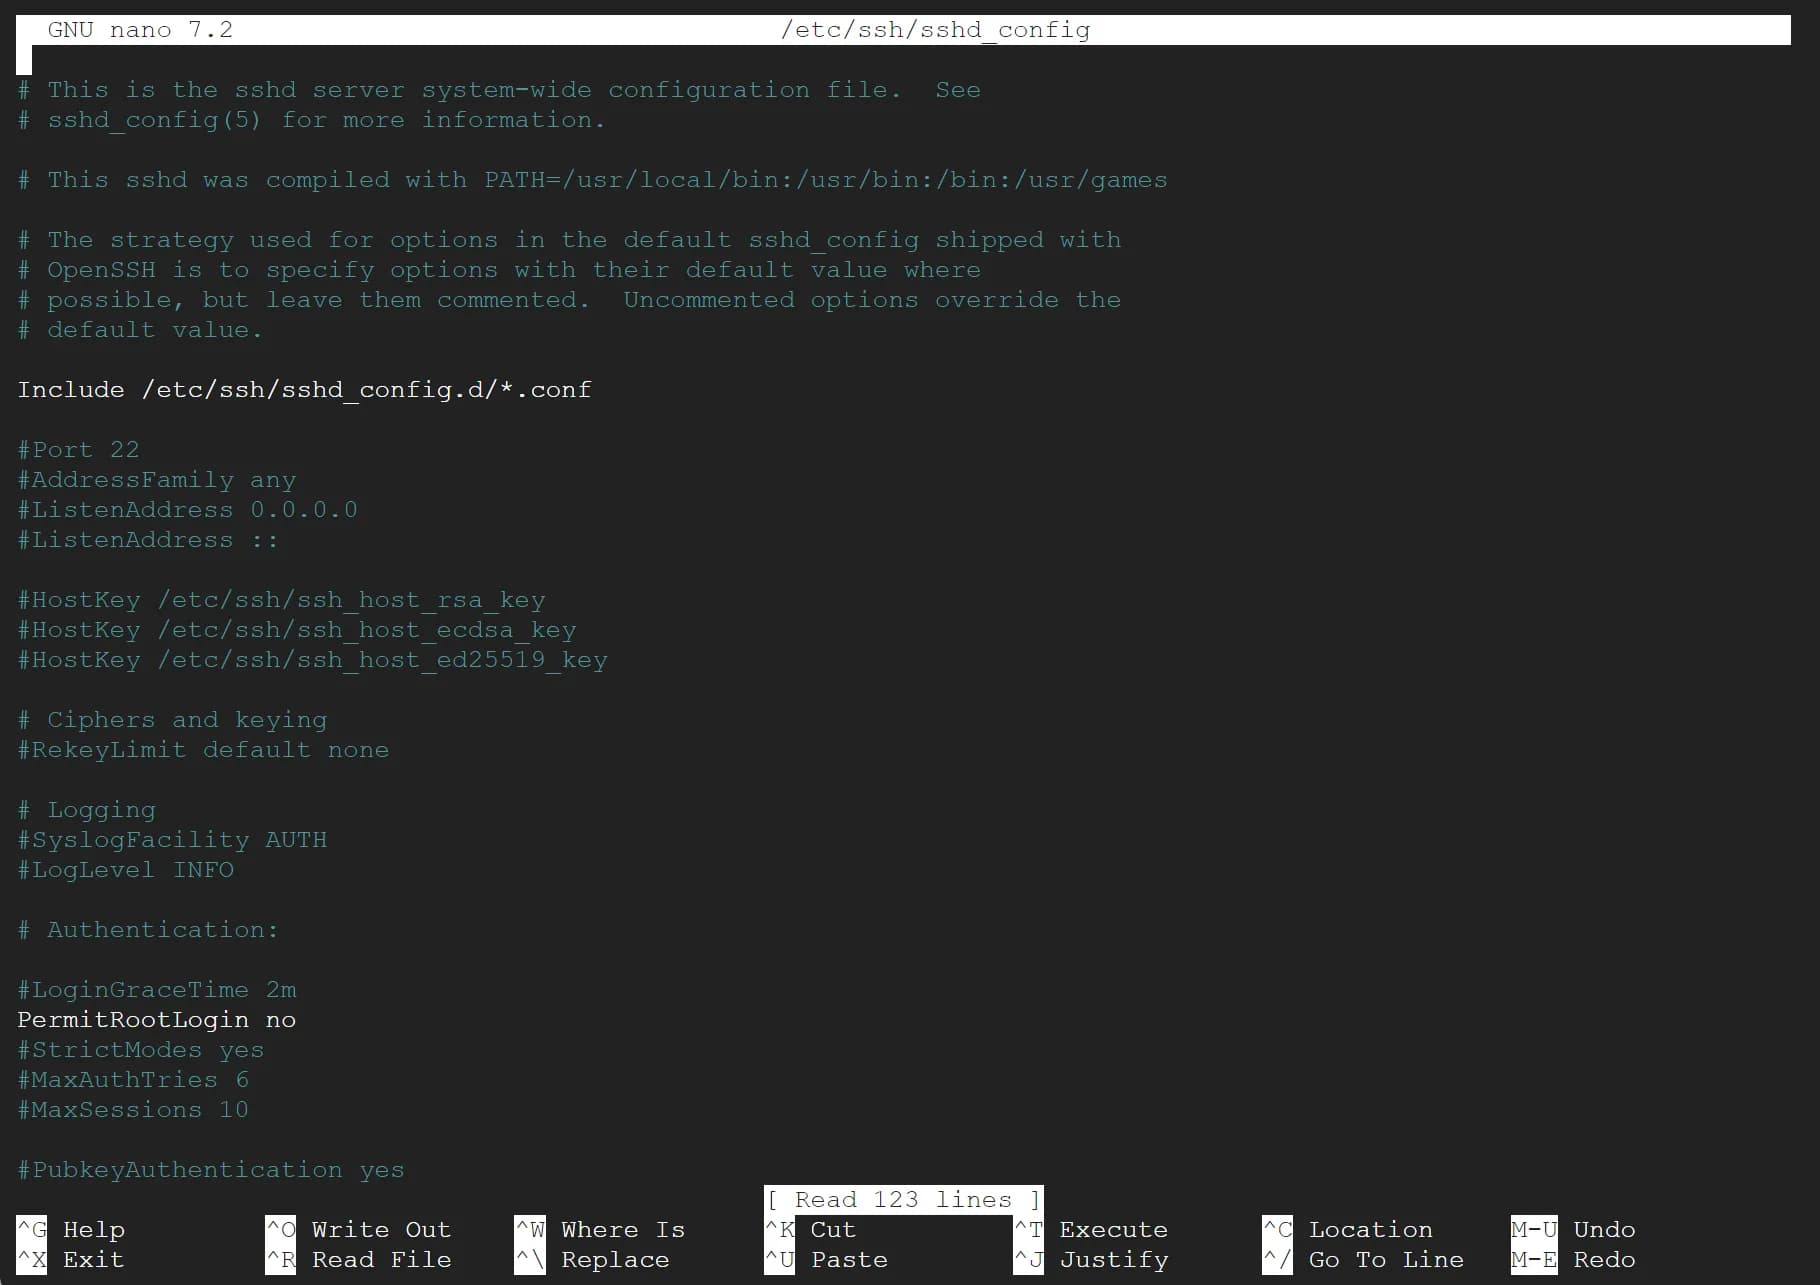
Next, find and modify the line that corresponds to Subsystem sftp. Use the up and down arrows to navigate through the file.
Subsystem sftp internal-sftpThe view before the change:
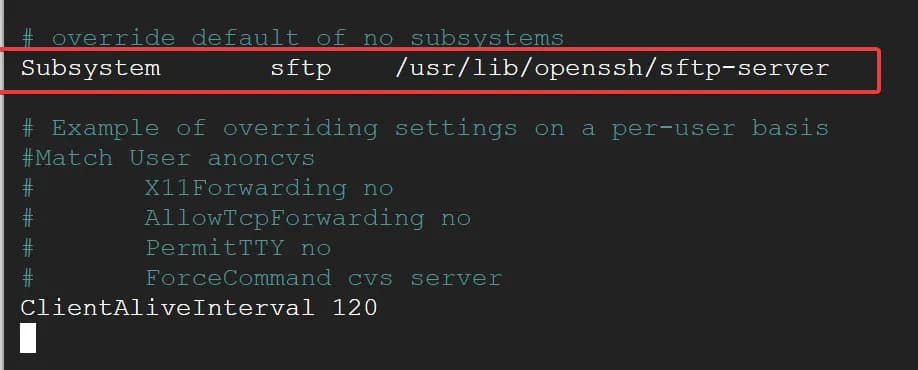
After that, add a new block of rules for the sftpuser to restrict their actions to just working with SFTP:
Match User sftpuser
    ChrootDirectory /home/sftpuser
    ForceCommand internal-sftp
    AllowTcpForwarding no
    PermitTunnel no
    X11Forwarding no
The final view:
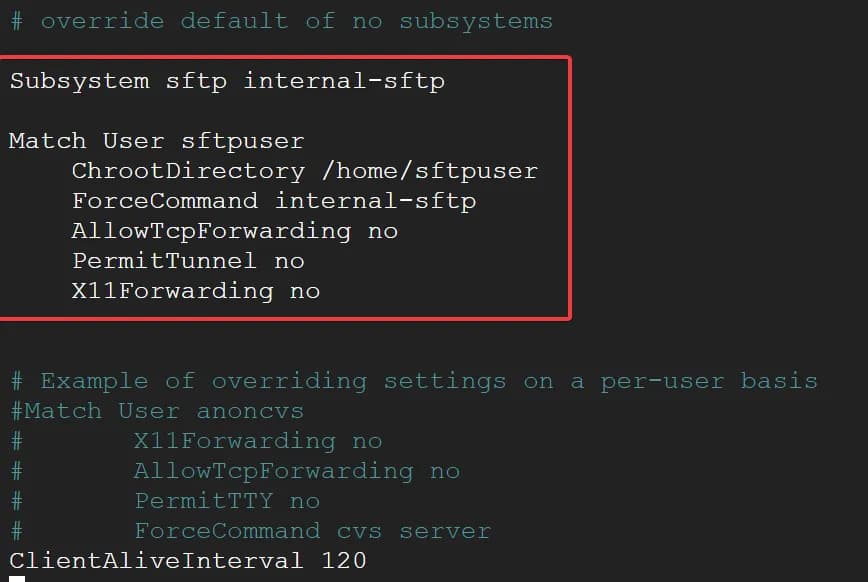
- ChrootDirectory: Restricts the
sftpuserto their home directory only, preventing access to other parts of the filesystem. - ForceCommand internal-sftp: Limits all commands executed by the user to SFTP commands only.
- AllowTcpForwarding no: Disables TCP forwarding, which is used for tunneling network traffic over SSH.
- PermitTunnel no: Disables tunnel creation.
- X11Forwarding no: Disables X11 forwarding, which is used for graphical interface redirection (not needed for SFTP).
Remember to save the settings. The easiest way is to press Ctrl+X, then Y to confirm saving the changes, and finally Enter.
To apply the changes, restart the SSH service with the following command:
sudo systemctl restart sshdMake sure to keep the SSH connection open, as we will need it for further steps.
Set up data transfer from BigQuery to the server
After setting up SSH and SFTP access for the user, the next step is to organize the files that will be transferred to the server.
As a reminder, we have already created the necessary folder at /home/sftpuser/uploads/ where sftpuser is the name of your user. Now, you need to set up data transfer from BigQuery to this folder. To do this, follow these steps:
How to create a service account and key in Google Cloud Platform
- Create a separate service account in Google Cloud.
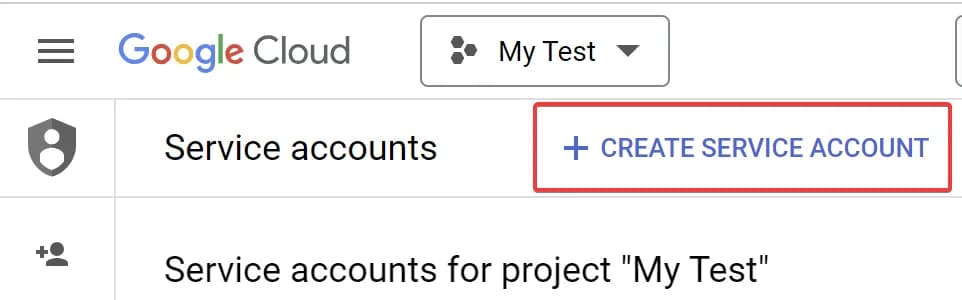
To do this, go to IAM & Admin -> Service accounts.
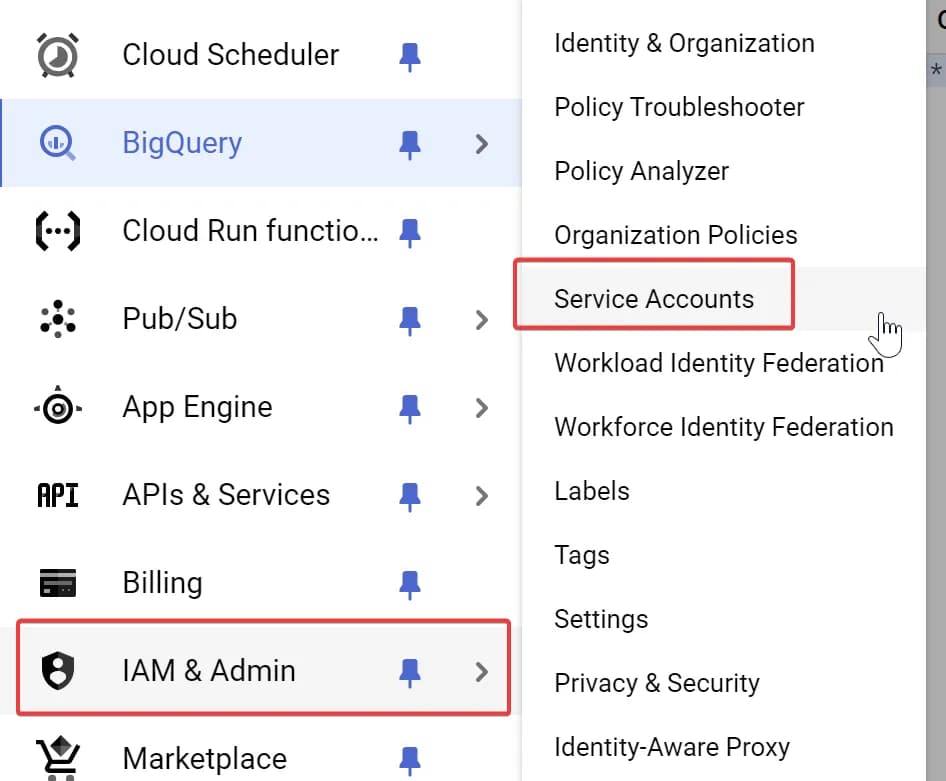
and click CREATE SERVICE ACCOUNT.
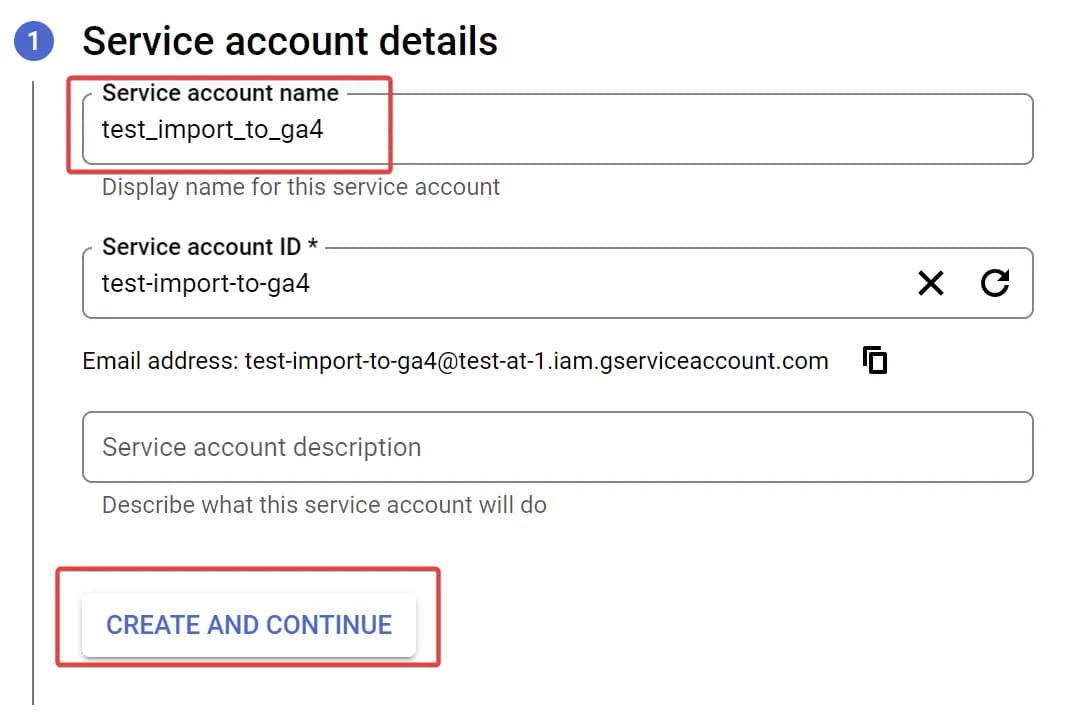
At the Service account details stage, provide a name and click Create and Continue.
On the next stage, grant the required roles: BigQuery Data Viewer and BigQuery Job User, and click Continue to apply the changes.
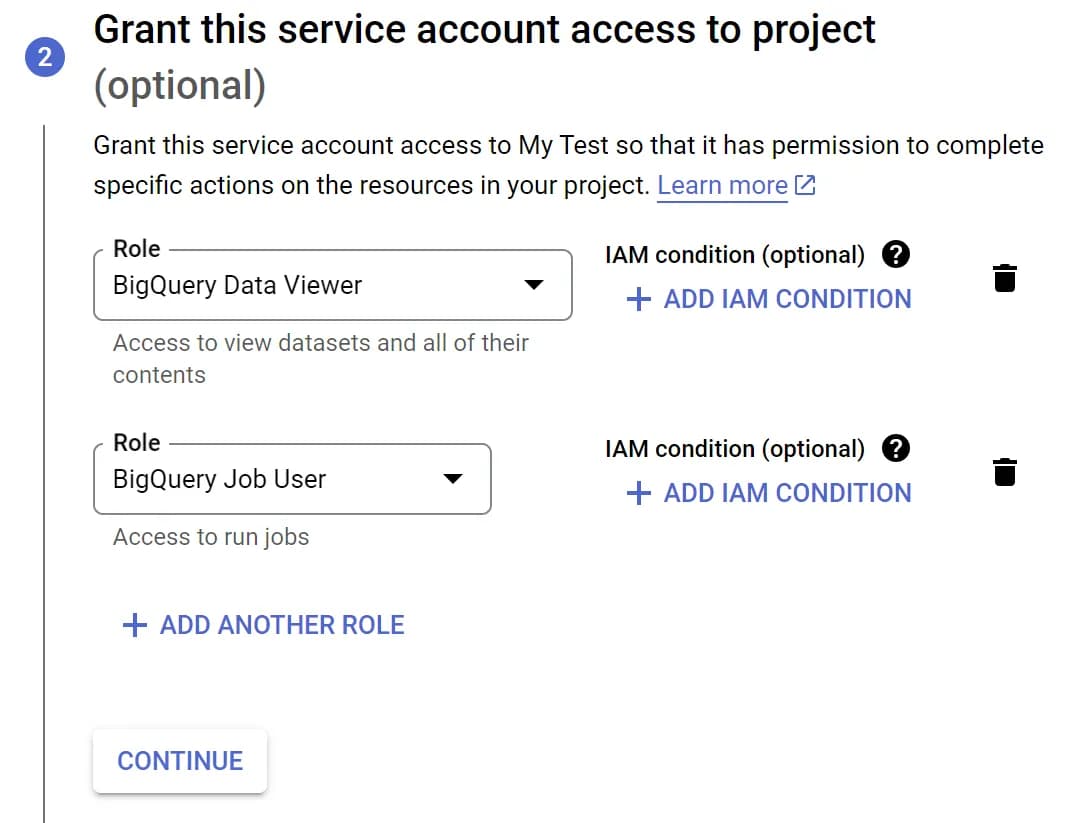
After this, click Done.
We have now created the service account. The next step is to create a key. To do this, select the service account you created, go to the Keys tab, and click Add Key.
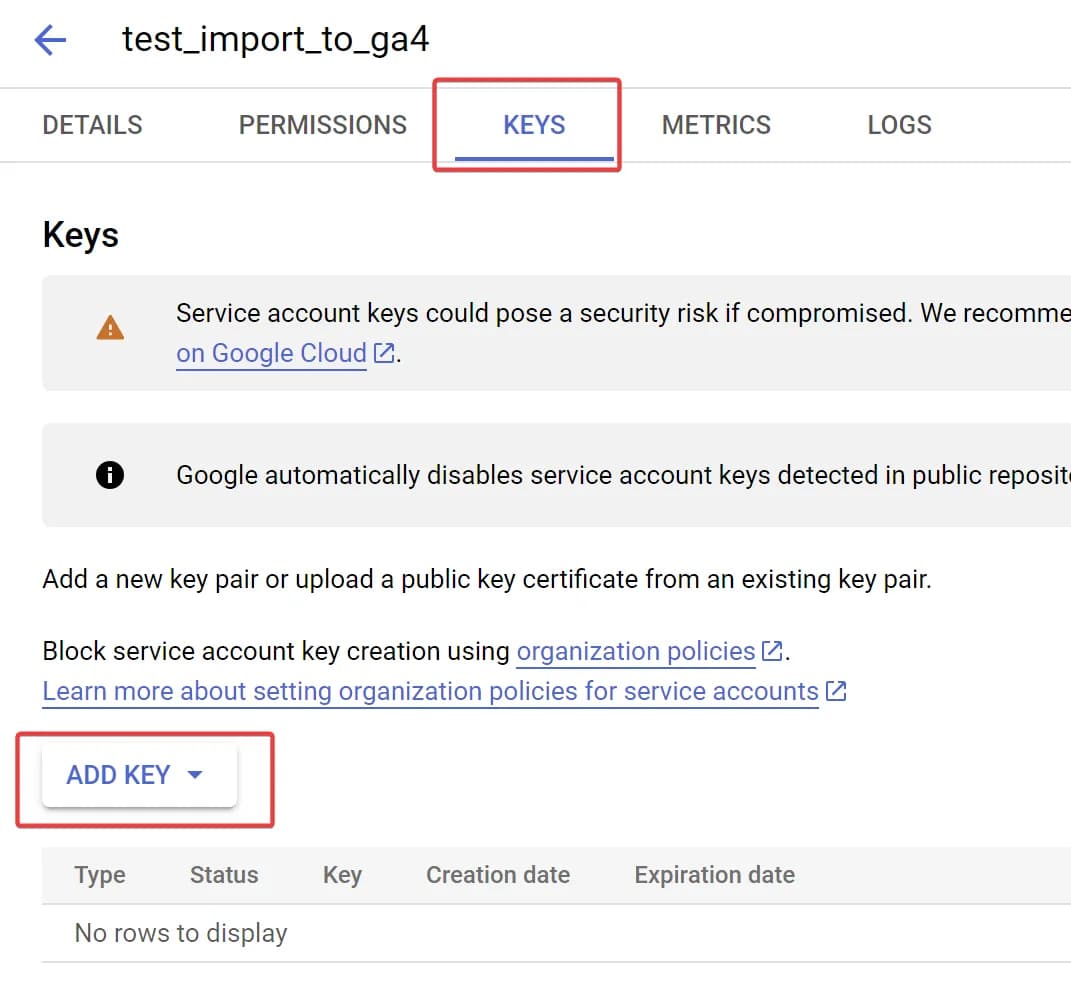
In the window that appears, select the JSON key type and save the file to your PC.
How to upload a service account key to the server
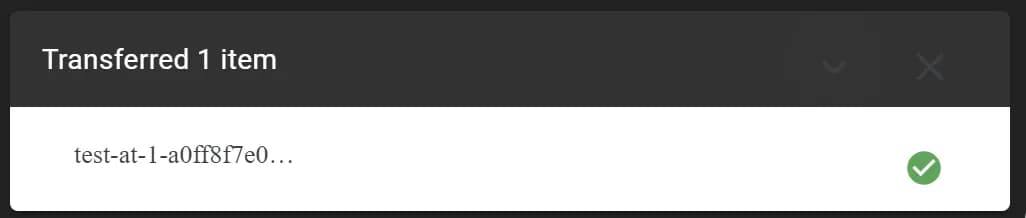
To do this, open the console where you connected to the server via the browser-based SSH. Click the Upload file button and select the key file you downloaded in the previous step.

If everything went smoothly, you should see a window like this at the bottom:
Sometimes, during the file upload process, your connection might get interrupted. If this happens, just try reconnecting and uploading the file again.
In that case, the key will be located at /home/m, where m is the name of your current user. You can find this name before the @ sign in the terminal.

To obtain the path to the file, you can also use the pwd command, as shown in the screenshot above. Although this command shows the current directory you are in, since there were no commands moving you to another directory, it will be accurate for finding your file.
How to install the Google Cloud SDK on the server
This is the simplest task. Just enter the following command:
sudo apt-get install google-cloud-sdkThis package will allow us to fetch data from BigQuery.
How to set up daily update of expense data on the server
Now everything is ready to set up automation. We will do this using cron for daily exports. Before starting this final step, make sure you have prepared everything you need. We will need:
Note that you can only upload one cost file to GA4, so if you have multiple advertising accounts, all the data should be consolidated within a single View.
In the example, I'm using a View because it's more convenient for managing query changes if needed. However, as you will see below, you can use any SQL query.
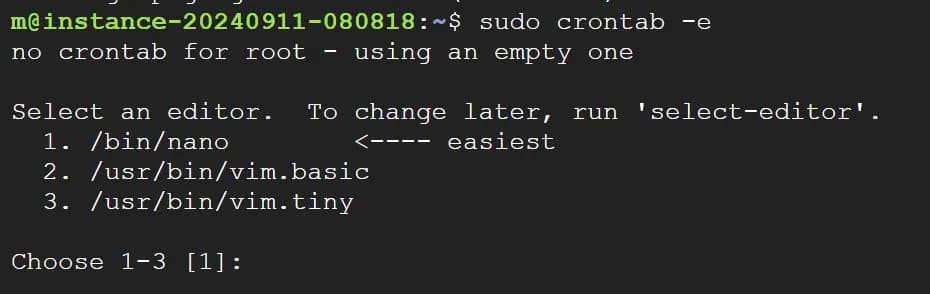
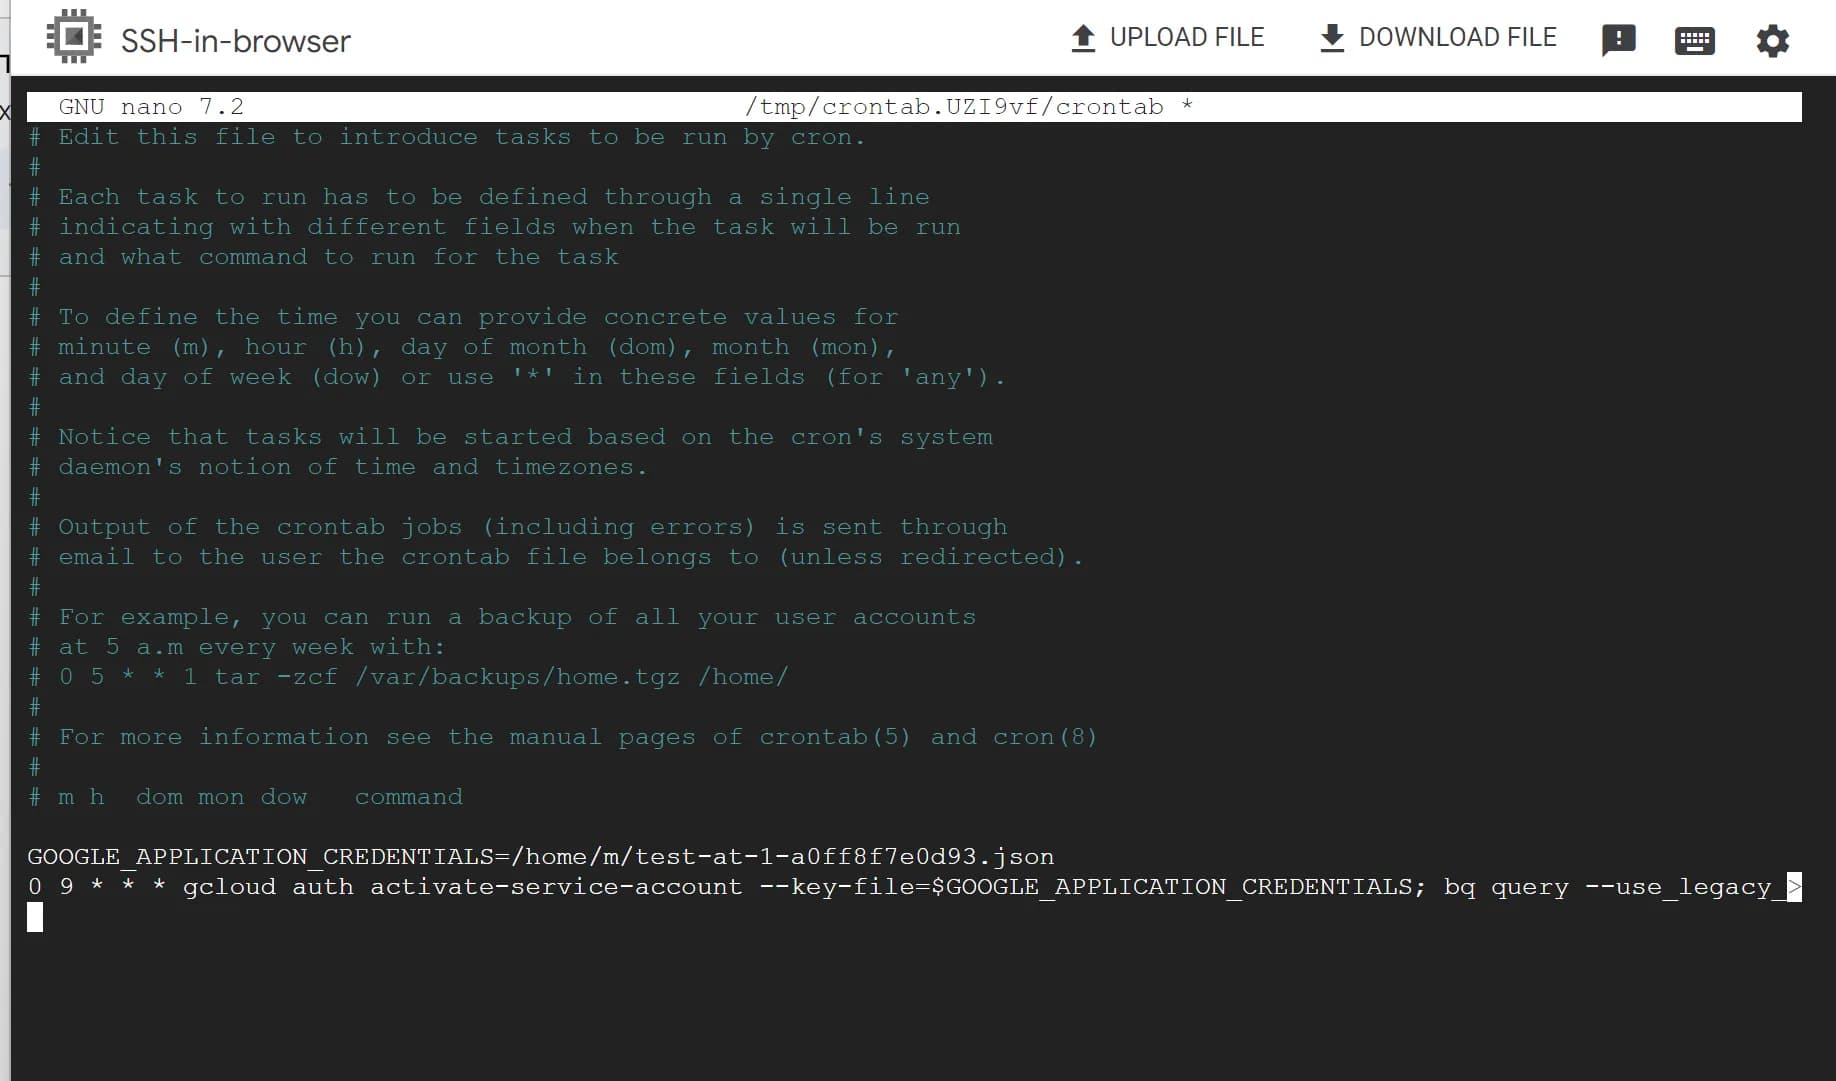
To open the file with scheduled cron tasks, run the following command:
sudo crontab -eWhen executing the command, you may be prompted to choose a text editor to open the file. Simply select the desired editor by specifying its number. Below is an example showing nano (1).
In the opened file, add the following command:
GOOGLE_APPLICATION_CREDENTIALS=[FULL_PATH_TO_YOUR_KEY]
[CRON_EXPRESSION] gcloud auth activate-service-account --key-file=$GOOGLE_APPLICATION_CREDENTIALS; bq query --use_legacy_sql=false  --format=csv 'SELECT * FROM `[BQ_VIEW]`' > /home/[YOUR_SFTP_USER_NAME]/uploads/[YOUR_FILE_NAME].csv
Don’t forget to replace variables with your actual data (replace values directly, without square brackets):
[FULL_PATH_TO_YOUR_KEY]- path to your service account key file. We did this earlier.[CRON_EXPRESSION]- this is the expression specifying the frequency of data updates. For example, the following expression schedules a daily update at 9 AM:0 9 * * *[BQ_VIEW]- the full name of your BigQuery view. For example:test-at-1.sql_test.fb_cost_data. We did this earlier.[YOUR_SFTP_USER_NAME]- your SFTP username. We did this earlier.[YOUR_FILE_NAME]- the name of the file you want to use. This will be needed in the final step. Since in my example the costs are only from Facebook Ads, I’ll name the file facebook.csv.
In my case, the final version looks like this:
GOOGLE_APPLICATION_CREDENTIALS=/home/m/test-at-1-a0ff8f7e0d93.json
0 9 * * * gcloud auth activate-service-account --key-file=$GOOGLE_APPLICATION_CREDENTIALS; bq query --use_legacy_sql=false  --format=csv 'SELECT * FROM `test-at-1.sql_test.fb_cost_data`' > /home/sftpuser/uploads/facebook.csv
This is how it should look in the cron in the end:
Now this file will be available to Google Analytics 4 via SFTP at the address: sftp://[YOUR_SERVER_IP]/uploads/facebook.csv
Make sure to verify that the file is being updated regularly.
Setting up a data source in GA4 and adding an SSH key to the server
The final step is to configure Google Analytics 4 to receive data via SFTP. To do this, go to GA4 and start creating a data source.
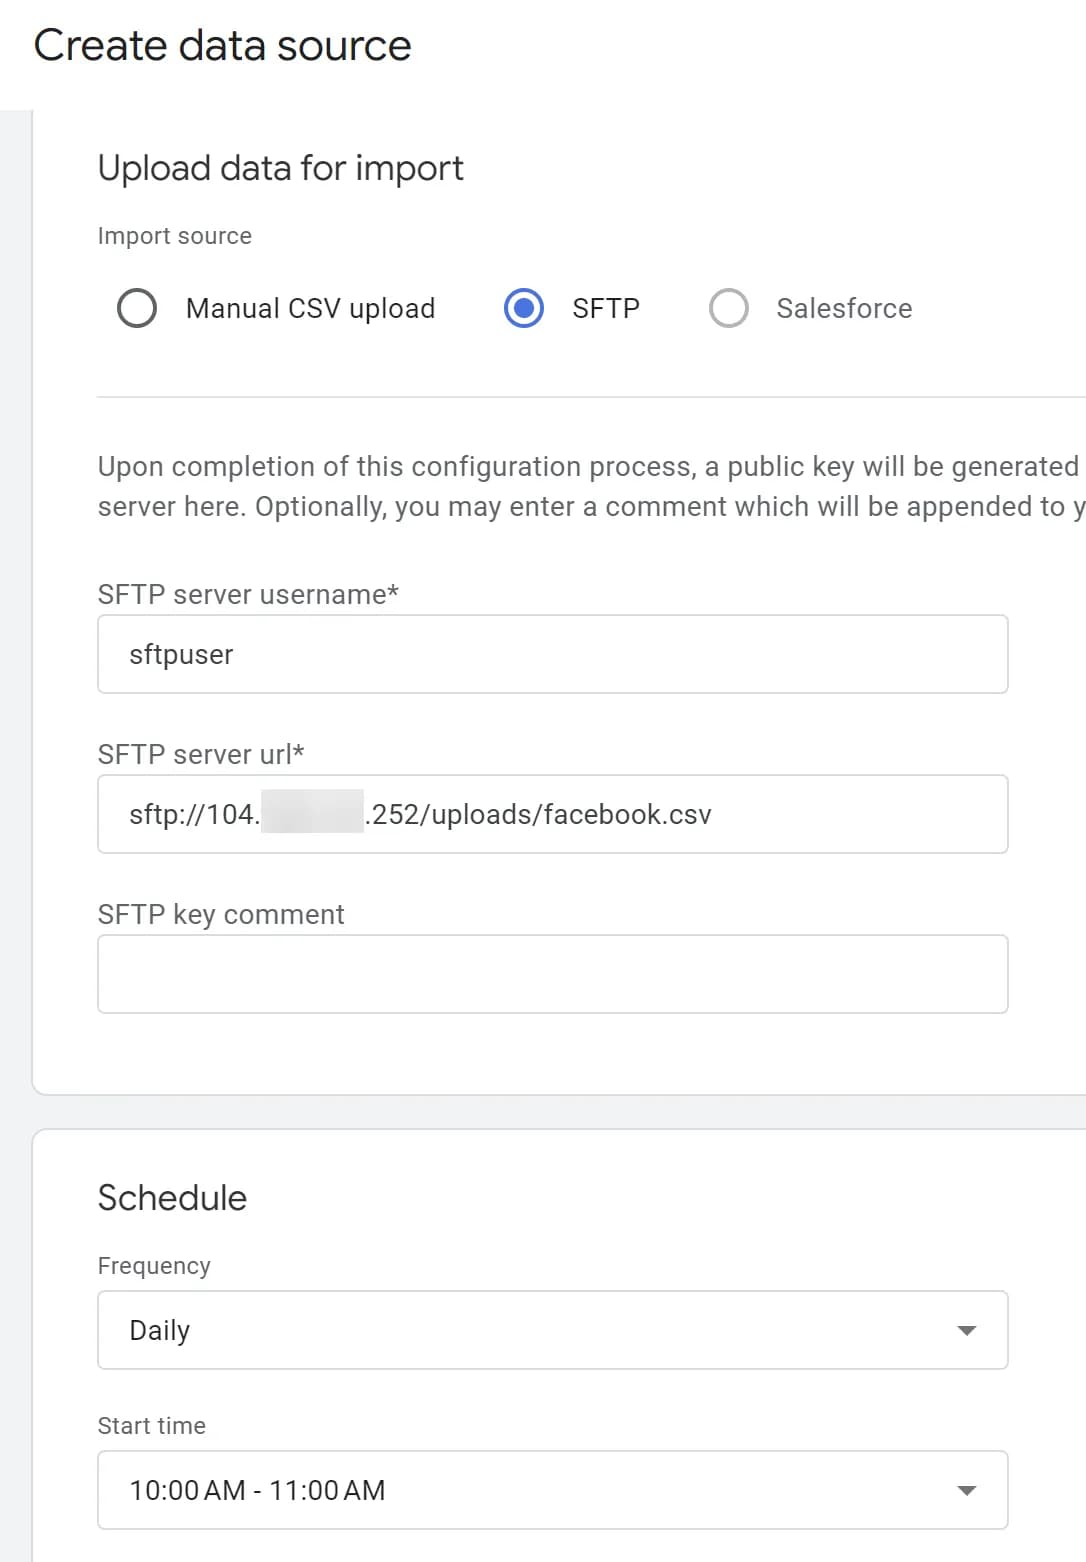
Next, provide a name, select the data type as Cost data, and choose Import source as SFTP. Enter the required values in the fields that appear:
- SFTP server username - Your SFTP username, which we set earlier. In my case, it's
sftpuser. We did it here. - SFTP server URL- The link to your file. We did it here.
In the section How to Set Up Daily Updates for Ad Spend Data on the Server, we obtained a URL like this:
sftp://[YOUR_SERVER_IP]/uploads/facebook.csv
You can find [YOUR_SERVER_IP] on the Instances screen in Compute Engine under the External IP column.

Don't forget to also select the time when GA4 will fetch data from your server. The final settings should look like this:
If everything is correct, click Next in the top right corner.
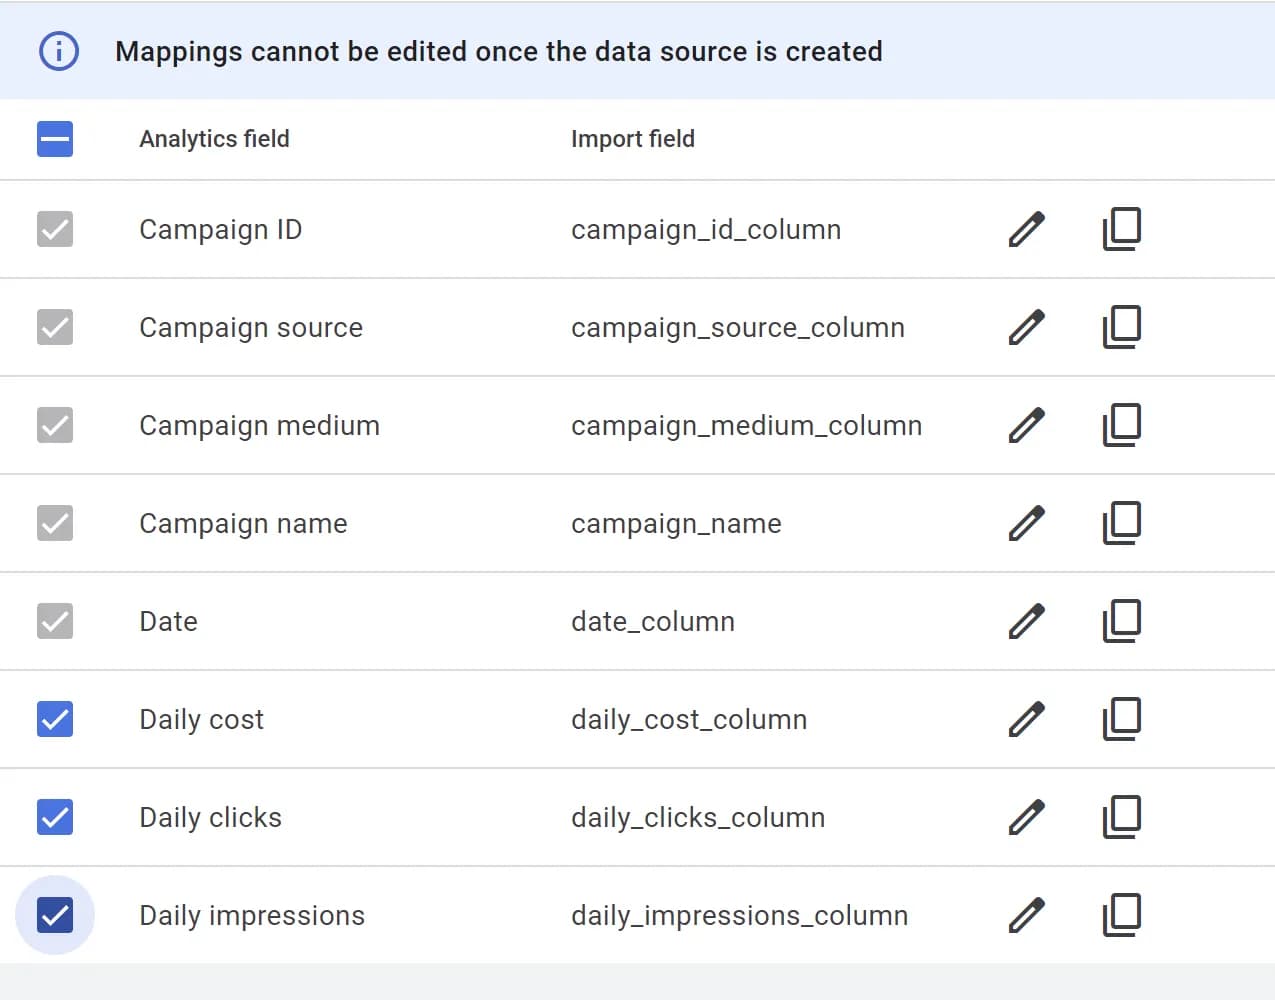
On the next step, the system will ask you to map the field names in GA4 to the columns in your file. This should be straightforward, and it's something we have already covered above.
After mapping, click Create & Generate Key.
On the final step, the system will provide you with an SSH key needed for authentication on your server. This key will allow GA4 to connect to the server and download files.

How to add an SSH key to the server?
To add the key, you need to create or edit the authorized_keys file for the sftpuser:
sudo mkdir -p /home/sftpuser/.ssh
sudo nano /home/sftpuser/.ssh/authorized_keys
Add the obtained SSH key to this file and save the changes.

Set up access rights to keys
To ensure the keys work correctly, you need to set the appropriate permissions. Yes, we’re back to security concerns)
sudo chown -R sftpuser:sftpuser /home/sftpuser/.ssh
sudo chmod 700 /home/sftpuser/.ssh
sudo chmod 600 /home/sftpuser/.ssh/authorized_keys
These settings ensure that only the sftpuser has access to the SSH keys.
Make sure that the key is added correctly and the permissions are configured properly. If the permissions are not set correctly, GA4 will not be able to connect to the server.
This was the final step in setting up automated data exports to GA4 via SFTP.
This was the final step in setting up automated data uploads to GA4 via SFTP. Now, return to GA4 and click the Import Now button or wait for the automatic upload according to the schedule.

If everything was successful, you will see information about it:

And of course, the data will appear in the reports. I covered this in detail earlier in the section Data import results into Google Analytics 4.
If needed, you can also upload historical cost data for up to 90 days back.
Congratulations! You now have a fully configured system that securely transfers data from your server to GA4 on a regular basis.
It wasn't that difficult, right?
Instead of conclusion
Yes, automated data import to GA4 does require some technical knowledge and skills, and perhaps this article seemed quite "technical" to some, despite my efforts to make the description as detailed and explanatory as possible. However, this solution can ultimately save you a lot of time that you would otherwise spend daily navigating between advertising accounts and GA4. Now everything will be in one place, making it worth the time invested in implementation.
Of course, it's not a fully-fledged Power BI report based on "raw data" from BigQuery, but for many businesses, this level of automation will suffice for a while.
By the way, if you want to learn more about working with data in the GA4 interface and building comprehensive reports in Power BI based on "raw data" from BigQuery, you can check out the PRO ANALYTICS course.
How do you handle advertising cost data in your business: do you import it into GA4 or build your own reports from "raw data"? Share your experience in the comments.