

Natalie Fedorenko
Web analyst at PROANALYTICS.TEAMSetting Up Conversion Tracking for OpenAI Ads
Placing ads in ChatGPT is gaining popularity, and since any advertising must not run blind, setting up conversion tracking is essential. That's why we decided to write this article and cover the nuances you'll encounter during setup.
Today's plan:
- Setting up a pixel and conversions in OpenAI Ads Manager
- Setting up OpenAI conversion tracking via Google Tag Manager (browser)
- Setting up dual conversion tracking: client-side GTM and server-side GTM
- Setting up OpenAI conversion tracking via server-side GTM without a library on the site
- Specifics of sending OpenAI Ads conversions directly from site code
- Common issues and solutions
- Instead of a conclusion
At the time of writing this article (early June 2026), the OpenAI Ads Manager displays a "Beta" label, and it is currently not possible to create campaigns with conversion optimization.
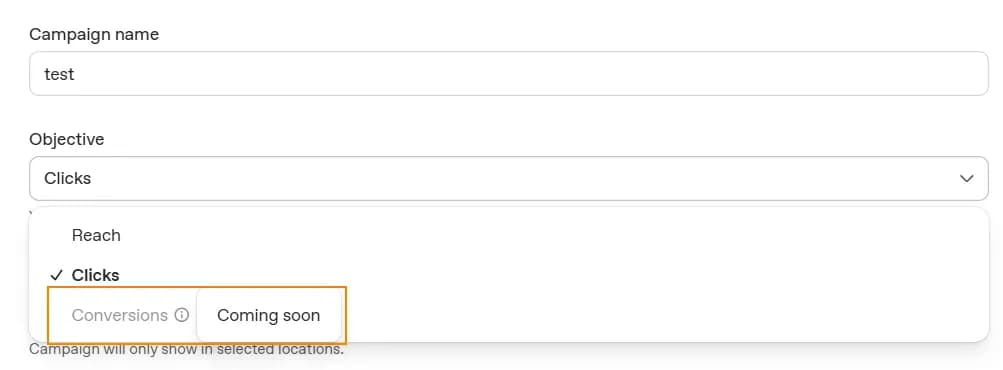
Another thing to note — OpenAI does not yet allow changing the conversion window, and it currently defaults to 30 days for everyone. Nevertheless, they have already made it possible to set up conversion tracking and attribution for other campaign types, such as reach or clicks.
Overall, OpenAI hasn't invented anything new when it comes to conversion tracking, and the principle is very similar to how things work in other comparable systems. The ad platform gives you a piece of code (a pixel) that initializes a library, which in turn captures the click ID parameter from the URL, stores it in cookies, and sends events to be tracked as conversions.
Setting up a pixel and conversions in OpenAI Ads Manager
In Ads Manager, go to the Tools section, navigate to Conversions, then click Create and select Data Source.

Give it a name and select the type Web. Click Create.

You've created a pixel. For further setup, you need to copy its ID.

Additionally, in the same section, you need to create a Conversion Event for each event you want to track in your ad campaigns.

Then:
- Enter the event name.
- Select the event you want to track, or choose Custom if you'll be passing a custom name.
- Under Data source, select the same pixel you just created.
- As for the conversion window, you currently have no other options — as of the date of writing, there is only one default option: 30 days.
- Click Create.

Repeat the same steps to create additional conversions if you have more than one.
They will then become available at the ad campaign level, where you can select conversions by the name you assigned during setup.

Check yourself:
At this stage you should have created:
- A pixel. You need to copy its ID.
- Conversions for all events you want to track. These conversions must be added to your ad campaigns.
Setting up OpenAI conversion tracking via Google Tag Manager (browser)
Now go to Google Tag Manager, navigate to the Templates section, and click Search Gallery.

In the search bar, type "openai" and select the tag by Stape. On the next step, click Add to workspace and then Add.

Now go to the Tags section and click the New button.

Click anywhere in the Tag Configuration area and under Custom, select the OpenAI tag.

In the first field, you need to add the Pixel ID you created in the ad platform. Since you'll be reusing it, best practice in such cases is to create a Constant variable so the value exists in only one place — this eliminates potential copy-paste errors. Click the variable creation icon next to the input field.

In the window that opens, click the blue plus in the top right corner, then click in the Variable Configuration field and select the Constant type.
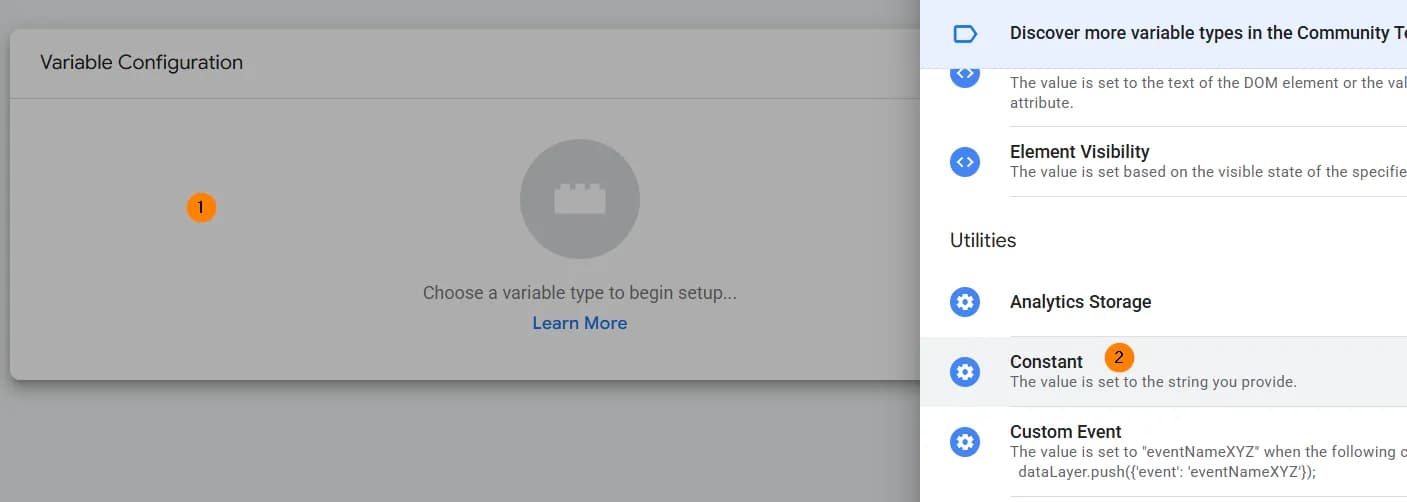
Paste the Pixel ID into the input field, give the variable a name, and save.

In the Event Name Setup Method section, you have two options: Inherit from Data Layer and Override. I recommend always choosing Override, because it gives you more control over which event you're sending.
For example, if you hover over the tooltip and read it, you'll see that a pageview is sent as the standard page_viewed event in OpenAI only if the page_view, page_view_stape, or gtm.dom event (corresponding to the DOM Ready trigger in GTM) arrives in the dataLayer.
Typically, a pageview fires on the gtm.js event (Page View trigger). So if you choose Inherit from Data Layer and your trigger is neither DOM Ready nor page_view / page_view_stape, the page_viewed event won't fire.

In my example, I'll be sending a registration event, so in the next field I select registration_completed.
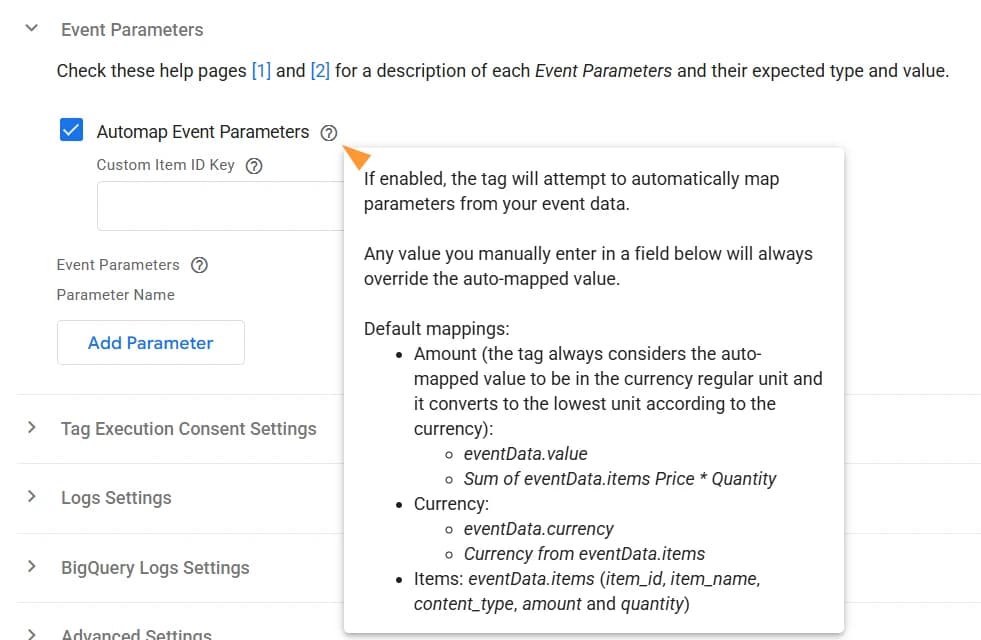
The next checkbox is enabled by default — it's automatic parameter mapping from the event. You can leave it enabled. You can also check the box below it to pass the most recent data from the Data Layer.
It's a nice touch that the Stape tag references Simo Ahava's article in the tooltip. So if you really want to dive into the nuances of this checkbox, I recommend reading that article too.

Let me explain the automatic event parameter mapping from the Data Layer in more detail.
It handles processing of product parameters from the e-commerce array, as well as event value and currency. If you have e-commerce set up in GA4 according to the documentation, this tag will adapt product information and pass it to OpenAI without any additional work on your part. Also, if you're passing event value in the value parameter and currency in the currency parameter, the tag will pick up those values and forward them to OpenAI.
A small note: if you're particularly attentive, you may have noticed an important detail here: the tooltip references the item array. The correct implementation according to the documentation uses an array called items. This is only an error in the tooltip text. The underlying code handles it correctly — via ecommerce.items.
If your event doesn't include parameters that the tag maps automatically, you can add them manually in the Event parameters section:
- Amount in the currency's lowest unit — event value in cents/pence/etc.
- Amount in the currency's regular unit — value in standard format with decimal places
- Currency — currency
- Contents — array of products or other line items in the order
- Plan ID — the subscription plan of a SaaS user

The Consent settings are an interesting section. By default, it's set to true, meaning data will be sent without restrictions.
If your consent setup is not through a Google-certified Consent Management Platform, or you have a custom implementation, you'll need to set a variable in this field that returns true when the user has given consent, and false when they've declined. Values the tag interprets as denial include: false, "false" (as a string), 0, "0", and "denied". Any other values will be treated as consent.
What's even more interesting is that the tag will queue events if the status is set to "denied" and will send them to OpenAI once the site visitor gives consent. However, this only applies to events that occurred between page load and consent being granted. If yours is not an SPA (i.e., each page performs a full load), and consent was not given on the landing page, previous pageviews and the Click ID will not be sent to OpenAI. It's therefore very important to encourage users to give consent on the very first page they land on.

If you have a consent banner from a certified platform, it's enough to check Enable Google Consent Mode Support, and the tag will automatically listen to the ad_storage status and regulate its behavior accordingly.

Finalizing the setup:
- Add a trigger — the moment at which the event should fire
- Give the tag a descriptive name
- Click Save

Repeat the same process for any other events you want to track.
An important nuance about pageview tracking
*Skip this section if you're using server-side GTM.
Earlier in this article I mentioned that the pixel stores the click ID in cookies. If the conversion doesn't happen on the landing page, there's a good chance you'll lose the click ID:
- A visitor lands on the homepage, e.g.
example.com/?oppref=abc123 - They navigate to the registration page and sign up at
example.com/sign-up— the conversion tag fires here, the pixel initializes, but theopprefparameter is no longer present.
To avoid this issue, I recommend adding a pageview event tag (or any custom event — it doesn't matter) with an All Pages trigger.
If you have consent configured, use the same trigger that fires on page load for ad systems.
This tag will initialize the pixel on all pages and won't miss the click ID parameter.

Verifying conversion firing
- In the OpenAI Ads Manager, go to Conversions, open the Event Stream tab, and enable event listening.

2. In GTM, click Preview in the menu. In the new window, enter your site's URL and append the get-parameter containing the click ID — for example https://example.com/?oppref=test.
Click Connect.

3. Your site will open in a new window. Right-click anywhere on the page and select Inspect. The developer panel will open — navigate to the Network tab at the top.

4. In the search field, type "openai" and press Enter.

5. Perform the target event on the site — in my case, a registration. After completing the action, you should see 2 entries with a status starting with 2XX. The first entry is the pixel initialization; the second is the event being sent.

6. Click on the event entry, go to the Payload tab, and expand the arrows next to the records. You should see two events of type sdk_init — the pixel initialization — as well as the conversion event.
In my case, that's registration_completed with the value of the oppref get-parameter.

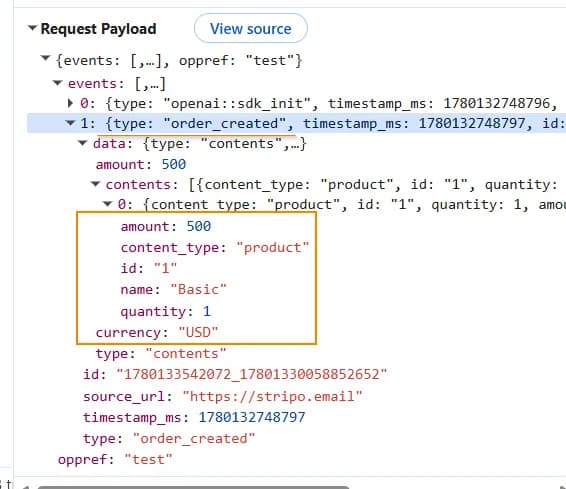
Example of what a purchase event with a product will look like:
7. Within a few seconds, your event should also appear in the ad platform.

If you've successfully completed the previous verification steps for all your events and saw them in the Network tab with a 2XX status and in the Event Stream in the ad platform — congratulations, you've done it.
The final step is to publish GTM.
If something went wrong, try reviewing this section.
Setting up dual conversion tracking: client-side GTM and server-side GTM
If you have server-side GTM (sGTM), you can improve data collection and pass events through your server. I'll note upfront that I assume you already have the necessary events being sent to GA4 via sGTM.
In this section, I'll describe the setup that virtually all ad platforms recommend in their documentation.
But not us (ProAnalytics.Team).
The approach we recommend will be described in the next section, along with an explanation of why.
For now, if you want to follow the documentation-recommended setup, keep reading.
Setup in Client-side GTM
In the previous section, I deliberately skipped one configuration item — Server Side Tracking Settings — because it only needs to be configured if you're sending data from both web GTM and server-side GTM simultaneously.
If you want to send events from both the browser and server-side GTM, you must add an event ID parameter for deduplication.
Since you'll be sending the same event from both the browser and sGTM, the system needs an identical event ID in both events to recognize them as the same event and deduplicate them.
So, for setup, go through the entire sequence from the previous section for browser-side event configuration. Then open the Server Side Tracking Settings section and click the variable selector button.

On the next step, click the blue plus in the top right corner and select Variable Configuration.
In the window that opens, click Community Template Gallery.

Search for the Unique Event ID template by Stape and add it.

This variable has no settings, so just give it a name and save. The variable will then be populated into the Event ID field in the tag.

This same variable needs to be added as an event_id parameter to the GA4 event that uses the exact same trigger.
Very important: the trigger must be exactly the same, because the variable generates the event_id at the moment the trigger fires. If the triggers differ, the event_id values will differ too, and the events will be treated as separate.

Setup in Server-side GTM
In sGTM, go to the Templates section and click Search Gallery in the tags section (not clients). Search for "openai" and add the Conversions API tag by Stape.

The logic in the Event Name Setup Method section is almost the same as for the web version of the tag.
Three options are available:
- Standard — to select a standard event from the list.
- Inherit from client — maps GA4 events to their corresponding OpenAI events. How exactly, can be seen in the tooltip.
- Custom — for sending a custom event name.

I could have left "Inherit from client" for my event, since it's named sign_up, which is included in the tooltip's list. But I'll select Standard → registration_completed for clarity.
- Next, just as for the web setup, create a Constant variable and add the Pixel ID to it.
- In the following field, create another Constant variable for the API key. Where to get it is described immediately below the next screenshot.
- Leave Action Source as Web, since you're sending events from a website.
- Validate only sends the event only for validation purposes and won't be counted in stats. There's a high chance that if you set this to
true, you'll forget about it by the end of setup and publish a configuration that won't be tracked. Leave it asfalse— it won't hurt anything.

How to generate a Conversion API Key in the OpenAI Ads Manager
To create an API key, go to the Conversions section in the ad platform, click Manage conversion keys, then click Create a new key.

On the next step, give the key a name, click Create, and copy the key. As you know, it needs to be added to a variable in sGTM.

The following configuration sections greatly simplify things, so I'll just explain what's behind each one. In practice, we simply need to check the boxes for automatic parameter mapping.
Server event data parameters pull in parameters needed for server-side events, specifically: the event ID from GA4 event parameters, and the value of the oppref get-parameter or the __oppref cookie.

User data parameters pull in GA4 event parameters passed in the user data object — email, phone, etc. — as well as user ID, user IP, and user agent.

Event Parameters append values from GA4 to the event, such as value, currency, and the product list for the relevant events.
Anything from the previous three sections can be overridden manually.
If you have a different mapping not covered by the tag, add your own parameters via Add parameter.
You can also uncheck a box to simply exclude certain parameters from being sent.
Tag Execution Consent Settings has two options:
- Always send data.
- Listen to consent status and send data only if
ad_storageis granted.


For the same reason described in this section, we need to add a tag that fires on all pages of the site so that no click ID is missed.
This similar setup does not need to be done in web GTM — only in server-side GTM. In the Cookie Expiration section, set the number of days the cookie value should be retained in the browser. The trigger for this event should be page_view, or whatever settings you use to fire ad system pixels if you have a consent banner configured.

Verifying dual tracking
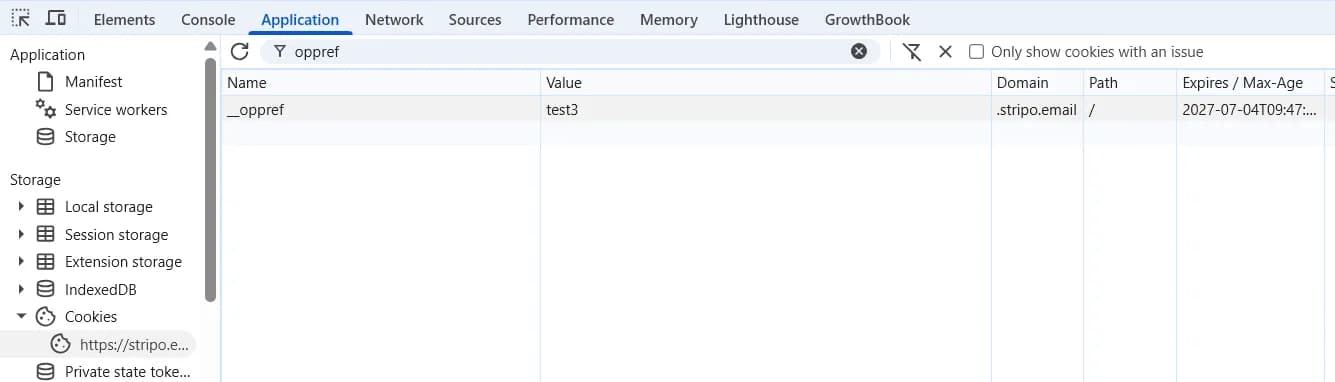
Now launch the sGTM preview mode, followed by the web GTM preview mode, also using the test URL https://example.com/?oppref=test. In the same place where you looked at the Network tab, you'll find the Application tab right next to it.
Go to it, then to Cookies, and type "oppref" in the search bar. You should see a cookie with the value from the get-parameter and the expiration period you set in the configuration.

Now perform the target action — for example, register on the site. Verifying the browser-side event follows the same steps as in the previous section.
After that, go to the sGTM preview on the Request tab for the corresponding event. Under Outgoing HTTP requests from server, you should see a request to the OpenAI domain with a 2XX status.

In the Conversions → Event Stream section of the ad platform, you should see this event arriving from two API channels: Pixel SDK and Server-to-Server.
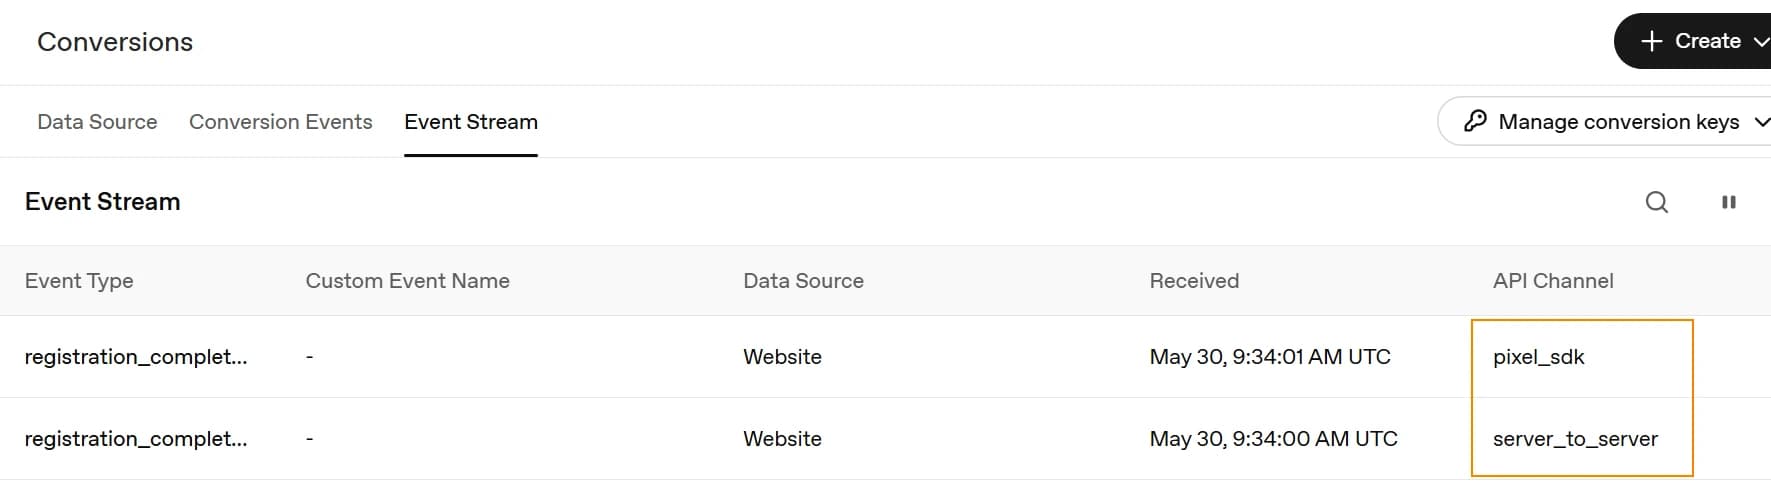
The ID in both events must be identical. To verify this:
- Go to Network and expand the event parameters.

2. In sGTM, click on the request to bzr.openai.com on the Request tab. In the request body, find the "id" parameter. Its value must exactly match the ID from the Network event.

If you saw all your events in the right places with matching IDs — congratulations. The final step is to publish both web GTM and sGTM.
Setting up OpenAI conversion tracking via server-side GTM without a library on the site
It's time to explain why we don't recommend the approach from the previous section on simultaneously sending events from web GTM and sGTM.
I completely understand why the documentation recommends that approach. It's aimed at a broad audience and isn't trying to complicate your life by explaining how ad system libraries work, how cookies function, or how to set them manually. So, in order to get all the benefits of server-side GTM without losing the click ID — and to make the process a little simpler — the documentation asks you to do a dual setup, but with an event ID for deduplication.
Server-side GTM lets you avoid installing additional third-party libraries on the site, which in turn speeds up page loading in the user's browser. This isn't just a nice-to-have — it's one of the core advantages of sGTM.
So our logic is simple: why add an extra library to the site if you don't have to? You lose nothing and only gain from it.
For this approach, you don't need web GTM at all. Seriously. You don't even need to open it.
Follow the entire sequence described in the server-side event setup section, except for the tag that fires on all pages — don't set that one up.
Now we'll configure a setup that stores the click ID in a cookie during page load, since this needs to happen on every page — not just where the conversion occurs.
Go to Variables and add a variable of type Event data with the key page_location.

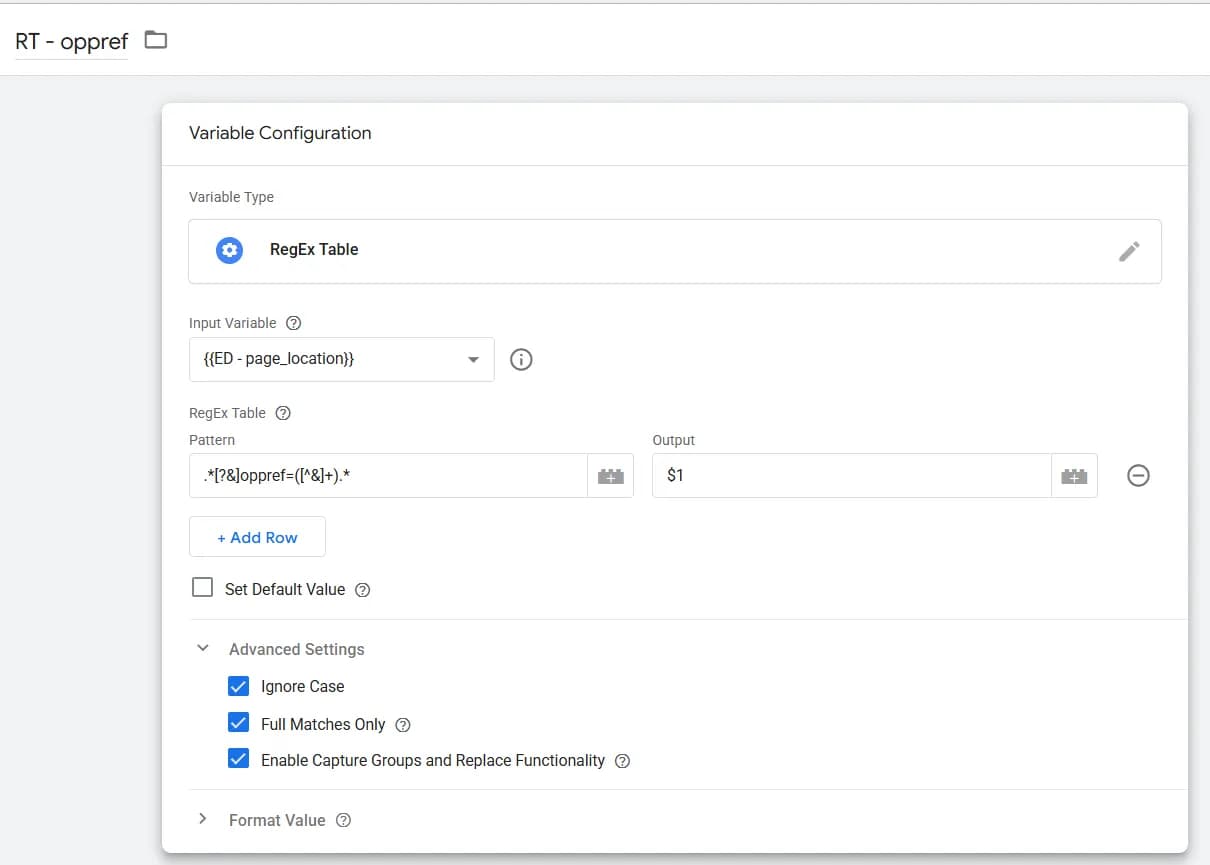
Now add another variable of type Regex Table with the following settings, as shown in my screenshot:
- Input variable — the variable you just created.
- Pattern —
.*[?&]oppref=([^&]+).* - Output —
$1 - Under Advanced Settings, all three checkboxes should be enabled.
Now go to the Tags section. Click New. Click anywhere in the Tag Configuration area, then click the blue banner at the top — Community Template Gallery.
In the search, look for the template by Simo Ahava called Cookie Monster.

Click Add Cookie.

In the panel that opens on the right, configure it exactly as shown in the screenshot:
- Cookie name —
__oppref - Value — your Regex Table variable.
- Lifetime in seconds — in my screenshot, that's two years.
- The remaining settings are the same.

All that's left is to give this tag a name and add a page view trigger.

The verification logic follows the same sequence as in the previous section.
The difference is that you only launch the server-side GTM preview and open the site with the tracking parameter.
When the page loads, you should see that your parameter has been saved in cookies.
The second difference from the previous section is that in Event Stream you'll only see one event from the server-to-server API channel. And this is precisely the case where less is more.

Specifics of sending OpenAI Ads conversions directly from site code
If you've decided to configure sending directly from site code rather than through GTM, this section covers a few important nuances that the developer will need to account for.
How to verify it's working was covered earlier.
There's no point in me rewriting the documentation, since it's very clear and straightforward. So I'll leave links to the JavaScript Pixel for browser-side tracking and the Conversion API for server-side.
Key things for the developer to pay attention to:
- The ad platform's pixel code includes the line
debug: true, which outputs events to the console. If you don't want console noise, remove that line.

2. Below the pixel, you'll find a sample event code with parameters. It's tied to the pixel code, since it sends the event to the oaiq function that the pixel creates. As a result, always place the pixel code above the event code.
3. The function that sends an event consists of three parts — the event name, its parameters, and additional options. It's very easy to miss in the documentation that the parameters appear optional, but there's a note alongside that explains you must actually send the type parameter with every event. Which type to pass for each event is described here.

4. The value in the amount parameter must be in cents, pence, etc. — in other words, as a whole number. So $99.00 should be passed as amount: 9900.
5. An important parameter for sending conversions via the Conversion API is the presence of oppref. The documentation states this parameter is optional.
However, without it, the system won't be able to connect the conversion to an ad click, so don't forget to include this parameter in the data object. It appears in a cookie named __oppref when the oppref get-parameter is present and the pixel has been initialized.

One final reminder that's also easy to miss: event_id and the custom event name custom_event_name are passed not as event parameters, but as additional eventOptions. Also, event_id must be passed if you're sending the same events from both the browser and via the Conversion API. More on this here.
Common issues and solutions
OpenAI pixel blocked by Content Security Policy
As I mentioned at the beginning of this article, this ad system is fairly new.
If your Content Security Policy doesn't allow everything, you'll most likely encounter browser-side requests being blocked.
In the Network tab, you'll see they're blocked.

Solution: Add these two entries to your CSP yourself, or ask your developers to do it:
Entry 1 — for loading the SDK script:
- Type → Script Source
- Data type → Default (or Host, if that option is available)
- Value →
https://bzrcdn.openai.com
Entry 2 — for sending events:
- Type → Connect Source
- Data type → Default
- Value →
https://bzr.openai.com
Event fires but I don't see it in the Network tab
Make sure all required parameters are arriving with the event, and in particular that the type parameter is present and matches the event if you're using a standard name. More details here.
Events come in but aren't attributed to ad campaigns
First, make sure your site isn't stripping the oppref GET parameter — if you land on the site with this parameter, it should remain in the address bar. If a redirect occurs on site entry, this parameter must also be preserved after the redirect. If the parameter is gone, that's a technical issue that needs to be fixed — ask your developer not to remove this GET parameter from the URL.
Second, verify that the cookie __oppref with the parameter's value is saved in your browser's Cookies section. If the cookie is missing and you have Advanced Consent Mode configured, make sure you're re-attempting to write the cookie when the user gives consent.
Third step: go to GA4 and check whether there have been any conversions from OpenAI ad campaigns since the setup was completed. To do this, your ad campaigns must be tagged with UTM parameters. If there have been zero conversions from this platform during that period, that explains the absence of attributed conversions.
Instead of a conclusion
This article turned out to be quite long — especially in terms of screenshots — but only because I wanted to explain every nuance.
I hope you managed to set up conversion tracking successfully, and I wish you successful ad campaigns.
And if something went wrong — reach out.
Comments
Share your thoughts and ask a question
Loading comments...